Hi, Readers.
Last month we discussed how to import data from a csv file to Business Central with Power Automate (No customization) – csv to JSON. In the post, I saved the csv file in OneDrive first and then read the file from OneDrive and imported it into Business Central.
More details:
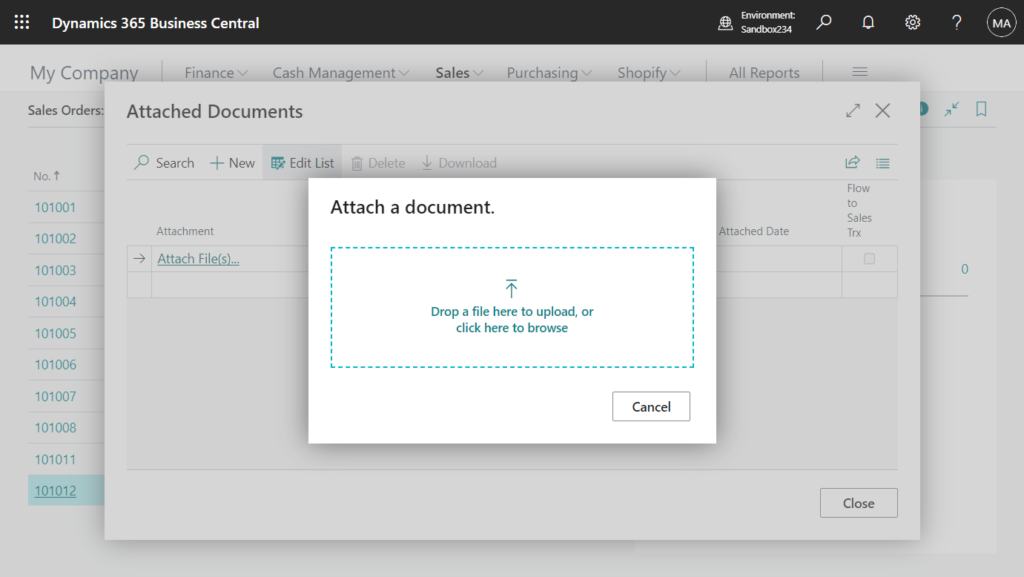
Recently I was asked, is it possible to import data from a local file? Similar to the way of uploading attachments in Business Central, first select the file and then import the data inside into Business Central.
If you use AL Language to customize, this is not very difficult. We have discussed the following ways for Excel, CSV, XML and zip file.
- How to use Excel Buffer to Import data
- How to import data from CSV (comma-separated values) file
- How to Export and Import Data (Using XMLports)
- How to import files from a zip file (Bulk import attachments and Excel files)
So, for non-developer users, can it be done with Power Automate? Yes, it’s not difficult, it just requires adding two steps. Let’s see more details.
PS: Power Automate is a service that helps you create automated workflows (or flows) between apps and services, like Business Central. With Business Central, you’re given a license to Microsoft Power Automate. This license lets you use your Business Central data as part of a workflow in Microsoft Power Automate. You create flows and connect to your data from internal and external sources through the Business Central connector.
The requirement this time is to first create a Sales Order (Sales Header) in Business Central, then select the csv file locally and import all Sales Lines in it.
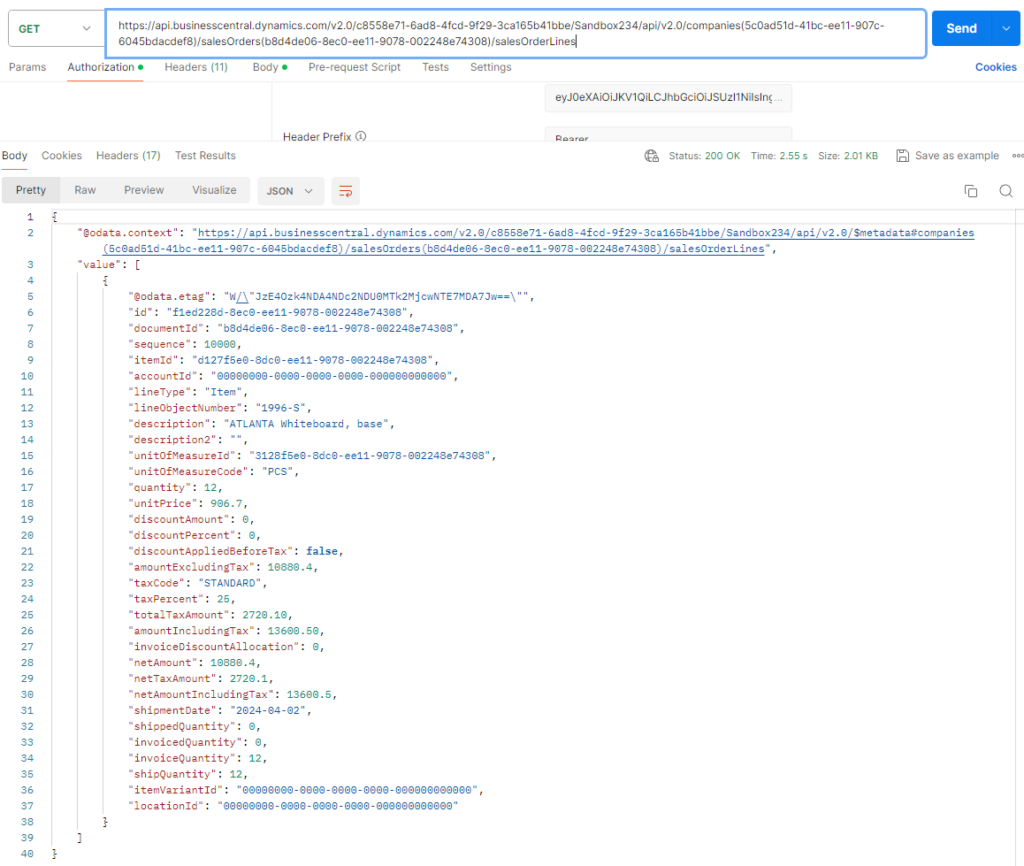
This time we are using the standard salesOrderLines API. Here is an example of the response, more details: Get salesOrderLines (What is returned is data in json format)
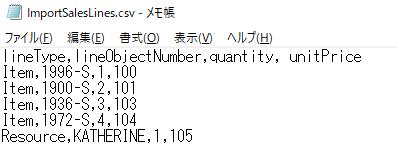
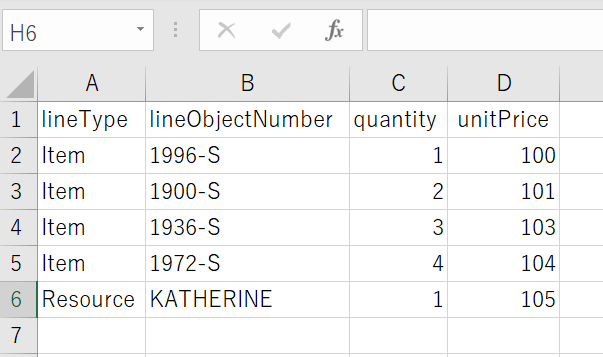
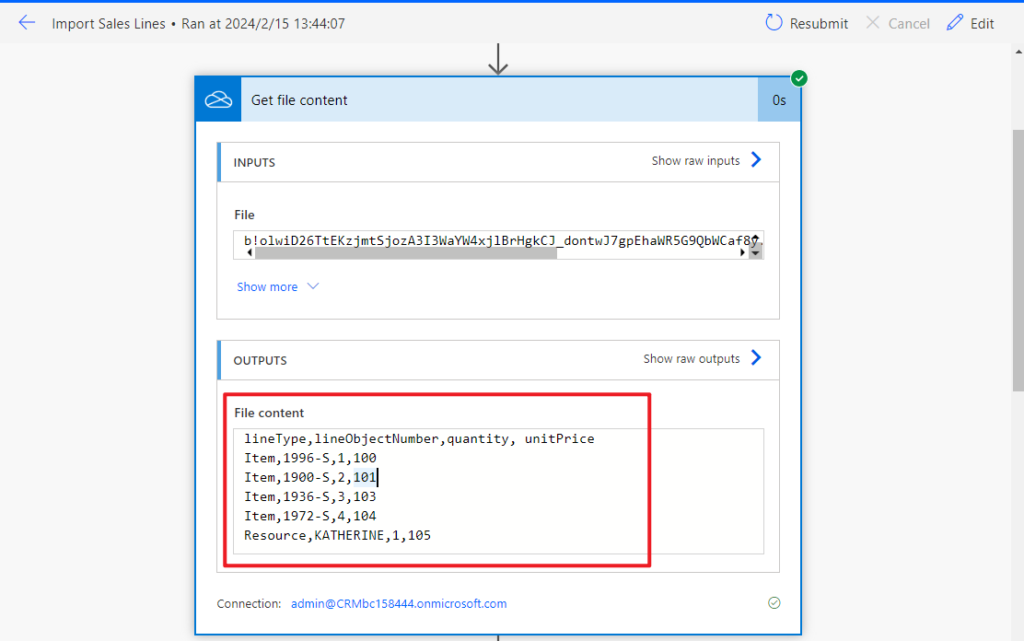
Test csv file: Please be careful not to leave any blank lines.
In Text Editor:
In Excel:
Download Test File:
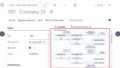
This time we are going to use the “For a selected record (V3)” trigger in Power Automate mentioned in How to create Purchase Order from Sales Order with Power Automate (Copy lines from SO to PO)
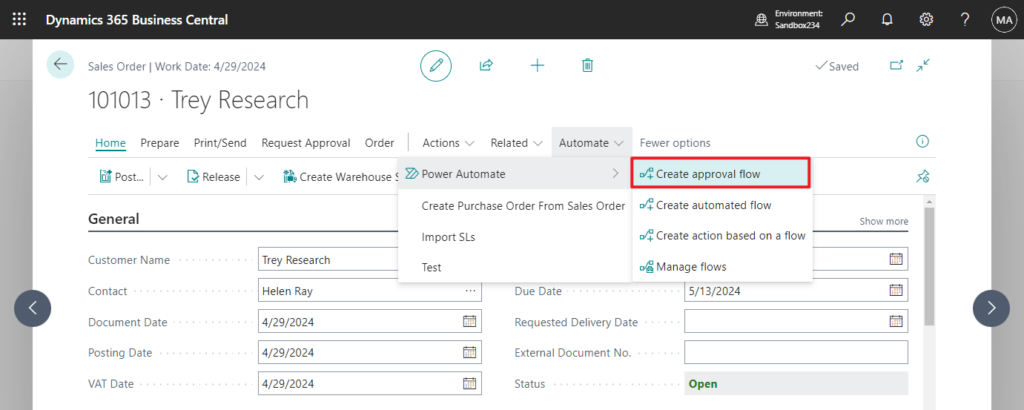
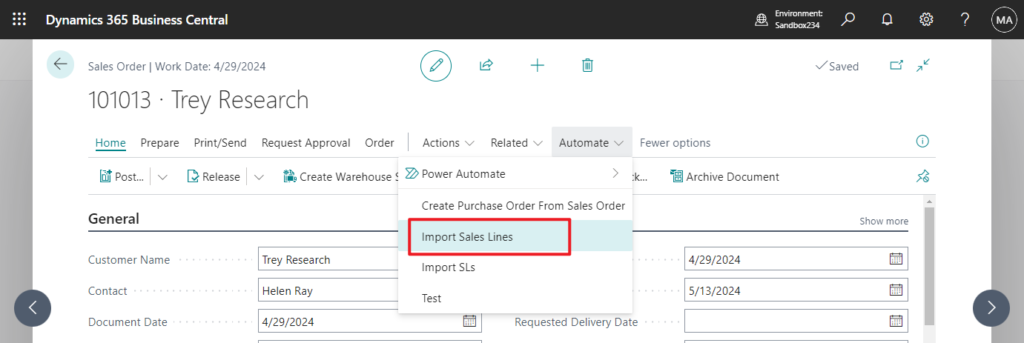
Let’s start. Choose Power Automate -> Create approval flow on the Sales Order page
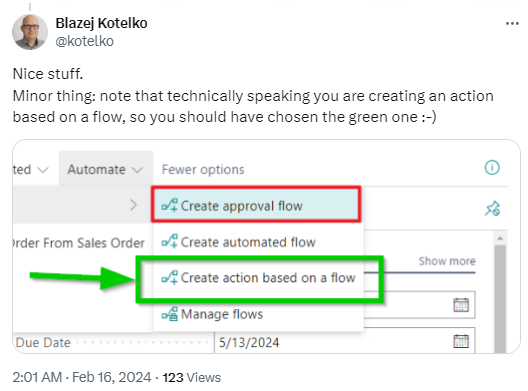
PS: Updating a tip from Blazej Kotelko.
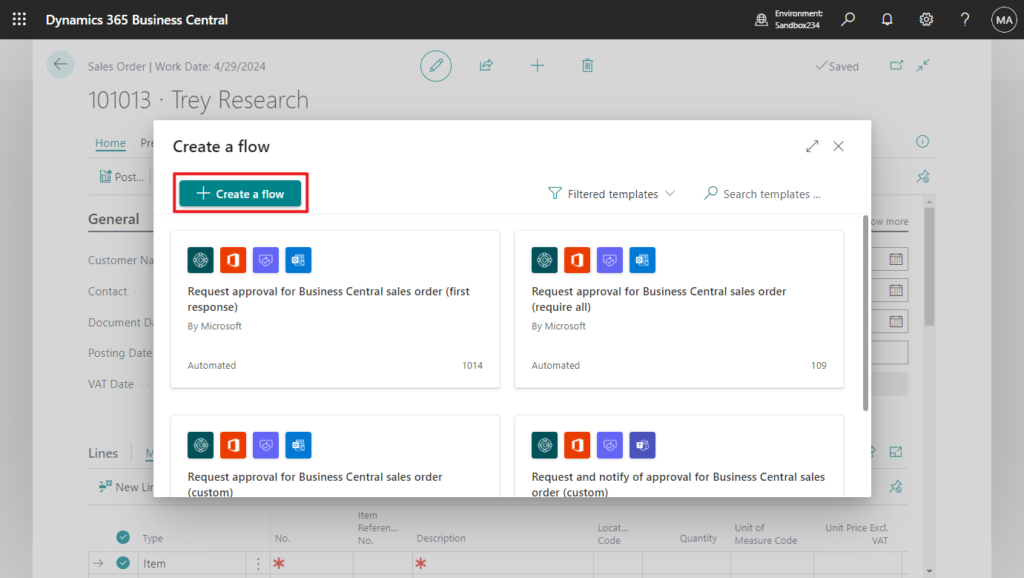
Then choose Create a flow. (Because there is no template for this requirement)
First, give the flow a name.
For example, Import Sales Lines (This will be displayed in the action bar)
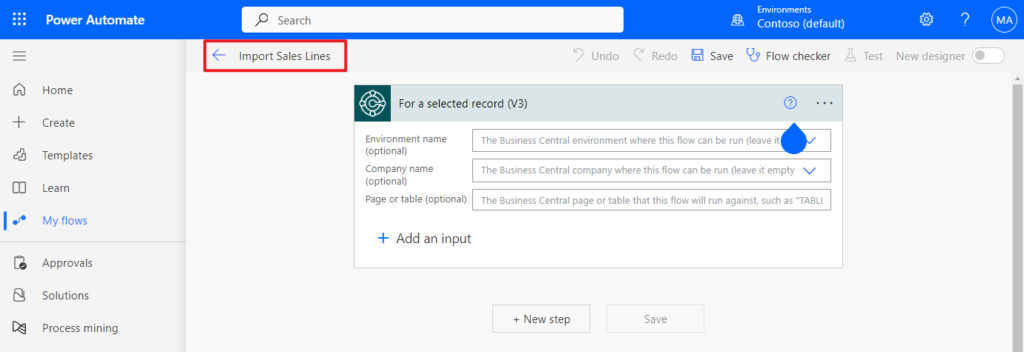
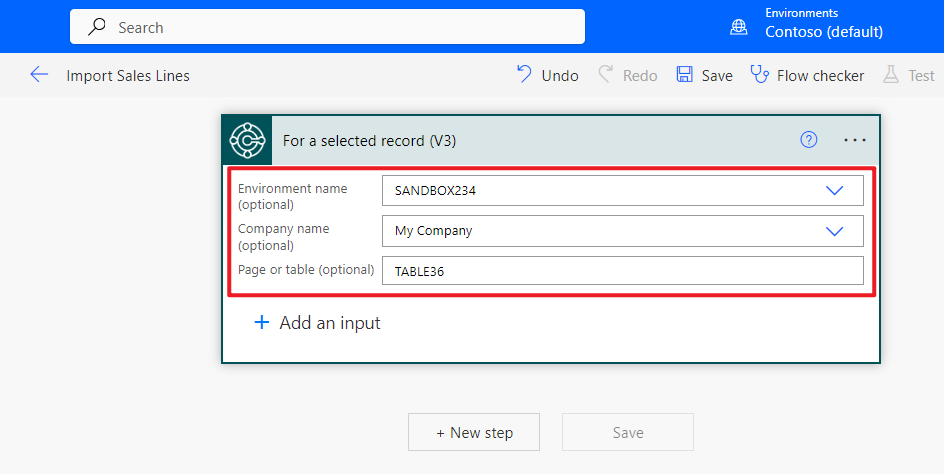
Select the environment and page or table that needs to be connected.
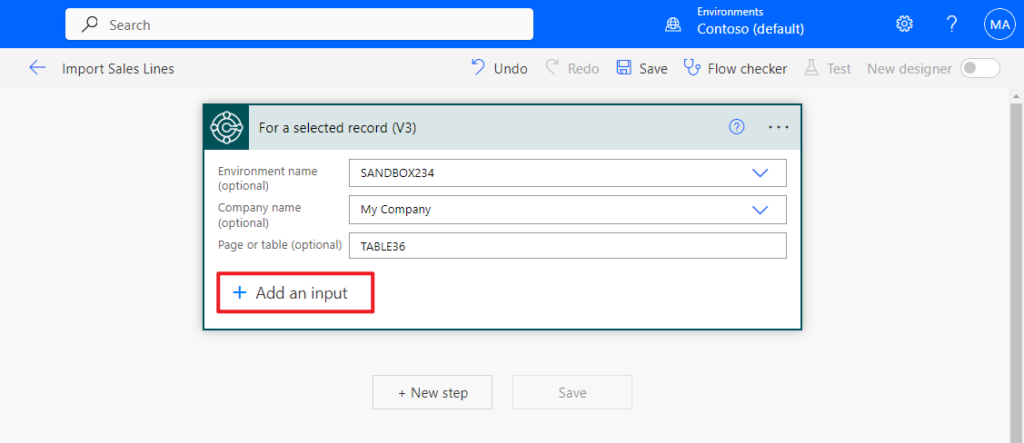
Then choose + Add an input
Choose File.
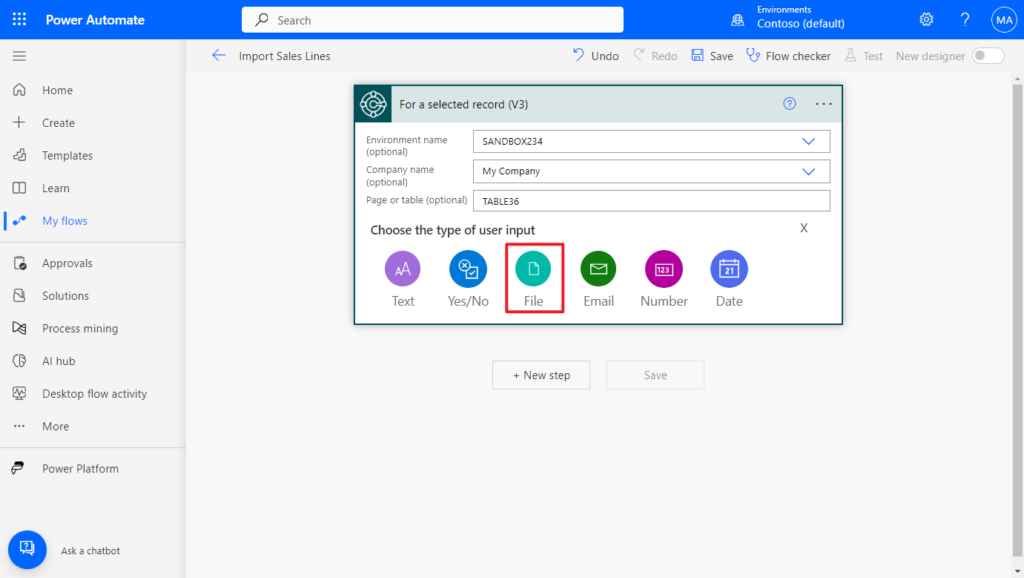
You can change the default prompt message.
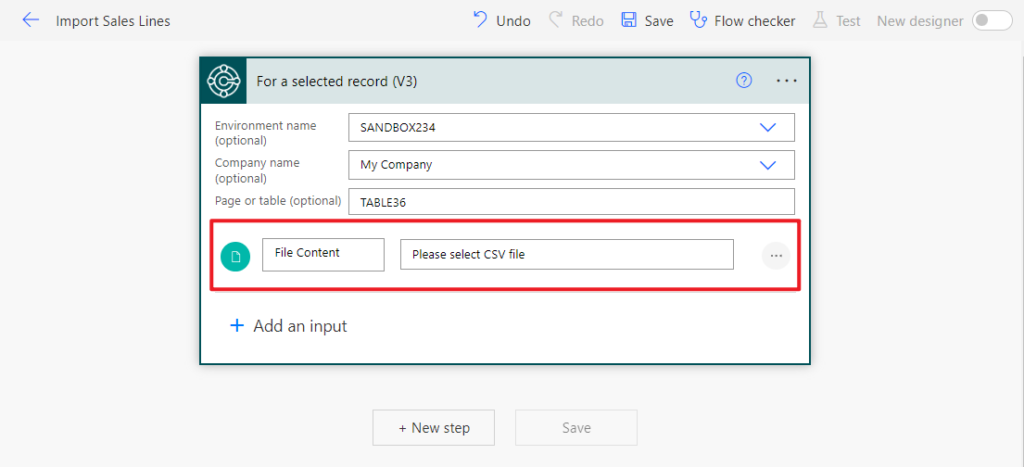
In this way, users can upload a file when starting the Power Automate flow.

Note that this file (File Content) is saved as Base64.
77u/bGluZVR5cGUsbGluZU9iamVjdE51bWJlcixxdWFudGl0eSwgdW5pdFByaWNlDQpJdGVtLDE5OTYtUywxLDEwMA0KSXRlbSwxOTAwLVMsMiwxMDENCkl0ZW0sMTkzNi1TLDMsMTAzDQpJdGVtLDE5NzItUyw0LDEwNA0KUmVzb3VyY2UsS0FUSEVSSU5FLDEsMTA1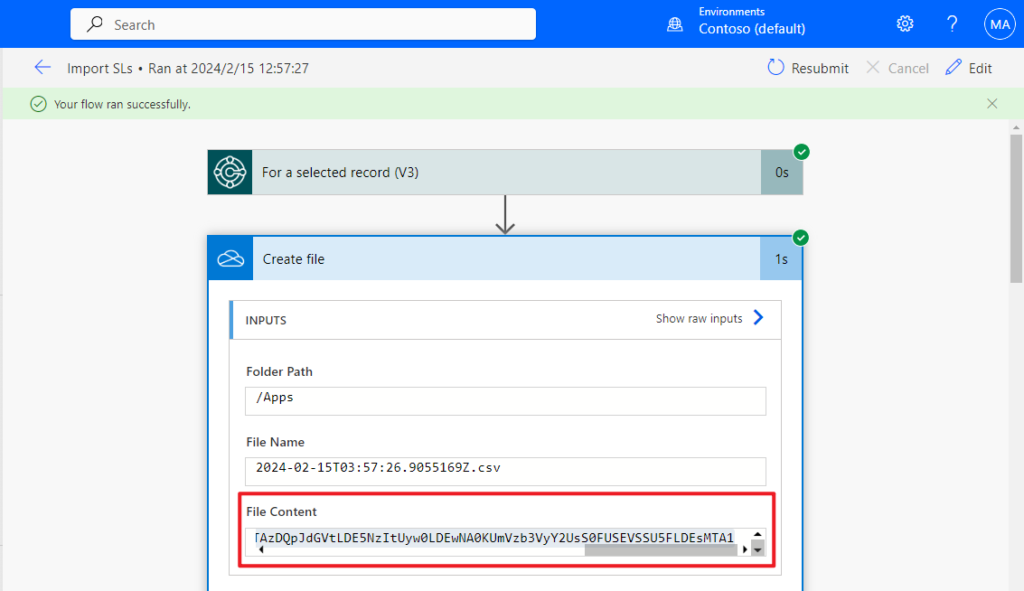
For example, you can use the following tool to convert Base64 into a CSV file.
Base64 to CSV:

But this is a bit difficult in Power Automate. In this post I introduce a simple way, just create a file after getting the Base64 file (File Content). If it is a format other than CSV files, it can also be processed in this way.
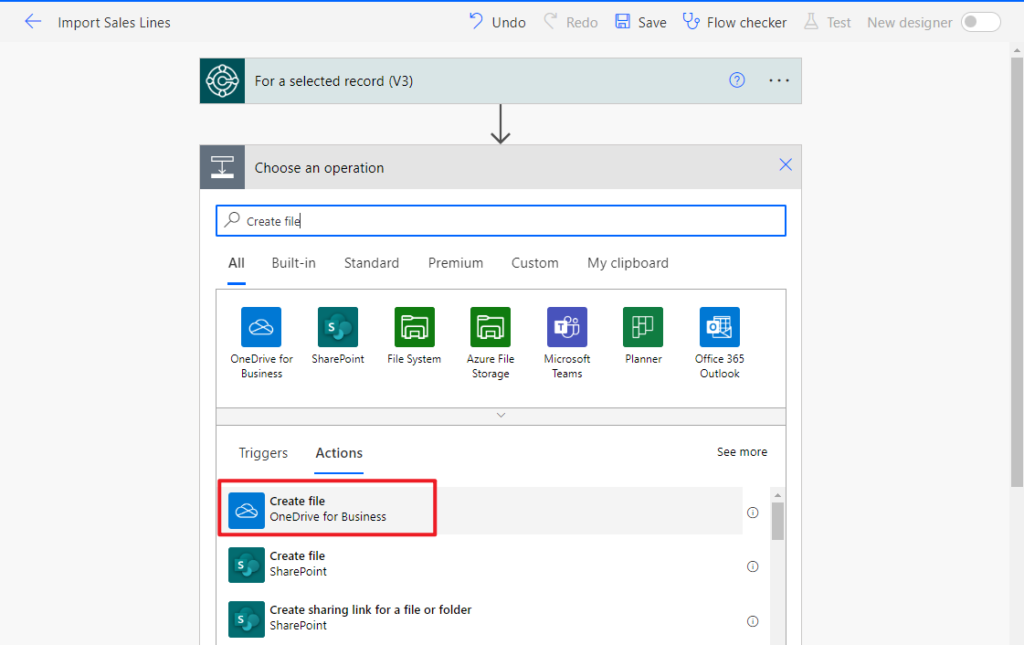
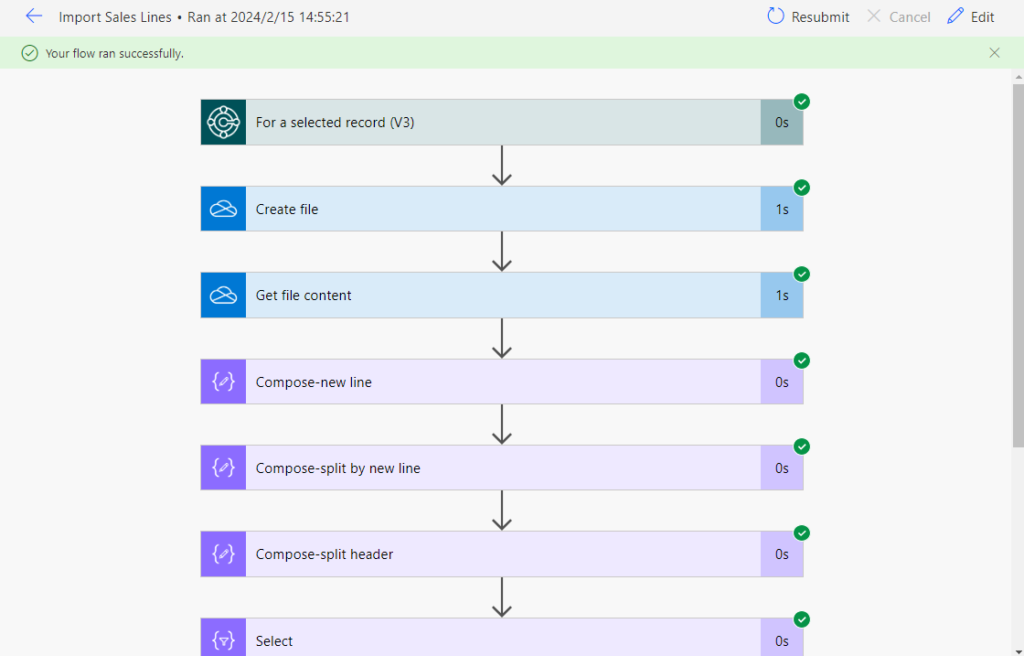
Click New step. Search for Create file (OneDrive for Business), and click on it.
Click the file icon to select the folder.
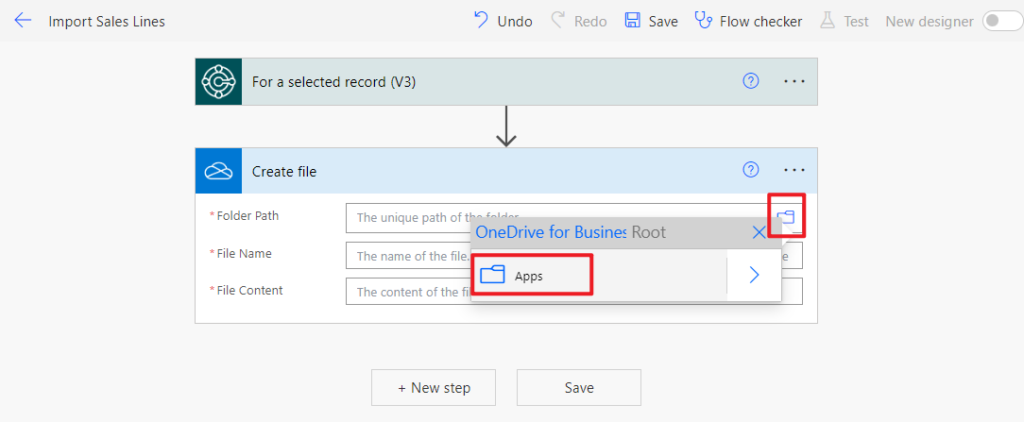
Set File Name (can also be fixed) and File Content (File Content in the For a selected record (V3) step)
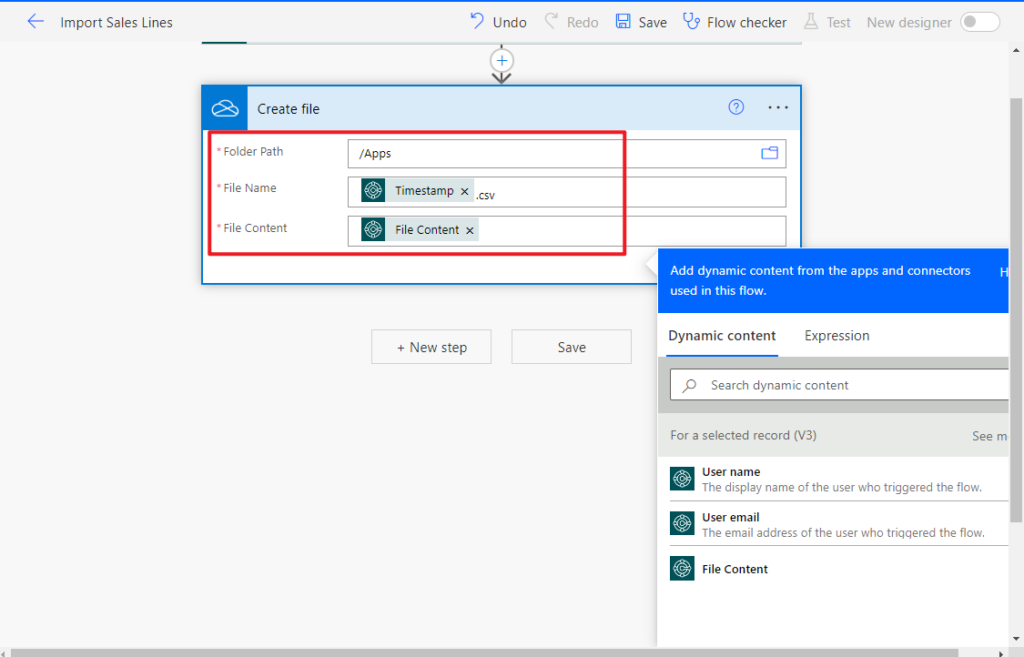
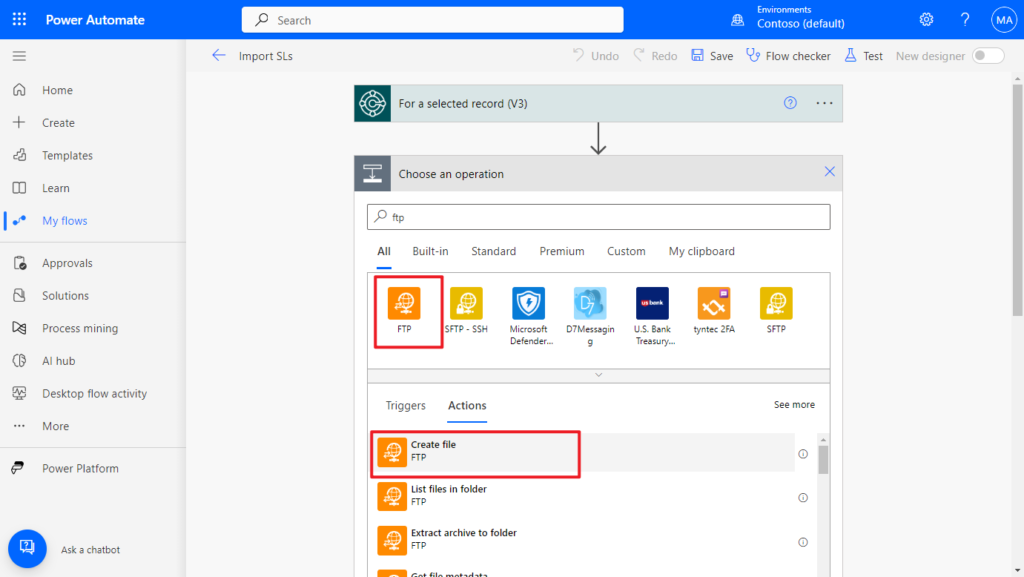
PS: This file can be created in OneDrive, Sharepoint, or other FTP server
Click New step. Search for Get file content (OneDrive for Business), and click on it.
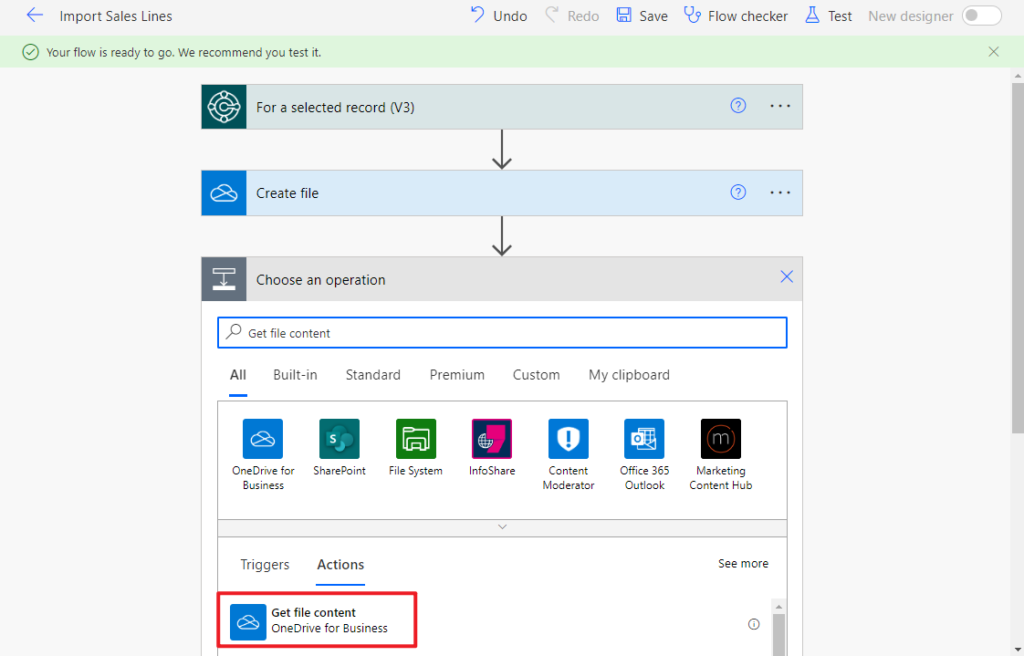
Set the Id in Create file step.
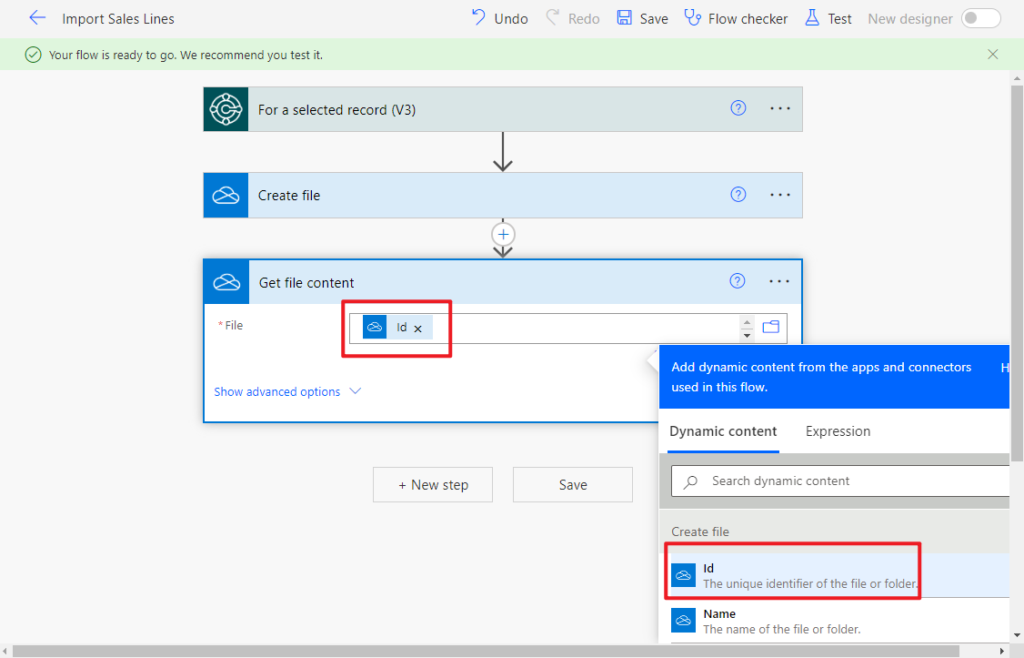
This way you can get the value in csv file.
The remaining processing is the same as in how to import data from a csv file to Business Central with Power Automate (No customization) – csv to JSON, I will briefly describe it and extract part of it directly.
Then we need to convert the data in csv file into json format to facilitate reading into BC. This is the difficulty in importing csv file. Below are several key functions we will use this time. It is recommended to read MS learn (docs) first.
- Split function: Splits a text string into a table of substrings.
- Replace and Substitute functions: Replace a portion of a string of text with another string.
- Skip function: Remove items from the front of a collection, and return all the other items. (This function is not found in the Power Platform documentation, the link is for Azure Logic Apps)
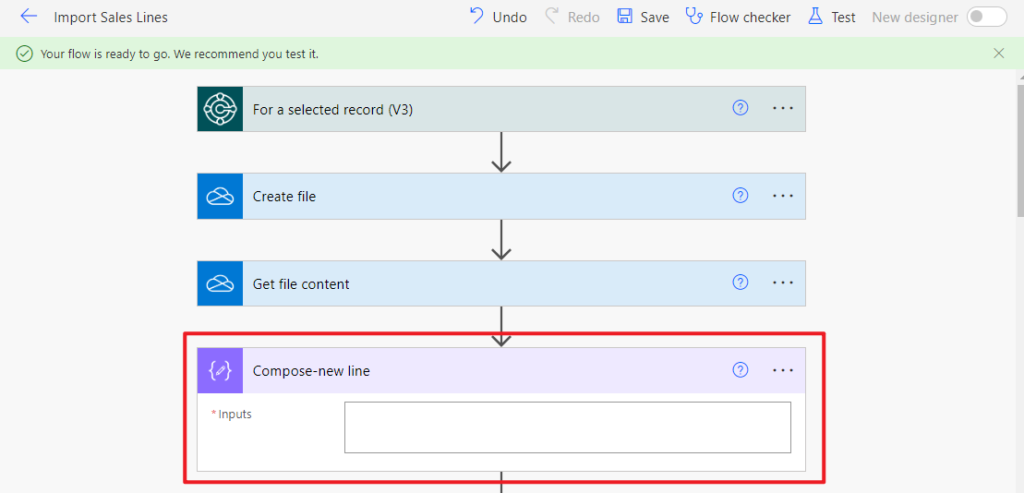
First we need to split the lines. (Please note that this way for reference only, you can improve it according to your own needs)
Click New step. Search for Compose, and click on it. Enter an “Enter” key in the Inputs. Use this carriage return character to split lines in csv. Rename the step as Compose-new line.
Click New step. Search for Compose, and click on it. Click Inputs -> Expression, enter the following formula and click OK. Rename the step as Compose-split by new line.
split(outputs('Get_file_content')?['body'],outputs('Compose-new_line'))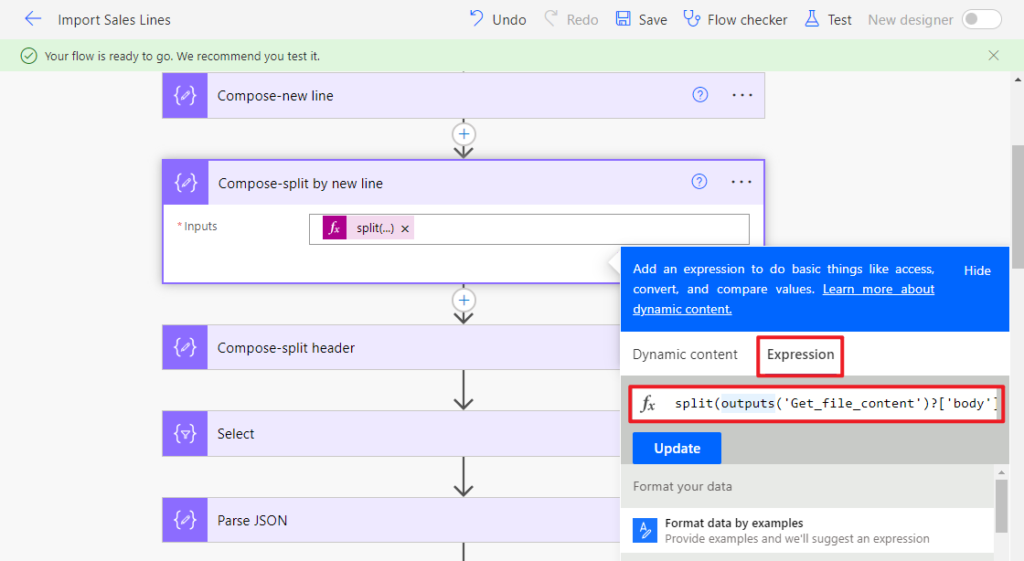
Next, since my csv file contains headers, if you need to use the text/title in the header, you can extract the header as follows. (If your csv file does not contain headers or does not require headers, you can ignore this step)
Click New step. Search for Compose, and click on it. Click Inputs -> Expression, enter the following formula and click OK. Rename the step as Compose-split header.
split(first(outputs('Compose-split_by_new_line')),',')
Next we can skip the header and split the data.
Click New step. Search for Select, and click on it. Click From -> Expression, enter the following formula and click OK. (Skip the first line)
skip(outputs('Compose-split_by_new_line'),1)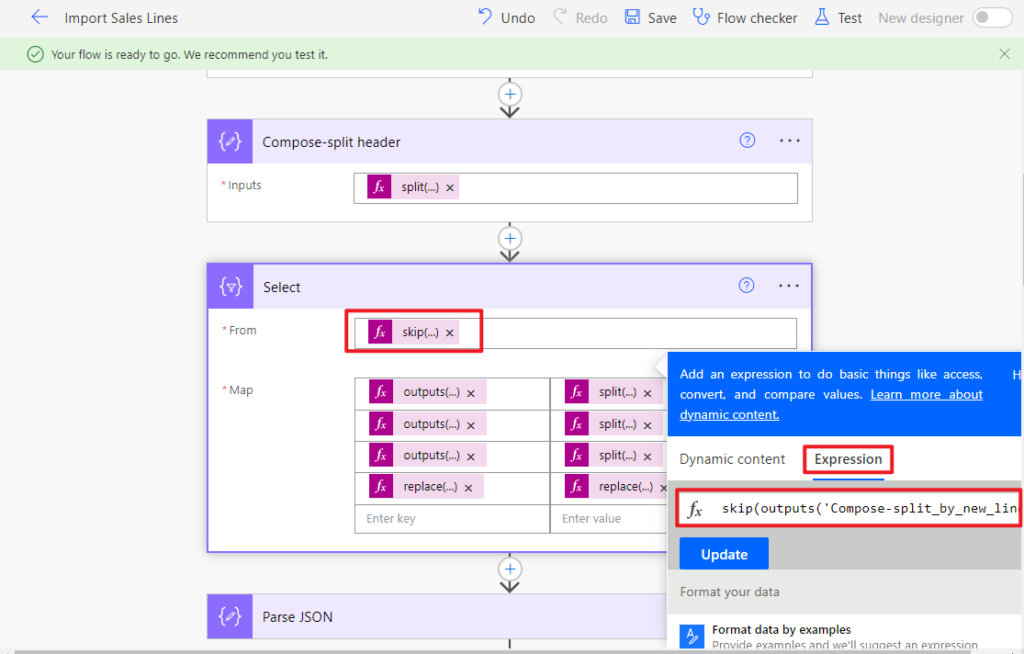
Then we need to enter key and value respectively. The left side is the key and the right side is the value. Fields in csv file are similar to option/enum type, begin with the number 0. There are 4 fields in my file, so it is 0~3.
Key: If your csv file does not contain a header, or you have not used the above step (Compose-split header) to split the header, you can enter the fixed key manually. This does not affect importing the data into BC.
outputs('Compose-split_header')[0]
outputs('Compose-split_header')[1]
outputs('Compose-split_header')[2]

replace(outputs('Compose-split_header')[3],decodeUriComponent('%0D'),'')
Value: Get the value from the split line, the delimiter is ‘,’, you can replace it with the delimiter in your csv file.
split(item(),',')?[0]
split(item(),',')?[1]
split(item(),',')?[2]

replace(split(item(),',')?[3],decodeUriComponent('%0D'),'')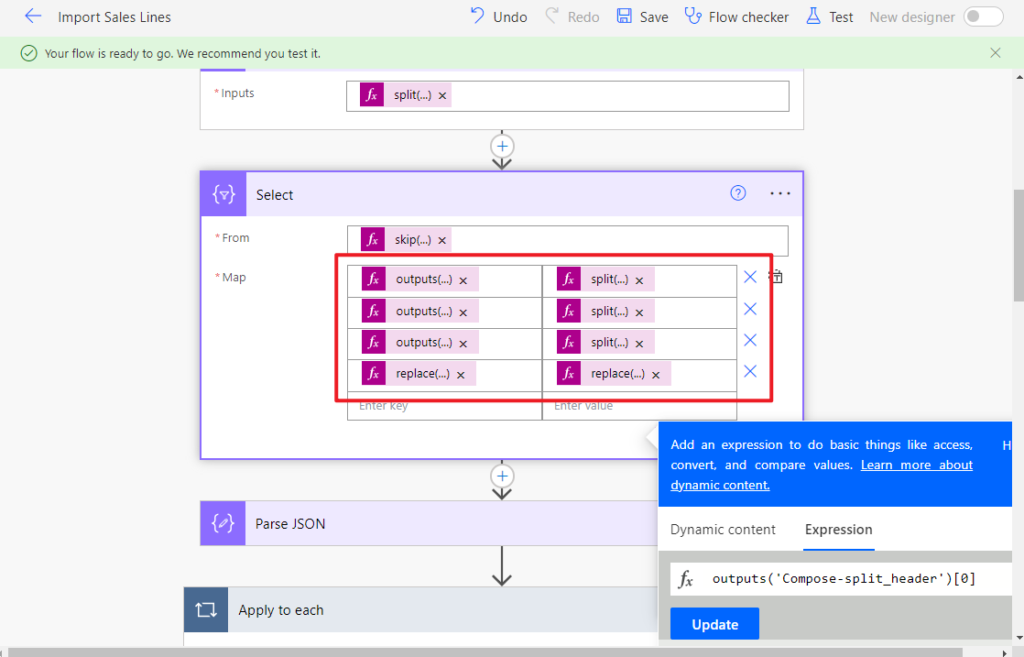
More details: URL-encoding
\r (Carriage Return): decodeUriComponent(‘%0A’)
\n (Line Feed): decodeUriComponent(‘%0D’)
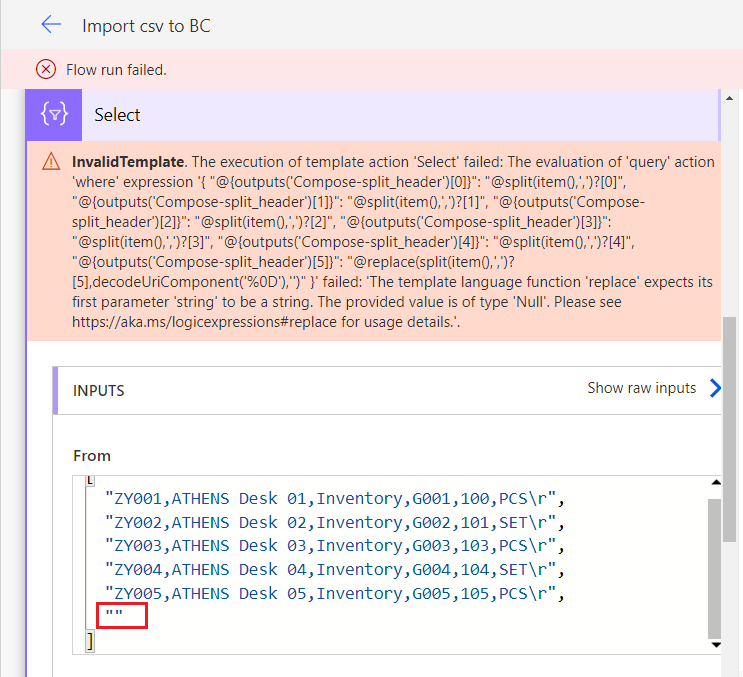
PS: If the csv file contains empty lines, an error will occur.
Next we can convert it to JSON format.
Click New step. Search for Parse Json, and click on it. Select Select -> Output in Content.
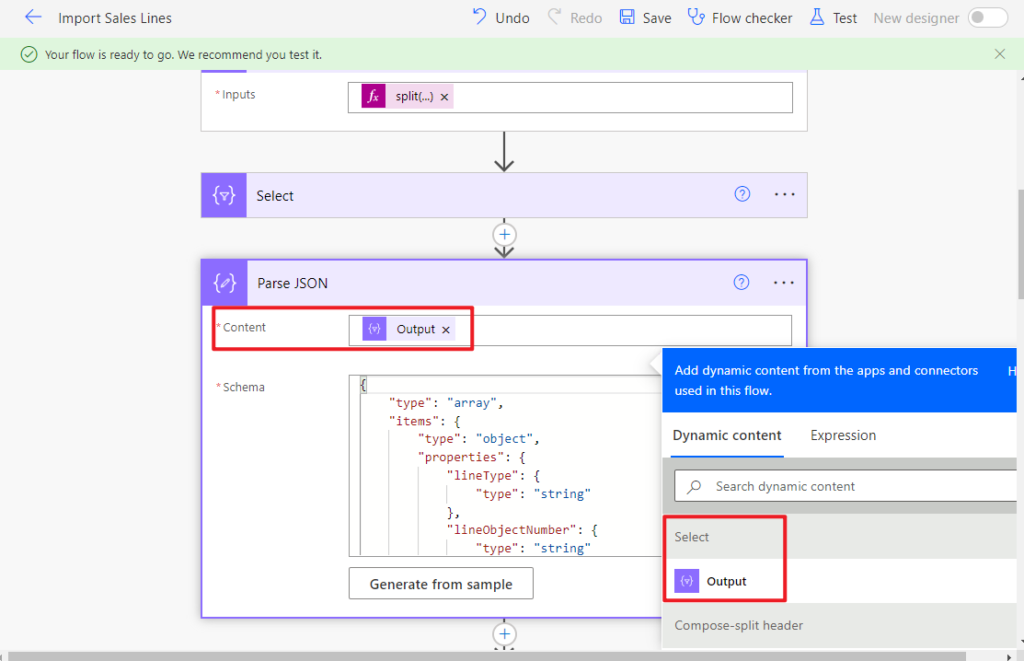
For Schema, you can also enter it manually, but if the json file is very complex, choose Generate from sample
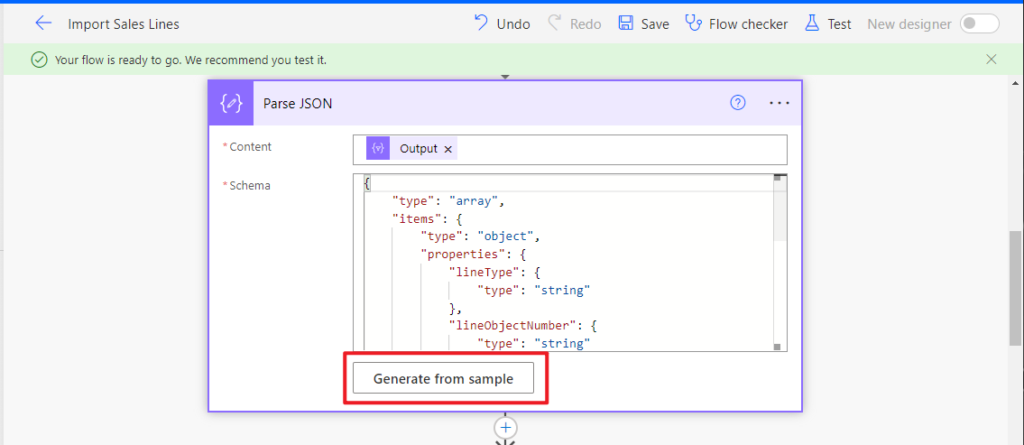
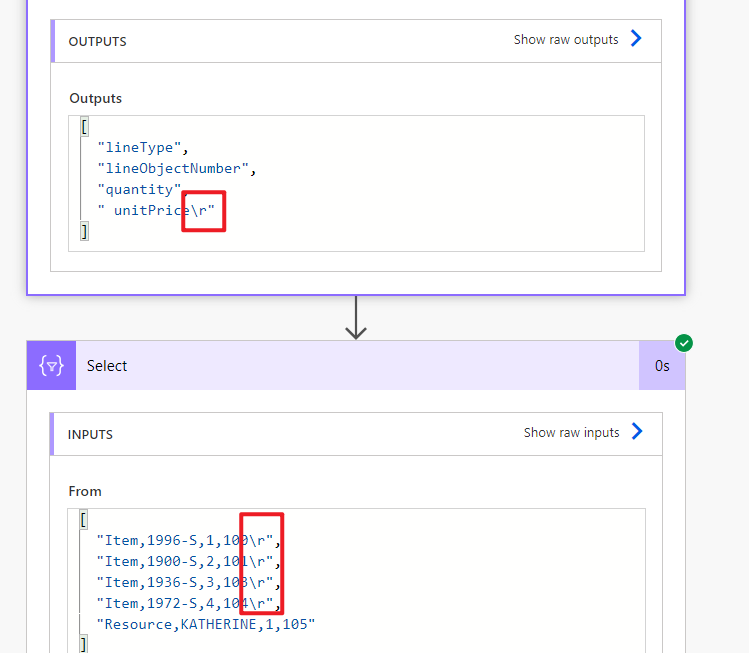
Paste the json value and click Done. The json value can be obtained from the outputs in the previous step. This does not require complete data. For example, the following three pieces of data are enough.
[
{
"lineType": "Item",
"lineObjectNumber": "1996-S",
"quantity": "1",
" unitPrice": "100"
},
{
"lineType": "Item",
"lineObjectNumber": "1900-S",
"quantity": "2",
" unitPrice": "101"
},
{
"lineType": "Item",
"lineObjectNumber": "1936-S",
"quantity": "3",
" unitPrice": "103"
},
{
"lineType": "Item",
"lineObjectNumber": "1972-S",
"quantity": "4",
" unitPrice": "104"
},
{
"lineType": "Resource",
"lineObjectNumber": "KATHERINE",
"quantity": "1",
" unitPrice": "105"
}
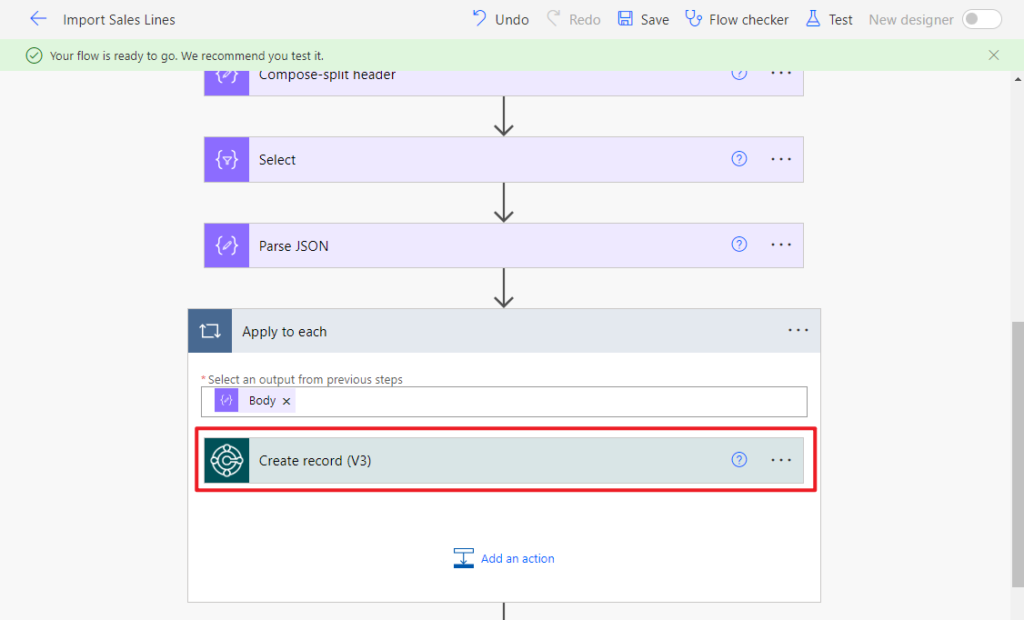
]OK, now we can insert data into the BC. However, it is important to note that because there are multiple records in the JSON file, each record needs to be inserted into the BC separately.
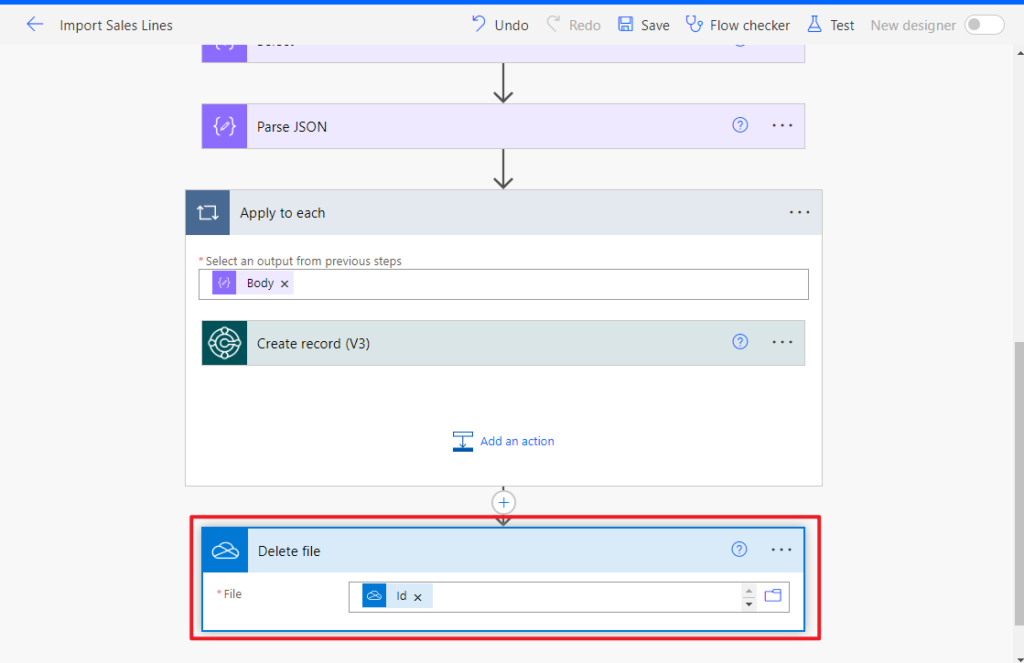
Click New step. Search for Apply to each, and click on it. Select Parse JSON -> Body

Click Add an action in Apply to each. Search for Business Central, and click on it. We need to create items, so this time we choose Create record (V3)
Select the BC environment that needs to be connected and the API that needs to be used. Custom APIs can also be used here.
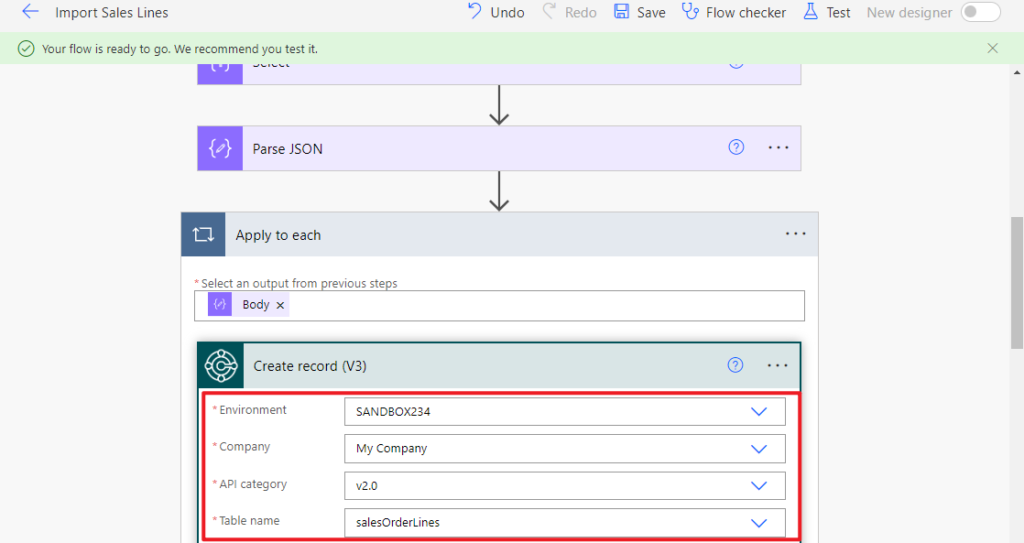
Then select the field of Parse JSON to the corresponding field of the API.
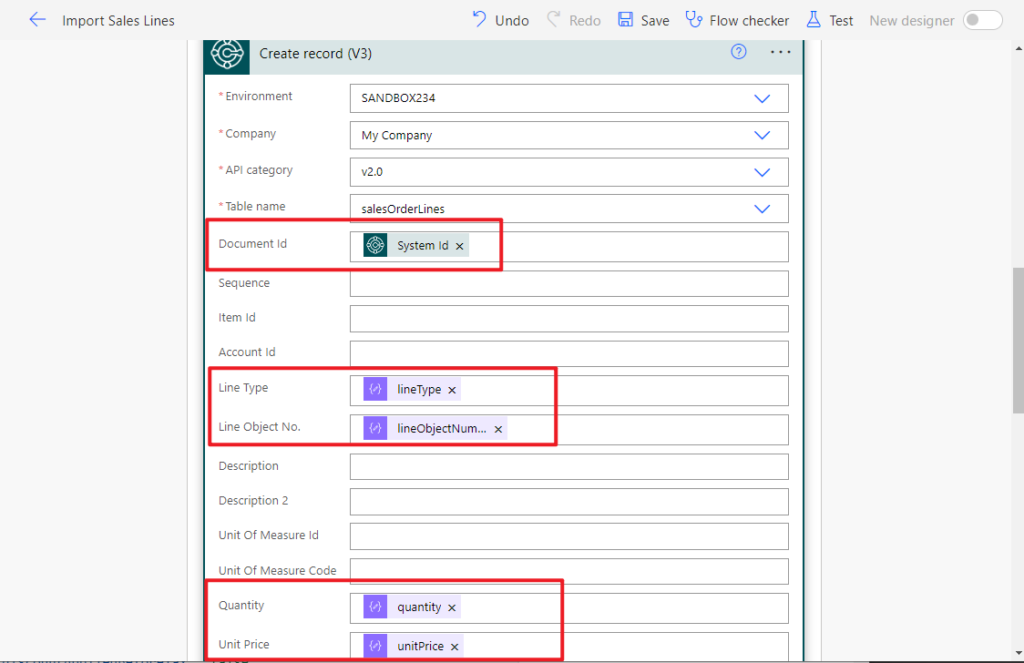
Finally, if you need to clear the temporary file (CSV file) saved in OneDrive, you can add the Delete file action. File Id is the same as the Id in Get file content step.
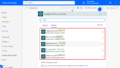
That’s all. Save the flow and test it.
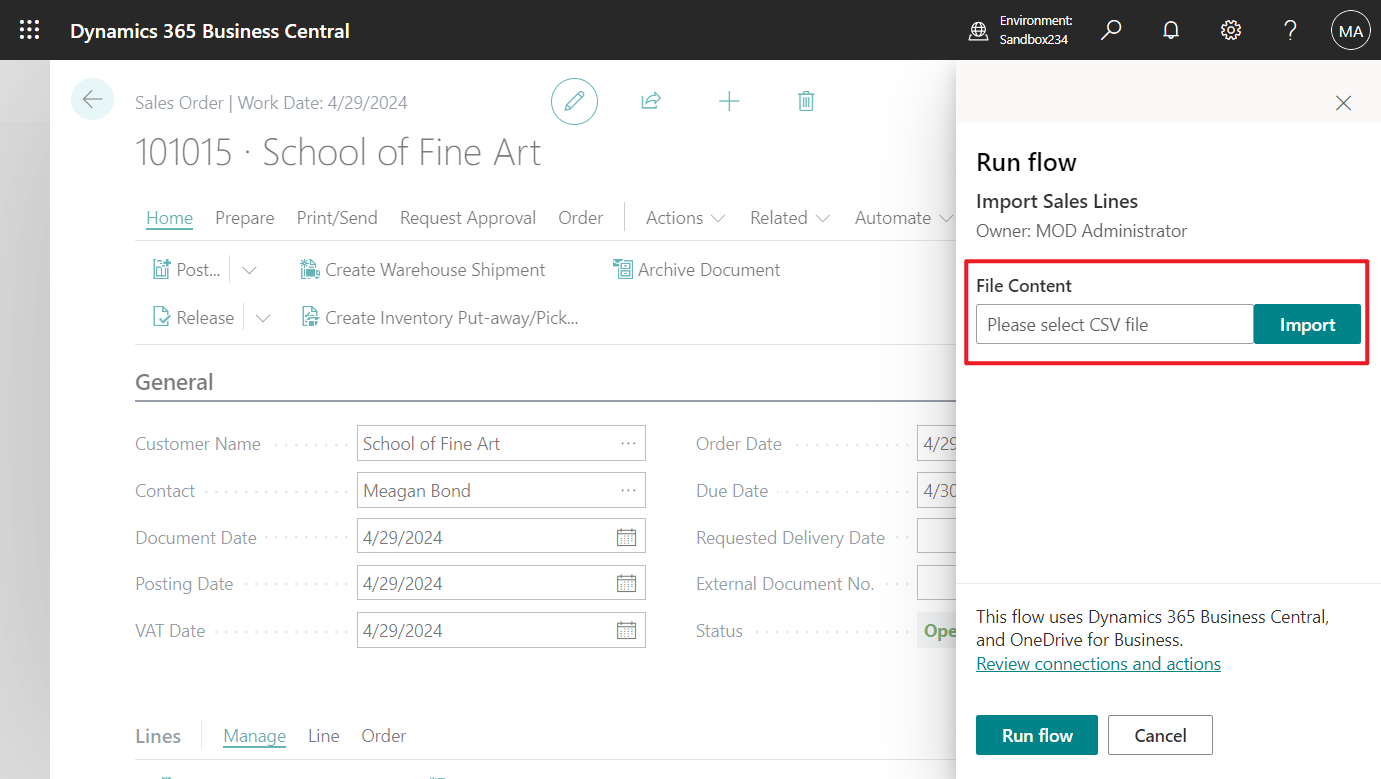
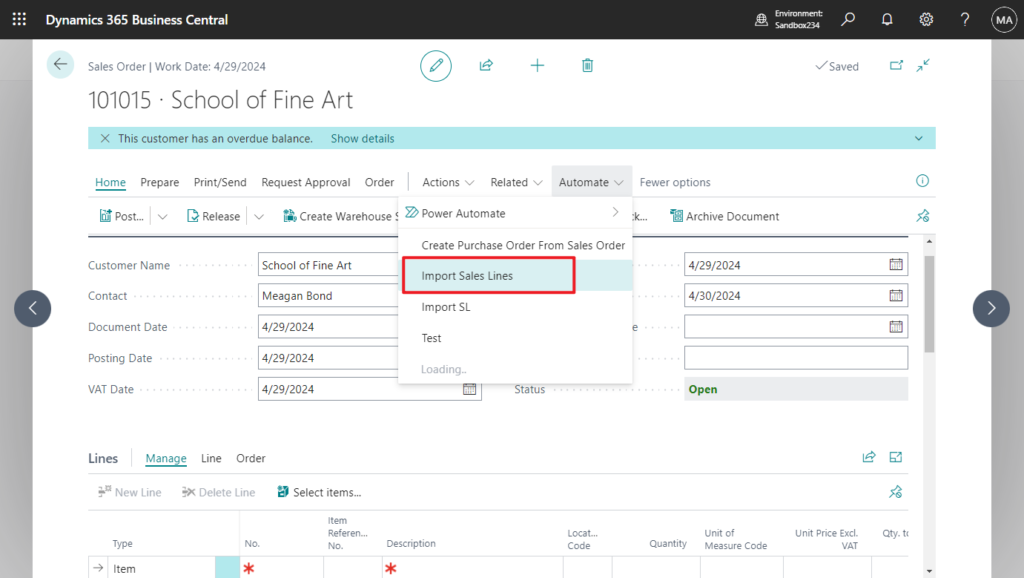
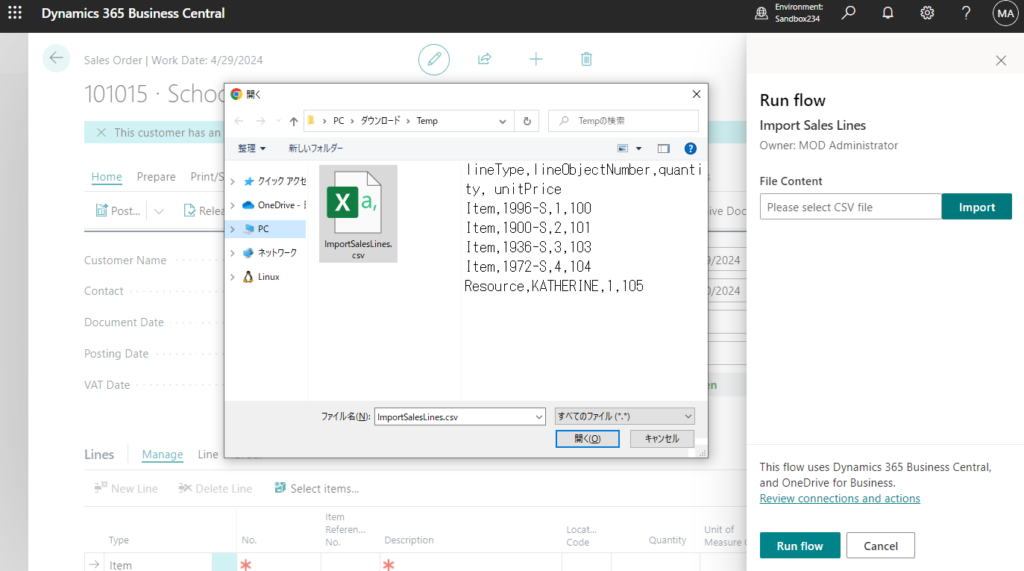
Create a new Sales Order, then choose Import Sales Lines.
Choose Import
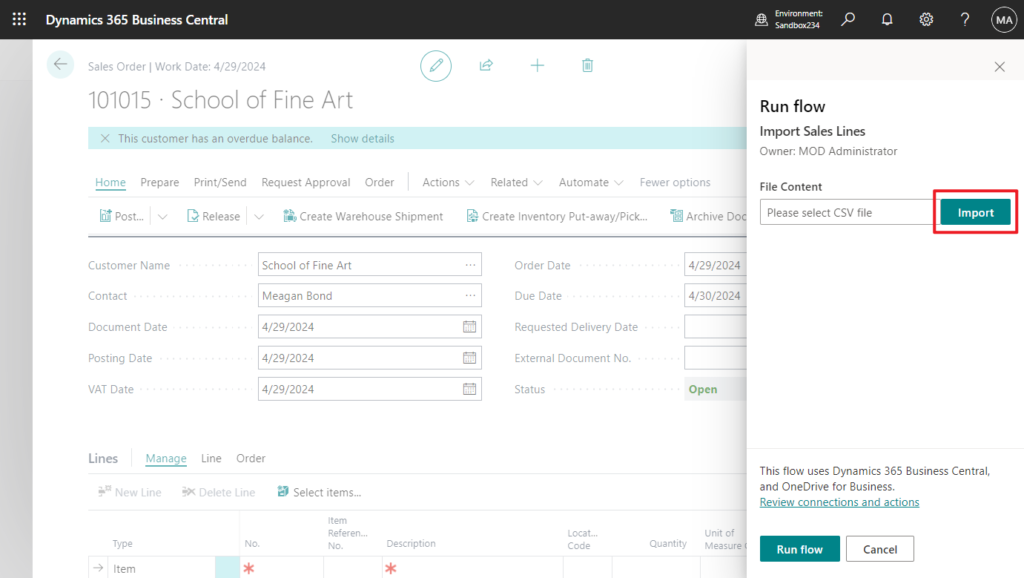
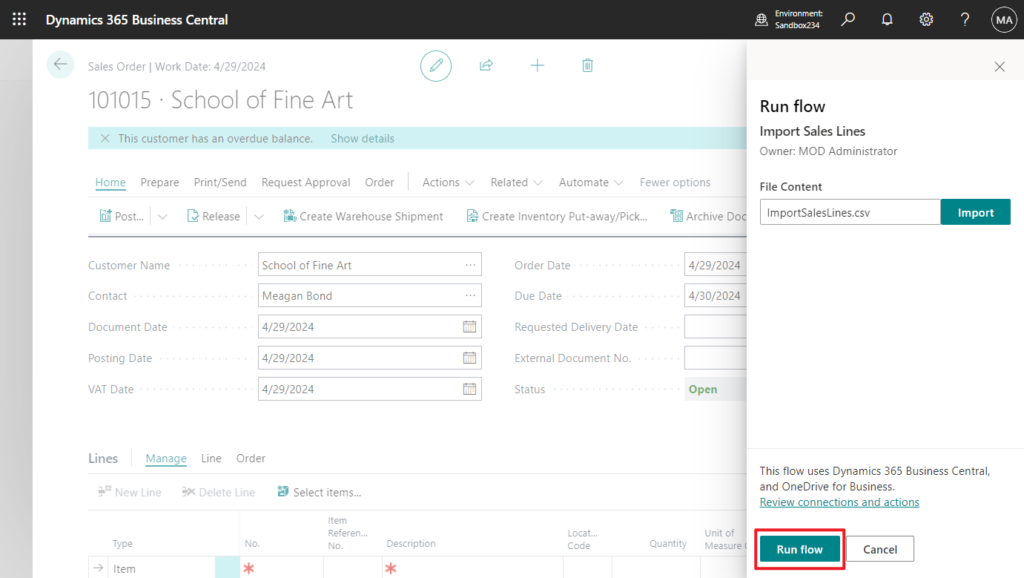
Then select a local CSV file.
Choose Run flow.
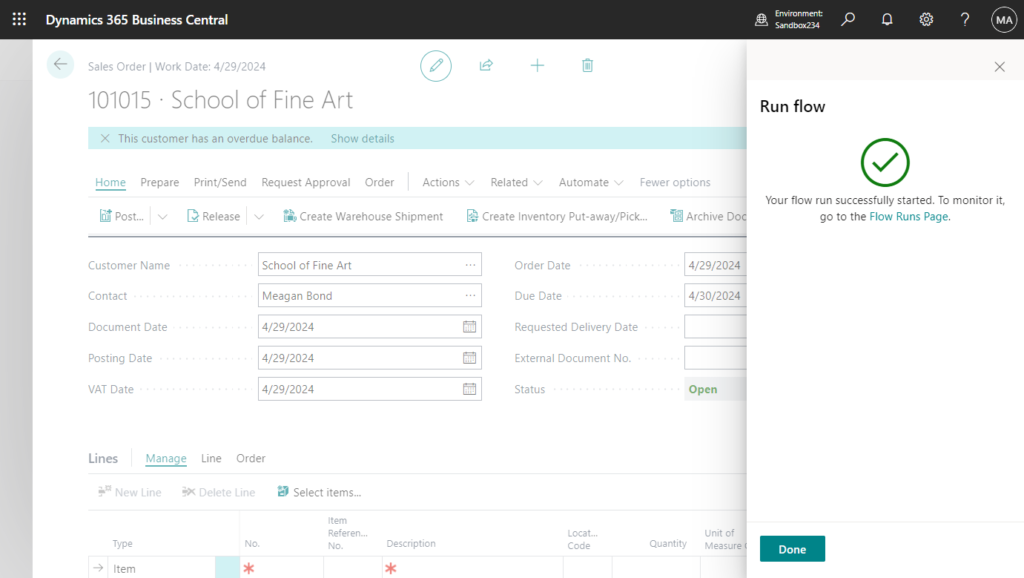
The flow run successfully.
Sales Lines have been added.

Test video:
Very simple, no coding required, no need to use Configuration Package and other tools, just the settings in Power Automate. Give it a try!!!😁
Download My Test flow:
End
Hope this will help.
Thanks for your reading.
ZHU
コメント