Hi, readers.
In Development, have you ever tried to create Lookup field on one Page that uses data from another table to populate a field in the current table? In this post, I will summarize some basic methods on how to create a Lookup, Drop-Down, or Option list. Hope this will help.
Lookup list (Single select)
Solution:
Creating a item lookup on Customer Card to show the Item Description. (I used a variable on the Customer Card only for demo, you can also use the actual field)
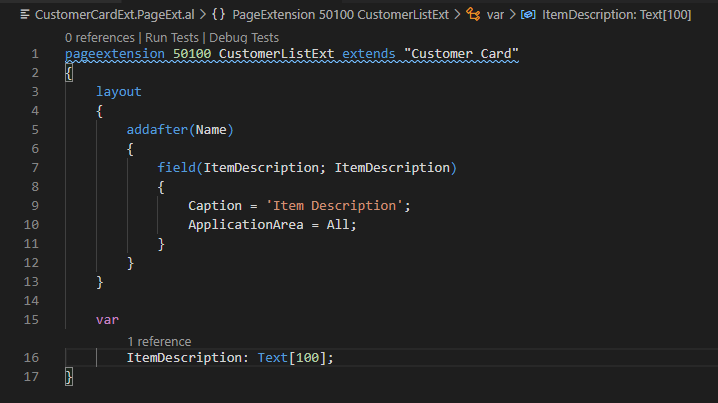
Use RunModal Method in trigger OnLookup().
Test Video:
Source code:
pageextension 50100 CustomerListExt extends "Customer Card"
{
    layout
    {
        addafter(Name)
        {
            field(ItemDescription; ItemDescription)
            {
                Caption = 'Item Description';
                ApplicationArea = All;

                trigger OnLookup(var Text: Text): Boolean
                var
                    ItemRec: Record Item;
                begin
                    ItemRec.Reset();
                    if Page.RunModal(Page::"Item List", ItemRec) = Action::LookupOK then
                        ItemDescription := ItemRec.Description;
                end;
            }
        }
    }

    var
        ItemDescription: Text[100];
}
Lookup list (Multi select)
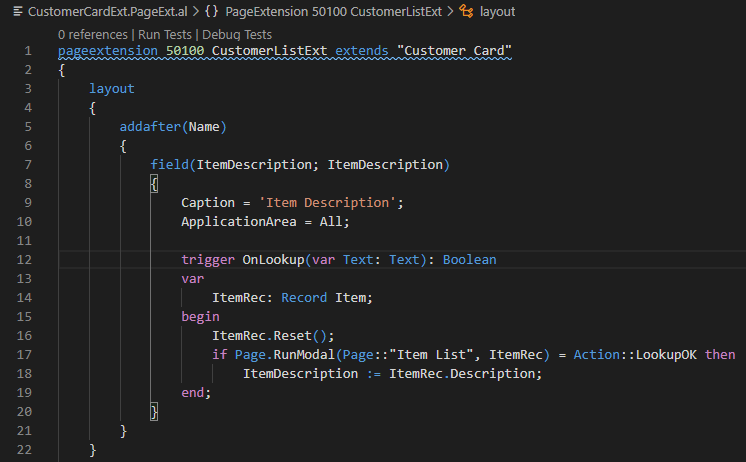
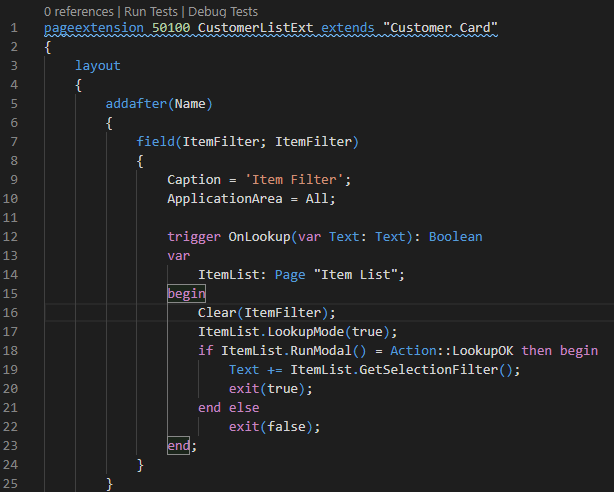
Solution:
Creating a item lookup on Customer Card to show the Item filter.
Use RunModal Method and GetSelectionFilter in trigger OnLookup().
Test Video:
Source Code:
pageextension 50100 CustomerListExt extends "Customer Card"
{
    layout
    {
        addafter(Name)
        {
            field(ItemFilter; ItemFilter)
            {
                Caption = 'Item Filter';
                ApplicationArea = All;

                trigger OnLookup(var Text: Text): Boolean
                var
                    ItemList: Page "Item List";
                begin
                    Clear(ItemFilter);
                    ItemList.LookupMode(true);
                    if ItemList.RunModal() = Action::LookupOK then begin
                        Text += ItemList.GetSelectionFilter();
                        exit(true);
                    end else
                        exit(false);
                end;
            }
        }
    }

    var
        ItemFilter: Text[100];
}
More details: How to get a filter for the selected records on any page (For example, ‘1..3|6’)
Drop-Down list
Solution:
Creating a item Drop-Down list on Customer Card to show the Item No. and Item Description. (I used a variable on the Customer Card, but you can also use the actual field)

Test Video:
Source code
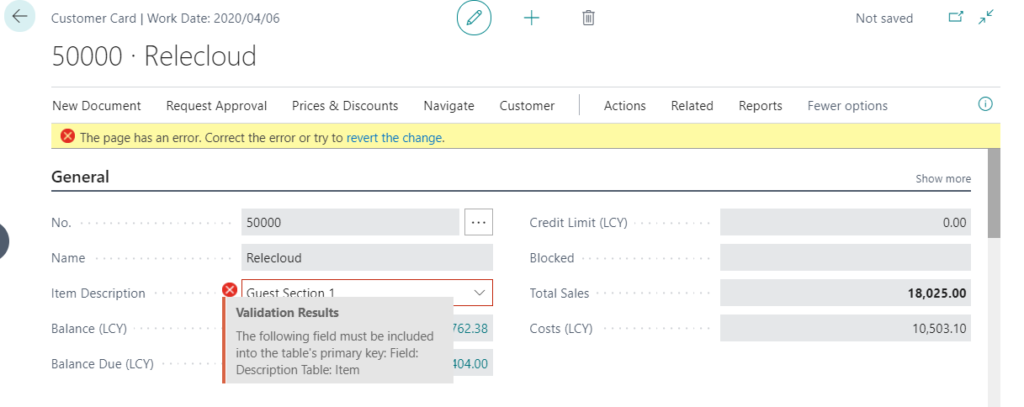
Note:
1. TableRelation cannot be set as “TableRelation = Item.Description” because Description is not a key field. A runtime error will occur.
The following field must be included into the table’s primary key: Field: Description Table: Item
2. If you want to customize standard Drop-Down List, please refer to the blog below.
Dynamics 365 Business Central: How to Customize Drop-Down List (Field Groups)
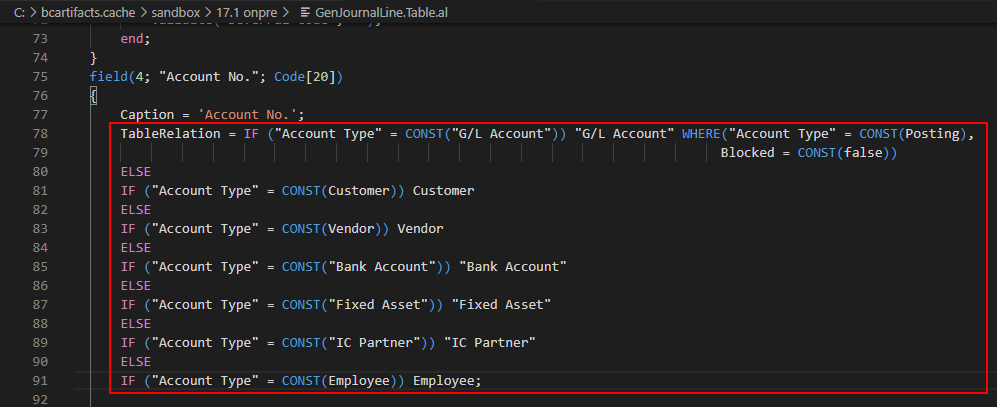
3. You can use “if…else…” or “where” conditions in TableRelation Property. Please refer to the “Account No.” field in table 81 “Gen. Journal Line”.
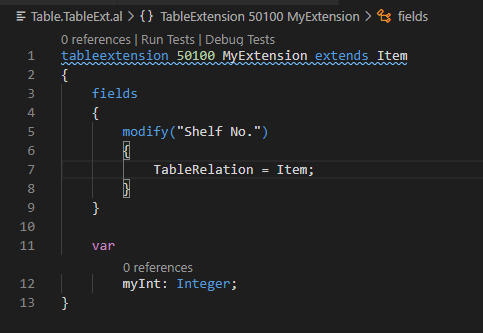
4. TableRelation property can be modified through a table extension.
Option list (Enum)
Solution:
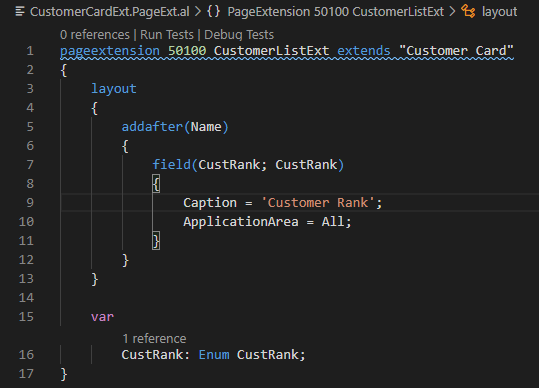
Creating a Drop-Down list on Customer Card to show the Customer Rank.
1. Create a new Enum type object and set values.
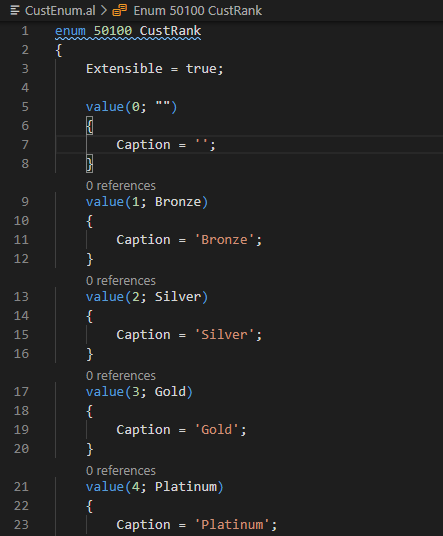
Enum is a list that consists of a set of named constants. It can be used as table fields, local and global variables, and parameters. Enum replaces the old Option data type and from now on, during development, instead of creating a new Option we have to create a new Enum.
2. Use Enum object in Page or Table.
Test Video:
END
Hope this will help.
Thanks for your reading.
ZHU

コメント