Hi, Readers.
Two weeks ago we talked about Dynamics 365 Sales and Business Central integration setup. And the following table lists the standard mapping between tables in Business Central and Dynamics 365 Sales that Business Central provides. (2021/08/12 BC18.3)
| BC Table | Direction | Integration Table | Integration Field |
| Contact | Bidirectional | Dataverse Contact | Contact |
| Currency | ToIntegrationTable | Dataverse Transactioncurrency | Transaction Currency |
| Customer | Bidirectional | Dataverse Account | Account |
| Customer Price Group | ToIntegrationTable | CRM Pricelevel | Price List |
| Item | Bidirectional | CRM Product | Product |
| Opportunity | Bidirectional | CRM Opportunity | Opportunity |
| Payment Terms | FromIntegrationTable | Dataverse Account | Payment Terms |
| Sales Invoice Header | ToIntegrationTable | CRM Invoice | Invoice |
| Sales Invoice Line | ToIntegrationTable | CRM Invoicedetail | Invoice Product |
| Resource | Bidirectional | CRM Product | Product |
| Salesperson/Purchaser | FromIntegrationTable | Dataverse Systemuser | User |
| Sales Price | ToIntegrationTable | CRM Productpricelevel | Product Price List |
| Shipment Method | FromIntegrationTable | Dataverse Account | Address 1: Freight Terms |
| Shipping Agent | FromIntegrationTable | Dataverse Account | Address 1: Shipping Method |
| Unit of Measure | ToIntegrationTable | CRM Uomschedule | Unit Group |
| Vendor | Bidirectional | Dataverse Account | Account |
So, what if we want to add a new integration table?
This post will guide you through setting up an integration between a new table (Lab Book) in Business Central and a new entity (Lab Book) in Microsoft Dataverse.
Prerequisites:
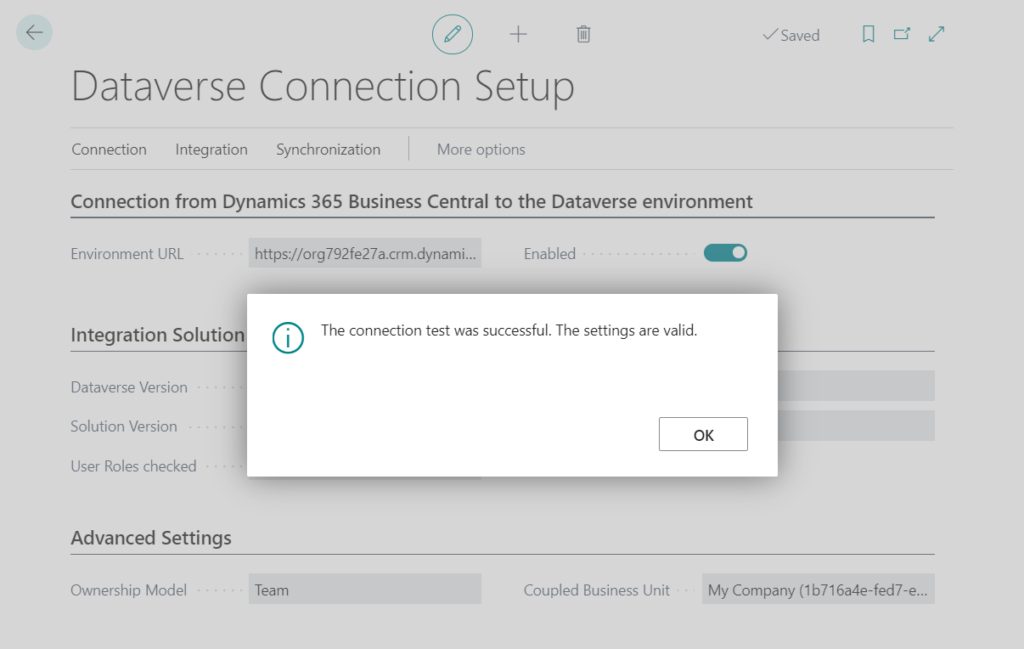
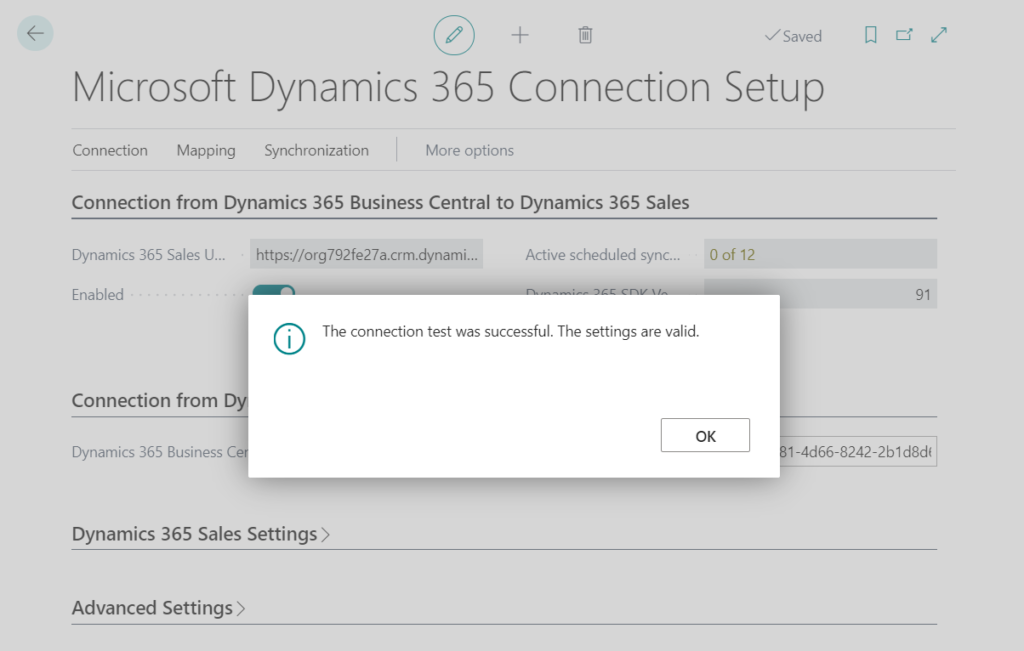
1. Dynamics 365 Sales and Business Central integration setup must be completed first.
Dataverse Connection Setup:
Microsoft Dynamics 365 Connection Setup:
2. Create a new table you want to integrate with Dataverse in Business Central.
For example: table 50100 “Lab Book”


Source Code:
table 50100 "Lab Book"
{
    Caption = 'Lab Book';
    DataClassification = CustomerContent;

    fields
    {
        field(1; "No."; Code[10])
        {
            Caption = 'No.';
            DataClassification = CustomerContent;
        }
        field(2; Title; Text[30])
        {
            Caption = 'Title';
            DataClassification = CustomerContent;
        }
        field(3; Author; Text[30])
        {
            Caption = 'Author';
            DataClassification = CustomerContent;
        }
        field(4; Hardcover; Boolean)
        {
            Caption = 'Hardcover';
            DataClassification = CustomerContent;
        }
        field(5; "Page Count"; Integer)
        {
            Caption = 'Page Count';
            DataClassification = CustomerContent;
        }
    }

    keys
    {
        key(PK; "No.")
        {
            Clustered = true;
        }
    }
}
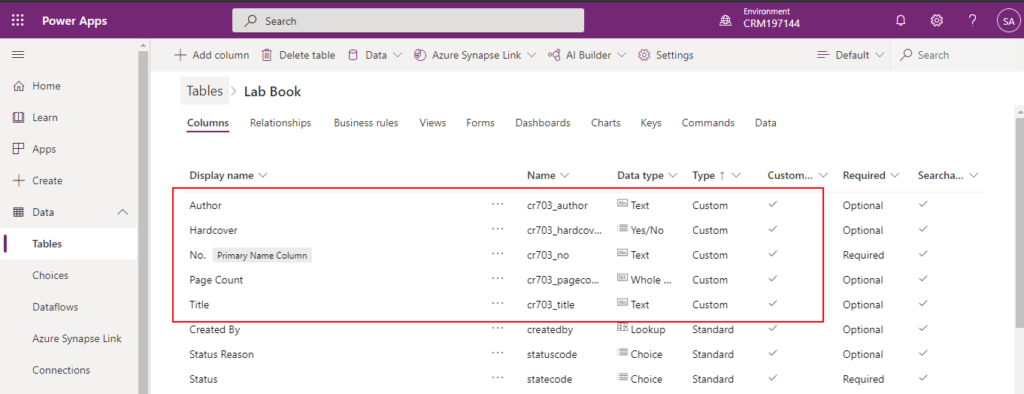
3. Create a new table in Dataverse.
table(entity): cr703_labbook

Okay, let’s get started.
PS: The Lab Book Card page source code. (The list page will be provided below)
page 50100 "Lab Book Card"
{
    Caption = 'Lab Book Card';
    PageType = Card;
    UsageCategory = Administration;
    SourceTable = "Lab Book";

    layout
    {
        area(Content)
        {
            group(General)
            {
                field("No."; Rec."No.")
                {
                    ApplicationArea = All;
                }
                field(Title; Rec.Title)
                {
                    ApplicationArea = All;
                }
            }

            group(Details)
            {
                field(Author; Rec.Author)
                {
                    ApplicationArea = All;
                }
                field(Hardcover; Rec.Hardcover)
                {
                    ApplicationArea = All;
                }
                field("Page Count"; Rec."Page Count")
                {
                    ApplicationArea = All;
                }
            }
        }
    }
}
Using AL Table Proxy Generator tool to create an integration table in Business Central for the Dataverse table
To integrate data from a Microsoft Dataverse table into Business Central, you must create a table object in Business Central that is based on the Microsoft Dataverse table, and then import the new table into the Business Central database.
The AL Table Proxy Generator tool can be used to generate one or more tables for integration with Microsoft Dataverse. When one or more tables are present in Microsoft Dataverse, but not in Dynamics 365 Business Central, the tool can be run to generate integration or proxy tables for the specified table or tables.
An integration or proxy table is a table that represents a table in Microsoft Dataverse. The integration table includes fields that correspond to columns in the Microsoft Dataverse table. The integration table acts as a link or connector between the Business Central table and the Microsoft Dataverse table.
The AL Table Proxy Generator tool is available with the AL Language extension. Look for the altpgen.exe tool in the equivalent folder of c:\users\<username>\.vscode\extensions\<al extension version>\bin. (Or C:\Users\yzhu\.vscode\extensions\ms-dynamics-smb.al-13.0.921843\bin\win32\altpgen)
For example: C:\Users\yzhu\.vscode\extensions\ms-dynamics-smb.al-7.4.496506\bin


1. Generating proxy tables
Start Windows PowerShell as an administrator.

From the command prompt, write .\altpgen.exe followed by the parameters as described below.
-Project
-PackageCachePath
-ServiceURI
-Entities
-BaseId
-[TableType]| Parameter | Description |
|---|---|
| Project | The AL project folder to create the table(s) in. |
| PackageCachePath | The AL project cache folder for symbols. Note: It is important that the latest symbols have been downloaded because these are used for comparison when the tool runs. |
| ServiceURI | The server URL for Microsoft Dataverse. For example, https://tenant.crm.dynamics.com. |
| Entities | The table(s) to create in AL. If multiple, this must be specified as a comma-separated list. Note: It is important that all related tables are specified too. Related tables are, for example, used for lookups and if the related tables are not found, a lookup will no longer be working. For more information, see the section Specifying tables. |
| BaseId | The assigned starting ID for the generated new table(s) in AL. |
| TableType | The table type for the table(s) in AL. The options are CDS and CRM.Note: If unspecified, the system looks both for CDS and CRM tables . |
Open the folder where the altpgen.exe tool is.
cd C:\Users\yzhu\.vscode\extensions\ms-dynamics-smb.al-7.4.496506\binOr
cd "C:\Users\yzhu\.vscode\extensions\ms-dynamics-smb.al-13.0.921843\bin\win32\altpgen"
Then run the generate proxy tables command.
For example: Need to be case sensitive
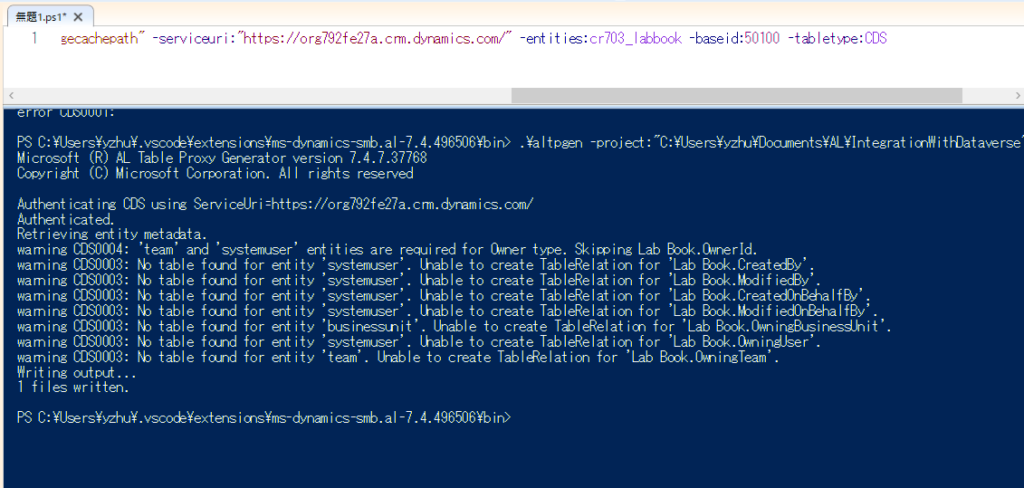
.\altpgen -project:"C:\Users\yzhu\Documents\AL\IntegrationWithDataverse" -packagecachepath:"C:\Users\yzhu\Documents\AL\IntegrationWithDataverse\packagecachepath" -serviceuri:"https://org792fe27a.crm.dynamics.com/" -entities:cr703_labbook -baseid:50100 -tabletype:CDS
Sign in with an administrator user account and give consent to the application that will be used to connect to Dataverse.


Complete: 1 files written.
Test Video:
Note:
The table can contain some or all of the fields from the Microsoft Dataverse table. However, if you want to set up bi-directional synchronization you must include all fields in the table.
A CDS table will be created automatically. ( table 50101 “CDS cr703_LabBook” : CDS + Entity Name)
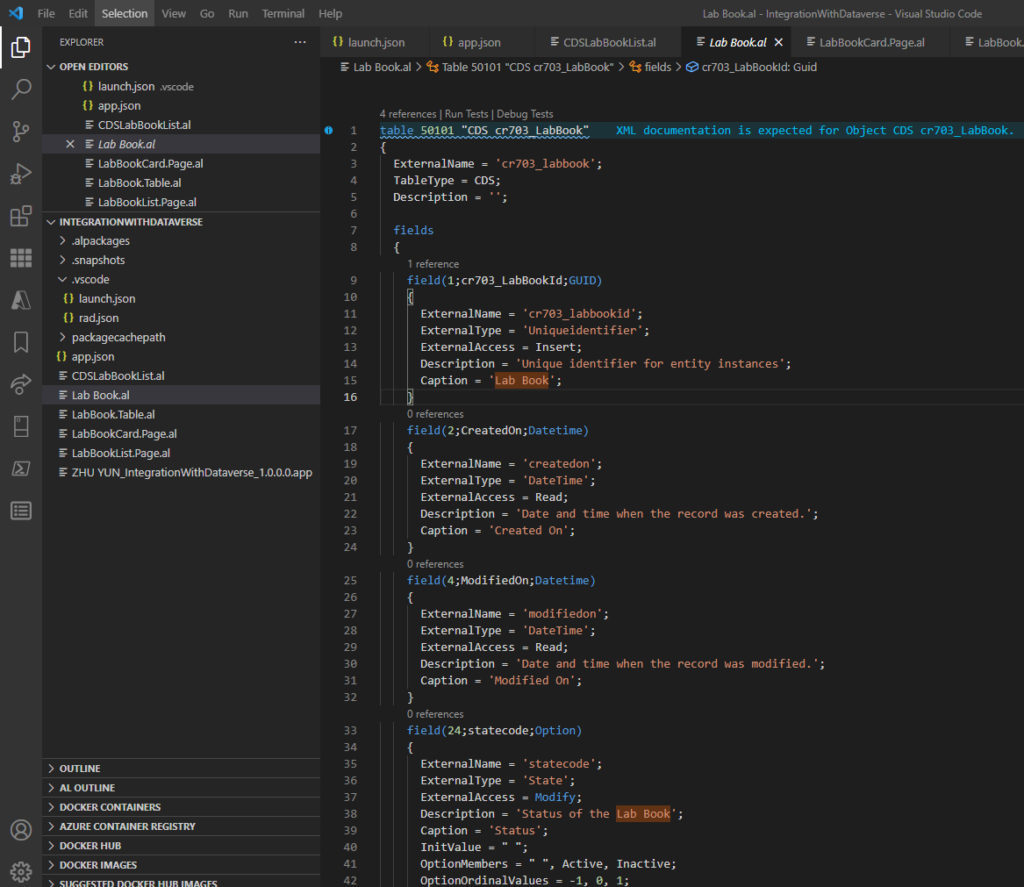
The source code: For reference only, please do not create manually.
table 50101 "CDS cr703_LabBook"
{
  ExternalName = 'cr703_labbook';
  TableType = CDS;
  Description = '';

  fields
  {
    field(1;cr703_LabBookId;GUID)
    {
      ExternalName = 'cr703_labbookid';
      ExternalType = 'Uniqueidentifier';
      ExternalAccess = Insert;
      Description = 'Unique identifier for entity instances';
      Caption = 'Lab Book';
    }
    field(2;CreatedOn;Datetime)
    {
      ExternalName = 'createdon';
      ExternalType = 'DateTime';
      ExternalAccess = Read;
      Description = 'Date and time when the record was created.';
      Caption = 'Created On';
    }
    field(4;ModifiedOn;Datetime)
    {
      ExternalName = 'modifiedon';
      ExternalType = 'DateTime';
      ExternalAccess = Read;
      Description = 'Date and time when the record was modified.';
      Caption = 'Modified On';
    }
    field(24;statecode;Option)
    {
      ExternalName = 'statecode';
      ExternalType = 'State';
      ExternalAccess = Modify;
      Description = 'Status of the Lab Book';
      Caption = 'Status';
      InitValue = " ";
      OptionMembers = " ", Active, Inactive;
      OptionOrdinalValues = -1, 0, 1;
    }
    field(26;statuscode;Option)
    {
      ExternalName = 'statuscode';
      ExternalType = 'Status';
      Description = 'Reason for the status of the Lab Book';
      Caption = 'Status Reason';
      InitValue = " ";
      OptionMembers = " ", Active, Inactive;
      OptionOrdinalValues = -1, 1, 2;
    }
    field(28;VersionNumber;BigInteger)
    {
      ExternalName = 'versionnumber';
      ExternalType = 'BigInt';
      ExternalAccess = Read;
      Description = 'Version Number';
      Caption = 'Version Number';
    }
    field(29;ImportSequenceNumber;Integer)
    {
      ExternalName = 'importsequencenumber';
      ExternalType = 'Integer';
      ExternalAccess = Insert;
      Description = 'Sequence number of the import that created this record.';
      Caption = 'Import Sequence Number';
    }
    field(30;OverriddenCreatedOn;Date)
    {
      ExternalName = 'overriddencreatedon';
      ExternalType = 'DateTime';
      ExternalAccess = Insert;
      Description = 'Date and time that the record was migrated.';
      Caption = 'Record Created On';
    }
    field(31;TimeZoneRuleVersionNumber;Integer)
    {
      ExternalName = 'timezoneruleversionnumber';
      ExternalType = 'Integer';
      Description = 'For internal use only.';
      Caption = 'Time Zone Rule Version Number';
    }
    field(32;UTCConversionTimeZoneCode;Integer)
    {
      ExternalName = 'utcconversiontimezonecode';
      ExternalType = 'Integer';
      Description = 'Time zone code that was in use when the record was created.';
      Caption = 'UTC Conversion Time Zone Code';
    }
    field(33;cr703_No;Text[100])
    {
      ExternalName = 'cr703_no';
      ExternalType = 'String';
      Description = 'Required name field';
      Caption = 'No.';
    }
    field(34;cr703_Title;Text[30])
    {
      ExternalName = 'cr703_title';
      ExternalType = 'String';
      Description = '';
      Caption = 'Title';
    }
    field(35;cr703_PageCount;Integer)
    {
      ExternalName = 'cr703_pagecount';
      ExternalType = 'Integer';
      Description = '';
      Caption = 'Page Count';
    }
    field(36;cr703_Hardcover;Boolean)
    {
      ExternalName = 'cr703_hardcover';
      ExternalType = 'Boolean';
      Description = '';
      Caption = 'Hardcover';
    }
    field(38;cr703_Author;Text[30])
    {
      ExternalName = 'cr703_author';
      ExternalType = 'String';
      Description = '';
      Caption = 'Author';
    }
  }
  keys
  {
    key(PK;cr703_LabBookId)
    {
      Clustered = true;
    }
    key(Name;cr703_No)
    {
    }
  }
  fieldgroups
  {
    fieldgroup(DropDown;cr703_No)
    {
    }
  }
}
2. Create a new page, specify the CDS cr703_LabBook integration table as the source table as shown below:
page 50102 "CDS Lab Book List"
{
    Caption = 'CDS Lab Book List';
    PageType = List;
    SourceTable = "CDS cr703_LabBook";
    Editable = false;
    ApplicationArea = All;
    UsageCategory = Lists;
    RefreshOnActivate = true;

    layout
    {
        area(Content)
        {
            repeater(Group)
            {
                field(cr703_No; Rec.cr703_No)
                {
                    Caption = 'No.';
                    ApplicationArea = All;
                }
                field(cr703_Title; Rec.cr703_Title)
                {
                    Caption = 'Title';
                    ApplicationArea = All;
                }
                field(cr703_Author; Rec.cr703_Author)
                {
                    Caption = 'Author';
                    ApplicationArea = All;
                }
                field(cr703_Hardcover; Rec.cr703_Hardcover)
                {
                    Caption = 'Hardcover';
                    ApplicationArea = All;
                }
                field(cr703_PageCount; Rec.cr703_PageCount)
                {
                    Caption = 'Page Count';
                    ApplicationArea = All;
                }
            }
        }
    }

    actions
    {
        area(processing)
        {
            action(CreateFromCDS)
            {
                ApplicationArea = All;
                Caption = 'Create in Business Central';
                Promoted = true;
                PromotedCategory = Process;
                ToolTip = 'Generate the table from the coupled Microsoft Dataverse lab book.';

                trigger OnAction()
                var
                    CDSLabBook: Record "CDS cr703_LabBook";
                    CRMIntegrationManagement: Codeunit "CRM Integration Management";
                begin
                    CurrPage.SetSelectionFilter(CDSLabBook);
                    CRMIntegrationManagement.CreateNewRecordsFromCRM(CDSLabBook);
                end;
            }
        }
    }

    var
        CurrentlyCoupledCDSLabBook: Record "CDS cr703_LabBook";

    trigger OnInit()
    begin
        Codeunit.Run(Codeunit::"CRM Integration Management");
    end;

    procedure SetCurrentlyCoupledCDSLabBook(CDSLabBook: Record "CDS cr703_LabBook")
    begin
        CurrentlyCoupledCDSLabBook := CDSLabBook;
    end;
}
Enable coupling and synchronization between Lab Book in Dataverse and in Business Central
To connect a Business Central table record with a Microsoft Dataverse table row, you create a coupling. A coupling consists of the primary ID, which is typically a GUID, from a Microsoft Dataverse row and the integration ID, also often a GUID, from Business Central.
1. Create a new codeunit.
2. In codeunit CRM Setup Defaults (ID 5334), subscribe to the OnGetCDSTableNo event, as follows:

You can now use the table to create a page for coupling Business Central records with Microsoft Dataverse rows.
3. In codeunit Lookup CRM Tables (ID 5332), subscribe to the OnLookupCRMTables event, as follows:
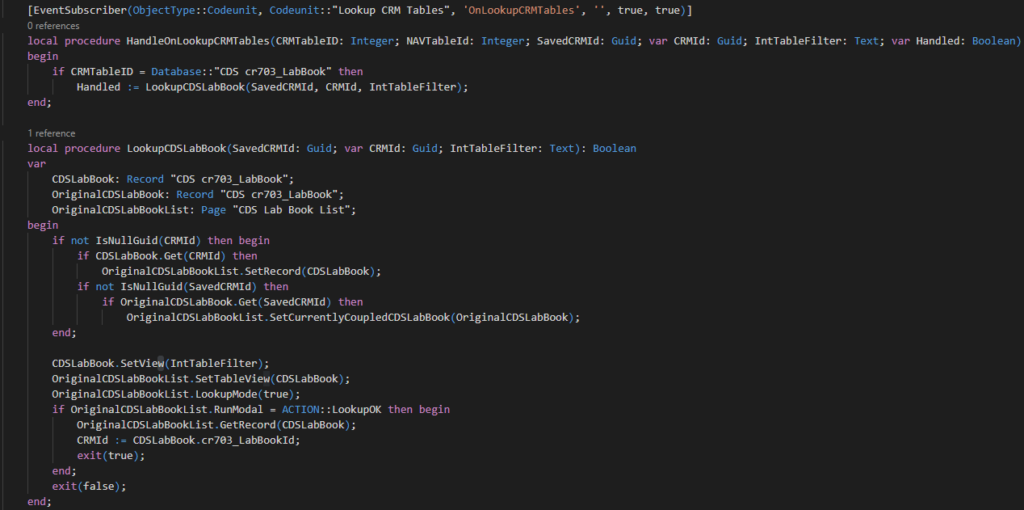
4. In codeunit CRM Setup Defaults (ID 5334), subscribe to the OnAddEntityTableMapping event in order to enable deep linking between coupled Business Central records and Microsoft Dataverse records.

Note: In the latest version of Business Central, ‘Codeunit “CRM Setup Defaults”‘ does not contain a definition for ‘AddEntityTableMapping’AL(AL0132), so you need to manually add this function as above.

Create default integration table mappings and field mappings
For synchronization to work, mappings must exist to associate the table ID and fields of the integration table (in this case, CDS cr703_LabBook) with the table in Business Central (in this case table Lab Book). There are two types of mapping:
- Integration table mapping – Integration table mapping links the Business Central table to the integration table for the Microsoft Dataverse table.
- Integration field mapping – Field mapping links a field in a table row in Microsoft Dataverse with a field in a record in Business Central. This determines which field in Business Central corresponds to which field in Microsoft Dataverse. Typically, there are multiple field mappings for a table.
To create an integration table mapping, we can create the integration table mapping by subscribing to the OnAfterResetConfiguration event in codeunit CDS Setup Defaults (ID 7204).
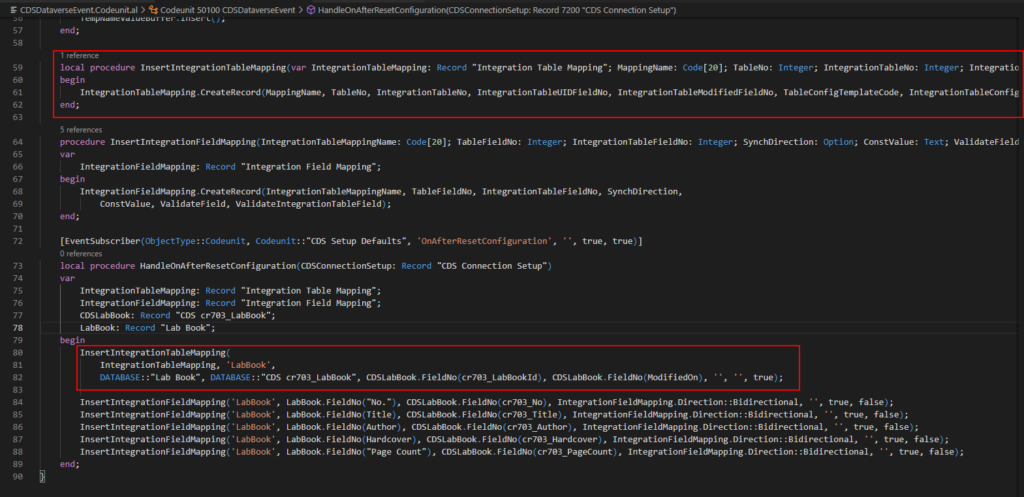
To create integration fields mappings, similar to the table above.
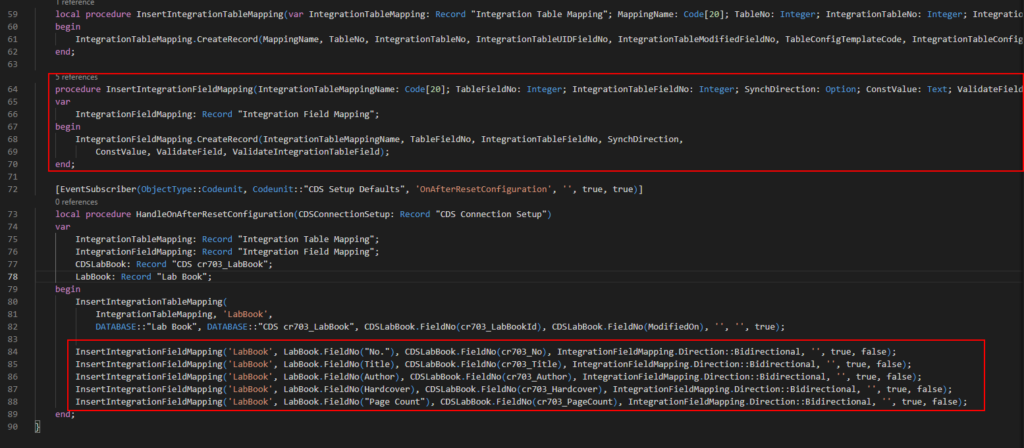
Codeunit Source Code: Please modify the red part according to your table.
codeunit 50100 CDSDataverseEvent
{
    [EventSubscriber(ObjectType::Codeunit, Codeunit::"CRM Setup Defaults", 'OnGetCDSTableNo', '', false, false)]
    local procedure HandleOnGetCDSTableNo(BCTableNo: Integer; var CDSTableNo: Integer; var handled: Boolean)
    begin
        if BCTableNo = DATABASE::"Lab Book" then begin
            CDSTableNo := DATABASE::"CDS cr703_LabBook";
            handled := true;
        end;
    end;

    [EventSubscriber(ObjectType::Codeunit, Codeunit::"Lookup CRM Tables", 'OnLookupCRMTables', '', true, true)]
    local procedure HandleOnLookupCRMTables(CRMTableID: Integer; NAVTableId: Integer; SavedCRMId: Guid; var CRMId: Guid; IntTableFilter: Text; var Handled: Boolean)
    begin
        if CRMTableID = Database::"CDS cr703_LabBook" then
            Handled := LookupCDSLabBook(SavedCRMId, CRMId, IntTableFilter);
    end;

    local procedure LookupCDSLabBook(SavedCRMId: Guid; var CRMId: Guid; IntTableFilter: Text): Boolean
    var
        CDSLabBook: Record "CDS cr703_LabBook";
        OriginalCDSLabBook: Record "CDS cr703_LabBook";
        OriginalCDSLabBookList: Page "CDS Lab Book List";
    begin
        if not IsNullGuid(CRMId) then begin
            if CDSLabBook.Get(CRMId) then
                OriginalCDSLabBookList.SetRecord(CDSLabBook);
            if not IsNullGuid(SavedCRMId) then
                if OriginalCDSLabBook.Get(SavedCRMId) then
                    OriginalCDSLabBookList.SetCurrentlyCoupledCDSLabBook(OriginalCDSLabBook);
        end;

        CDSLabBook.SetView(IntTableFilter);
        OriginalCDSLabBookList.SetTableView(CDSLabBook);
        OriginalCDSLabBookList.LookupMode(true);
        if OriginalCDSLabBookList.RunModal = ACTION::LookupOK then begin
            OriginalCDSLabBookList.GetRecord(CDSLabBook);
            CRMId := CDSLabBook.cr703_LabBookId;
            exit(true);
        end;
        exit(false);
    end;

    [EventSubscriber(ObjectType::Codeunit, Codeunit::"CRM Setup Defaults", 'OnAddEntityTableMapping', '', true, true)]
    local procedure HandleOnAddEntityTableMapping(var TempNameValueBuffer: Record "Name/Value Buffer" temporary);
    begin
        AddEntityTableMapping('labbook', DATABASE::"CDS cr703_LabBook", TempNameValueBuffer);
    end;

    local procedure AddEntityTableMapping(CRMEntityTypeName: Text; TableID: Integer; var TempNameValueBuffer: Record "Name/Value Buffer" temporary)
    begin
        TempNameValueBuffer.Init();
        TempNameValueBuffer.ID := TempNameValueBuffer.Count + 1;
        TempNameValueBuffer.Name := CopyStr(CRMEntityTypeName, 1, MaxStrLen(TempNameValueBuffer.Name));
        TempNameValueBuffer.Value := Format(TableID);
        TempNameValueBuffer.Insert();
    end;

    local procedure InsertIntegrationTableMapping(var IntegrationTableMapping: Record "Integration Table Mapping"; MappingName: Code[20]; TableNo: Integer; IntegrationTableNo: Integer; IntegrationTableUIDFieldNo: Integer; IntegrationTableModifiedFieldNo: Integer; TableConfigTemplateCode: Code[10]; IntegrationTableConfigTemplateCode: Code[10]; SynchOnlyCoupledRecords: Boolean)
    begin
        IntegrationTableMapping.CreateRecord(MappingName, TableNo, IntegrationTableNo, IntegrationTableUIDFieldNo, IntegrationTableModifiedFieldNo, TableConfigTemplateCode, IntegrationTableConfigTemplateCode, SynchOnlyCoupledRecords, IntegrationTableMapping.Direction::Bidirectional, 'CDS');
    end;

    procedure InsertIntegrationFieldMapping(IntegrationTableMappingName: Code[20]; TableFieldNo: Integer; IntegrationTableFieldNo: Integer; SynchDirection: Option; ConstValue: Text; ValidateField: Boolean; ValidateIntegrationTableField: Boolean)
    var
        IntegrationFieldMapping: Record "Integration Field Mapping";
    begin
        IntegrationFieldMapping.CreateRecord(IntegrationTableMappingName, TableFieldNo, IntegrationTableFieldNo, SynchDirection,
            ConstValue, ValidateField, ValidateIntegrationTableField);
    end;

    [EventSubscriber(ObjectType::Codeunit, Codeunit::"CDS Setup Defaults", 'OnAfterResetConfiguration', '', true, true)]
    local procedure HandleOnAfterResetConfiguration(CDSConnectionSetup: Record "CDS Connection Setup")
    var
        IntegrationTableMapping: Record "Integration Table Mapping";
        IntegrationFieldMapping: Record "Integration Field Mapping";
        CDSLabBook: Record "CDS cr703_LabBook";
        LabBook: Record "Lab Book";
    begin
        InsertIntegrationTableMapping(
            IntegrationTableMapping, 'LabBook',
            DATABASE::"Lab Book", DATABASE::"CDS cr703_LabBook", CDSLabBook.FieldNo(cr703_LabBookId), CDSLabBook.FieldNo(ModifiedOn), '', '', true);

        InsertIntegrationFieldMapping('LabBook', LabBook.FieldNo("No."), CDSLabBook.FieldNo(cr703_No), IntegrationFieldMapping.Direction::Bidirectional, '', true, false);
        InsertIntegrationFieldMapping('LabBook', LabBook.FieldNo(Title), CDSLabBook.FieldNo(cr703_Title), IntegrationFieldMapping.Direction::Bidirectional, '', true, false);
        InsertIntegrationFieldMapping('LabBook', LabBook.FieldNo(Author), CDSLabBook.FieldNo(cr703_Author), IntegrationFieldMapping.Direction::Bidirectional, '', true, false);
        InsertIntegrationFieldMapping('LabBook', LabBook.FieldNo(Hardcover), CDSLabBook.FieldNo(cr703_Hardcover), IntegrationFieldMapping.Direction::Bidirectional, '', true, false);
        InsertIntegrationFieldMapping('LabBook', LabBook.FieldNo("Page Count"), CDSLabBook.FieldNo(cr703_PageCount), IntegrationFieldMapping.Direction::Bidirectional, '', true, false);
    end;
}
To create actions on the page for managing coupling and synchronization
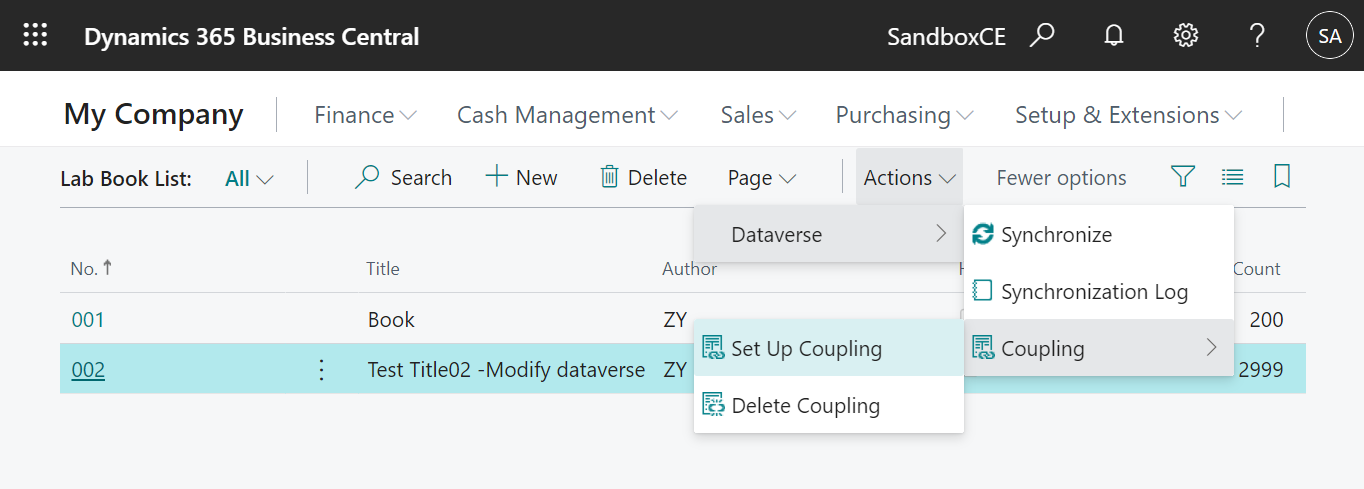
To enable users to create couplings between records in the two systems, we can extend the page with actions for creating and deleting couplings, for synchronizing and for deep linking.
For example: The following code example adds those actions to the Lab Book List page. (Recommend to add to Card Page)
page 50101 "Lab Book List"
{
    Caption = 'Lab Book List';
    PageType = List;
    ApplicationArea = All;
    UsageCategory = Administration;
    SourceTable = "Lab Book";
    CardPageId = "Lab Book Card";
    Editable = false;

    layout
    {
        area(Content)
        {
            repeater(Group)
            {
                field("No."; Rec."No.")
                {
                    ApplicationArea = All;

                }
                field(Title; Rec.Title)
                {
                    ApplicationArea = All;
                }
                field(Author; Rec.Author)
                {
                    ApplicationArea = All;
                }
                field(Hardcover; Rec.Hardcover)
                {
                    ApplicationArea = All;
                }
                field("Page Count"; Rec."Page Count")
                {
                    ApplicationArea = All;
                }
            }
        }
    }

    actions
    {
        area(Processing)
        {
            group(ActionGroupCDS)
            {
                Caption = 'Dataverse';
                Visible = CDSIntegrationEnabled;

                action(CDSGotoLabBook)
                {
                    Caption = 'Lab Book';
                    Image = CoupledCustomer;
                    ToolTip = 'Open the coupled Dataverse lab book.';

                    trigger OnAction()
                    var
                        CRMIntegrationManagement: Codeunit "CRM Integration Management";
                    begin
                        CRMIntegrationManagement.ShowCRMEntityFromRecordID(Rec.RecordId);
                    end;
                }
                action(CDSSynchronizeNow)
                {
                    Caption = 'Synchronize';
                    ApplicationArea = All;
                    Visible = true;
                    Image = Refresh;
                    Enabled = CDSIsCoupledToRecord;
                    ToolTip = 'Send or get updated data to or from Microsoft Dataverse.';

                    trigger OnAction()
                    var
                        CRMIntegrationManagement: Codeunit "CRM Integration Management";
                    begin
                        CRMIntegrationManagement.UpdateOneNow(Rec.RecordId);
                    end;
                }
                action(ShowLog)
                {
                    Caption = 'Synchronization Log';
                    ApplicationArea = All;
                    Visible = true;
                    Image = Log;
                    ToolTip = 'View integration synchronization jobs for the customer table.';

                    trigger OnAction()
                    var
                        CRMIntegrationManagement: Codeunit "CRM Integration Management";
                    begin
                        CRMIntegrationManagement.ShowLog(Rec.RecordId);
                    end;
                }
                group(Coupling)
                {
                    Caption = 'Coupling';
                    Image = LinkAccount;
                    ToolTip = 'Create, change, or delete a coupling between the Business Central record and a Microsoft Dataverse row.';

                    action(ManageCDSCoupling)
                    {
                        Caption = 'Set Up Coupling';
                        ApplicationArea = All;
                        Visible = true;
                        Image = LinkAccount;
                        ToolTip = 'Create or modify the coupling to a Microsoft Dataverse lab book.';

                        trigger OnAction()
                        var
                            CRMIntegrationManagement: Codeunit "CRM Integration Management";
                        begin
                            CRMIntegrationManagement.DefineCoupling(Rec.RecordId);
                        end;
                    }
                    action(DeleteCDSCoupling)
                    {
                        Caption = 'Delete Coupling';
                        ApplicationArea = All;
                        Visible = true;
                        Image = UnLinkAccount;
                        Enabled = CDSIsCoupledToRecord;
                        ToolTip = 'Delete the coupling to a Microsoft Dataverse lab book.';

                        trigger OnAction()
                        var
                            CRMCouplingManagement: Codeunit "CRM Coupling Management";
                        begin
                            CRMCouplingManagement.RemoveCoupling(Rec.RecordId);
                        end;
                    }
                }
            }
        }
    }
    trigger OnOpenPage()
    begin
        CDSIntegrationEnabled := CRMIntegrationManagement.IsCDSIntegrationEnabled();
    end;

    trigger OnAfterGetCurrRecord()
    begin
        if CDSIntegrationEnabled then
            CDSIsCoupledToRecord := CRMCouplingManagement.IsRecordCoupledToCRM(Rec.RecordId);
    end;

    var
        CRMIntegrationManagement: Codeunit "CRM Integration Management";
        CRMCouplingManagement: Codeunit "CRM Coupling Management";
        CDSIntegrationEnabled: Boolean;
        CDSIsCoupledToRecord: Boolean;
}
Update the default mappings to include our new integration table mapping
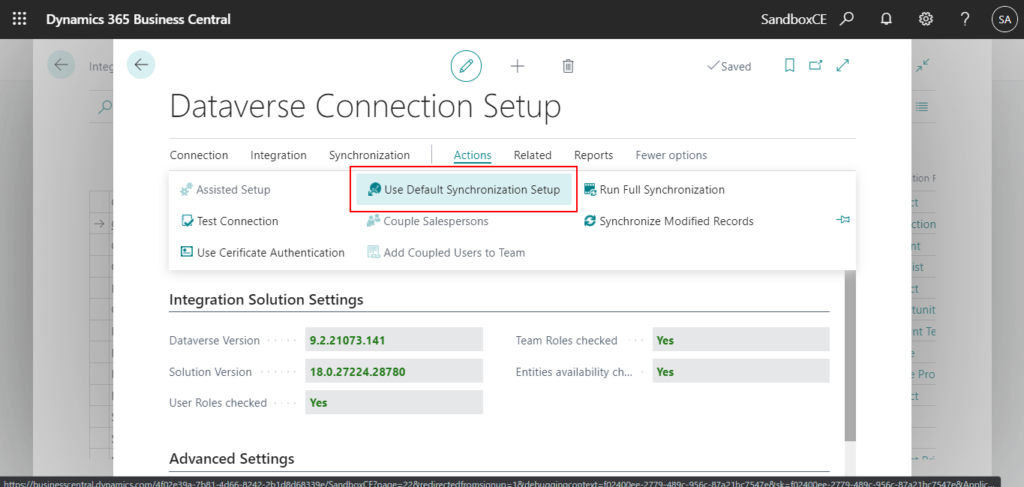
After publishing the extension, we can update the default mappings to include our new integration table mapping by opening the Dataverse Connection Setup page in Business Central and choosing Use Default Synchronization Setup.

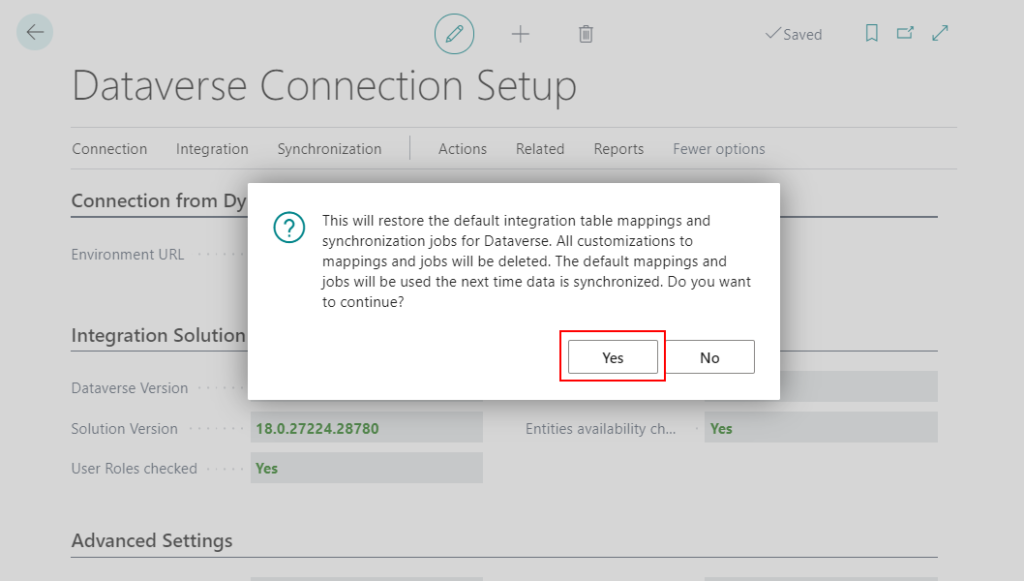
Choose Yes.
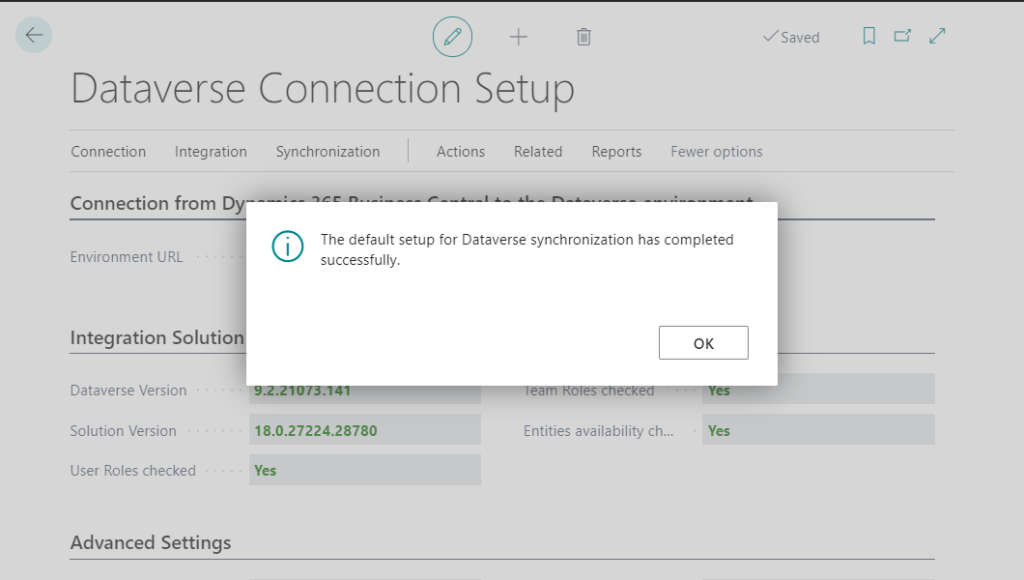
The default setup for Dataverse synchronization has completed successfully.
Then open Microsoft Dynamics 365 Connection Setup page.

Choose Integration Table Mappings.
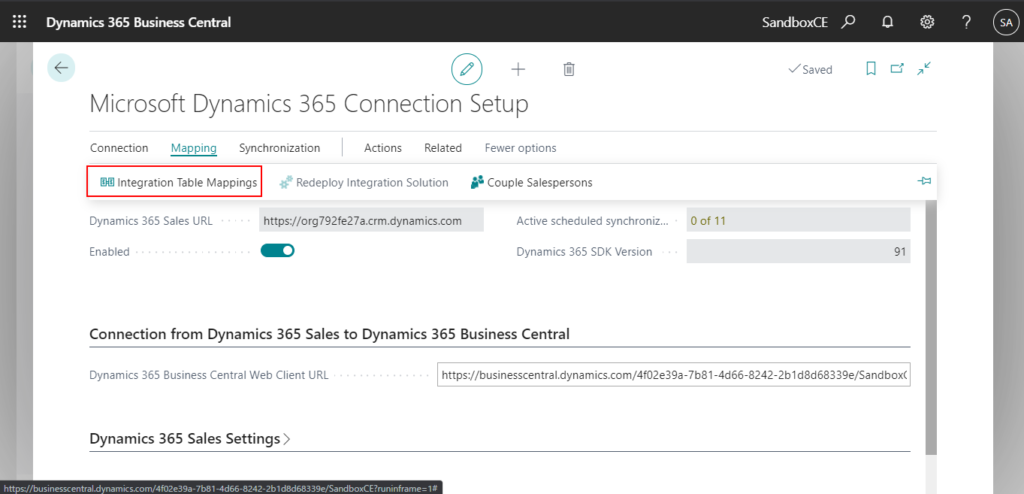
You can find the table you customized to add.
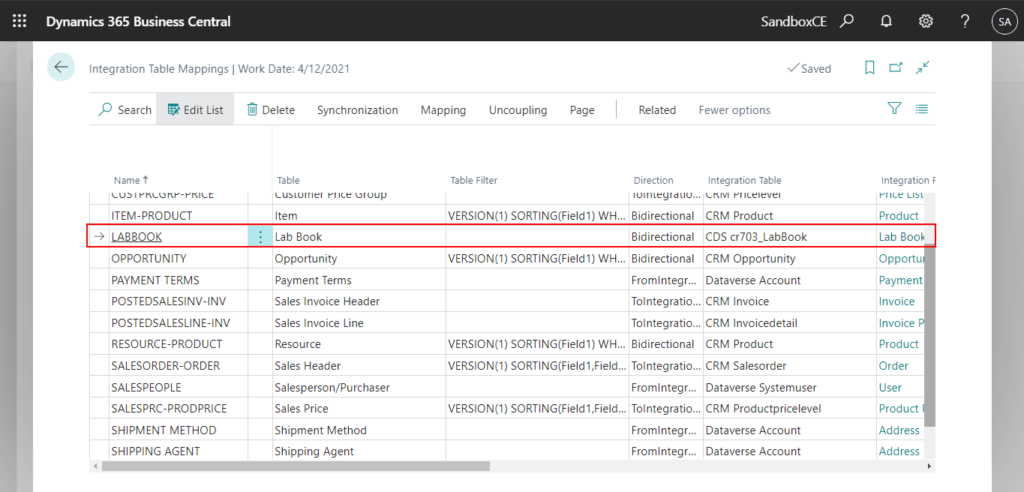
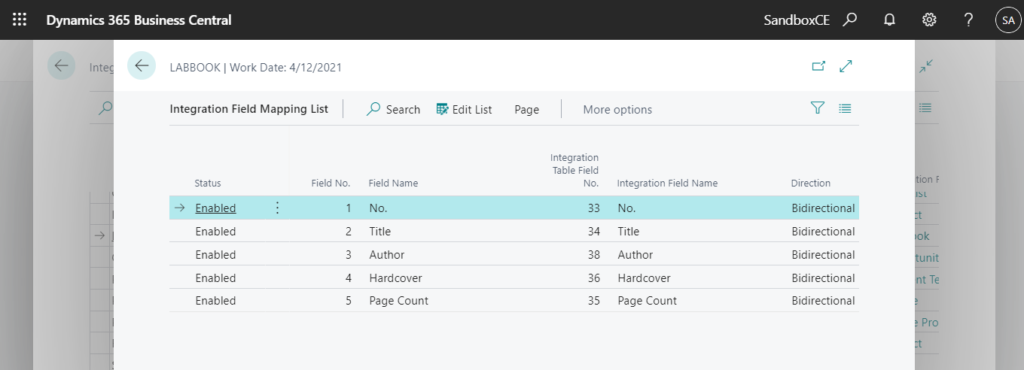
Choose Fields on this page.

You can see the fields you have added in codeunit.
Okay, users can now manually synchronize employee records in Business Central with Worker table rows in Microsoft Dataverse from the Business Central client.
But if you synchronize now, it will be failed.

The error message.

Principal user (Id=946233c6-9df9-eb11-94ef-00224803b0a4, type=8, roleCount=3, privilegeCount=112, accessMode=4), is missing prvReadcr703_LabBook privilege (Id=e9b04b6b-d87c-4e01-be18-55ad6bb97407) on OTC=10749 for entity ‘cr703_labbook’ (LocalizedName=’Lab Book’). context.Caller=946233c6-9df9-eb11-94ef-00224803b0a4
The same error message can be confirmed when opening the Dataverse table.

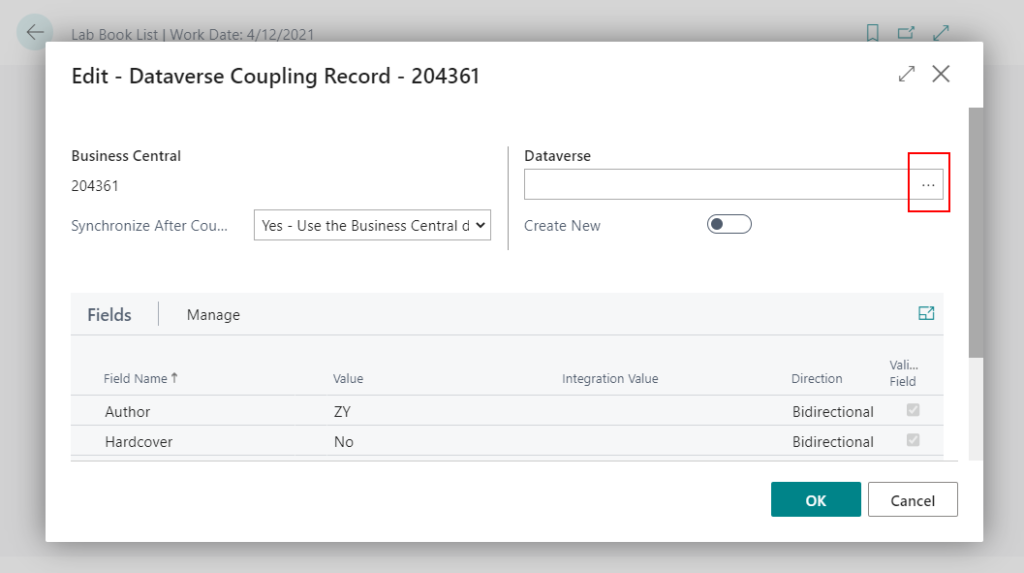
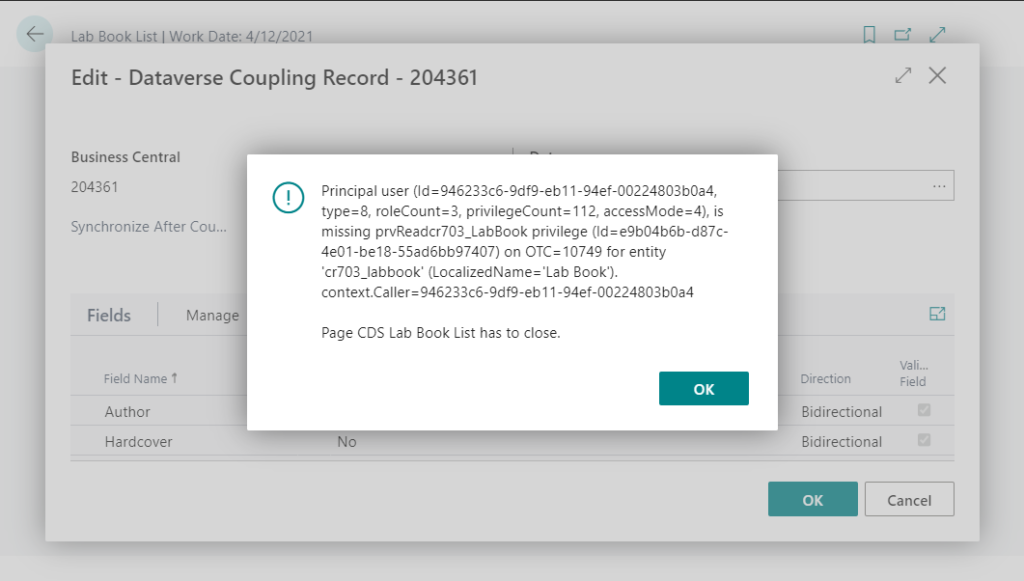
This issue took me a long time. It looks like a permission error for custom entities. But the user I use is a system administrator and has a license for Dynamics 365 Customer Engagement Applications (read-write access mode). And I can open this new table directly on the Dataverse. But when I go to Business Central, it shows this error that I don’t have permission.
Later, I discovered that when synchronizing, it is not based on the current user, but on the permissions of the Application User.
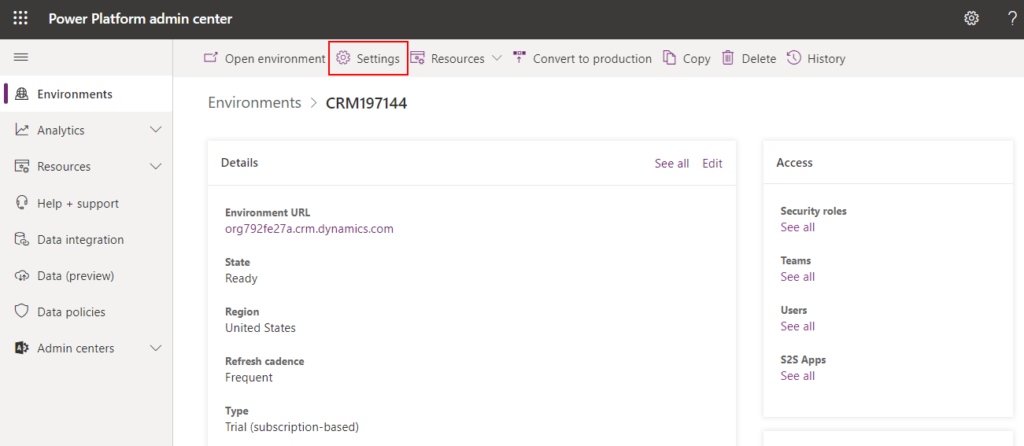
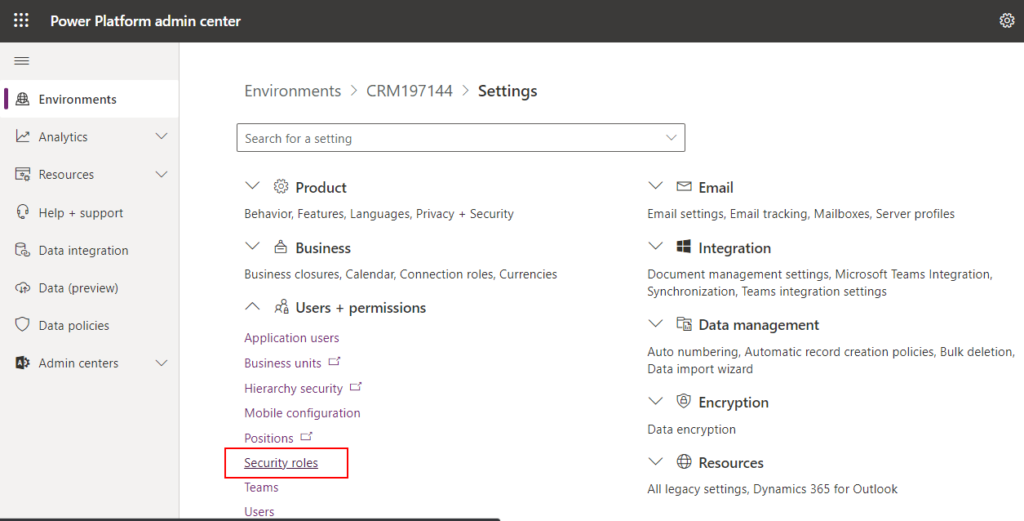
In the Power Platform admin center, select the environment and choose Settings.

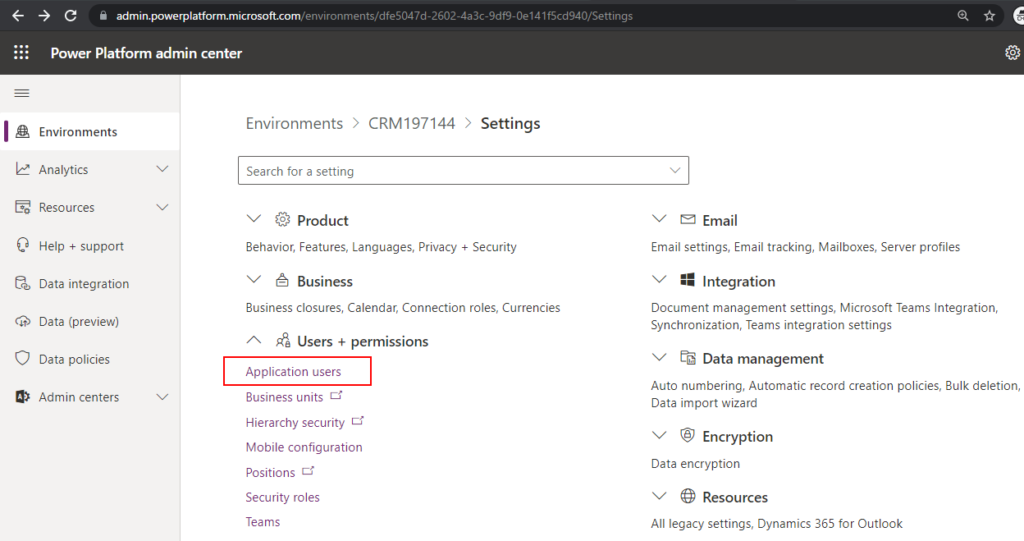
Choose User + permissions -> Application users.
There is an application user called Business Central Integration Business Central to Common Data Service. Choose Edit security roles.
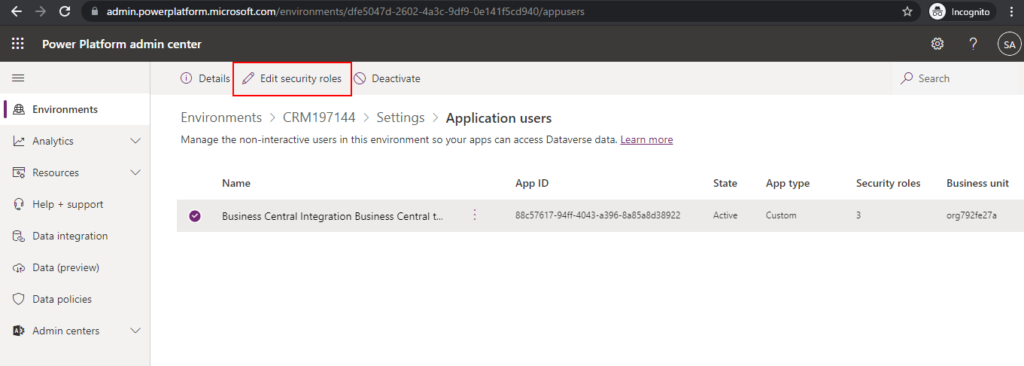
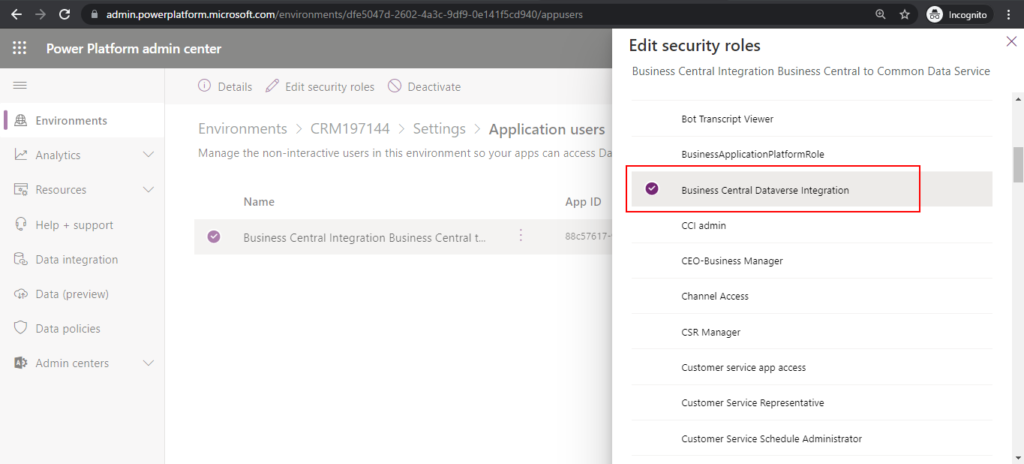
You can see the security roles of the application user assigned.
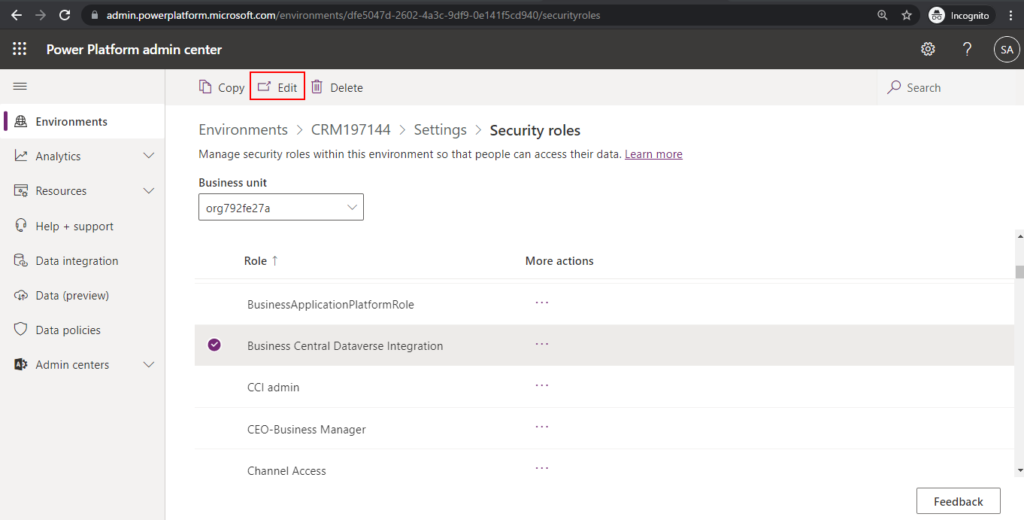
Then go to User + permissions -> Security roles.
Find the role and choose Edit.
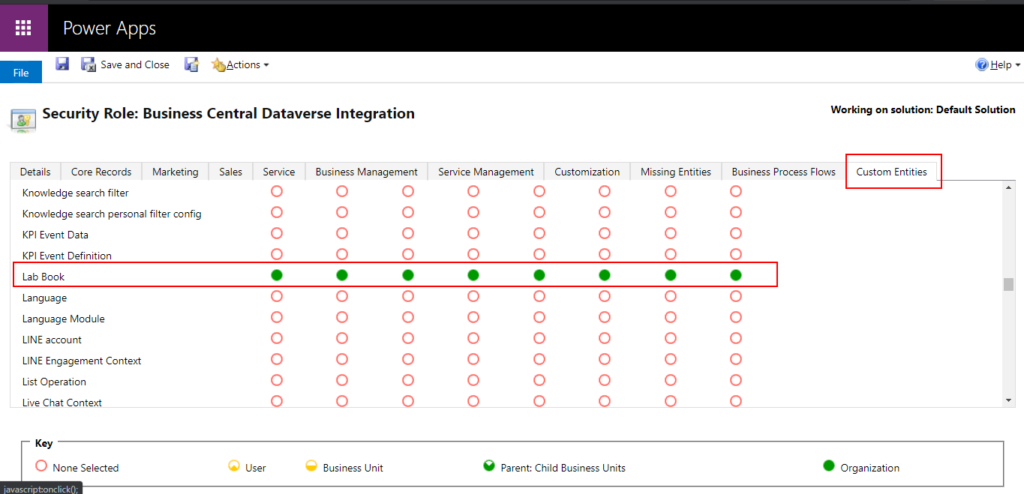
In Custom Entities tab, find your custom entities and add permissions
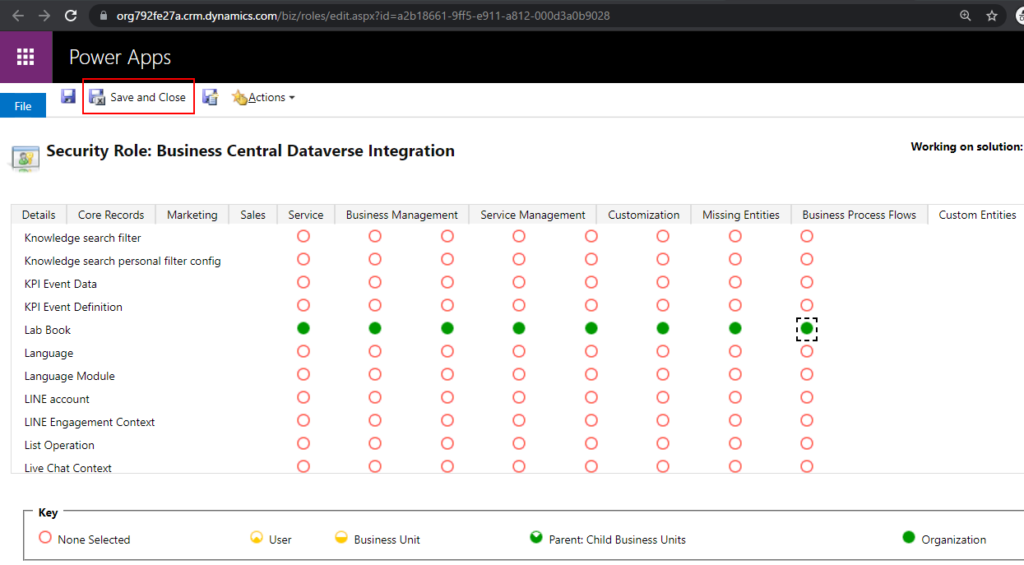
Finally, choose Save and Close.
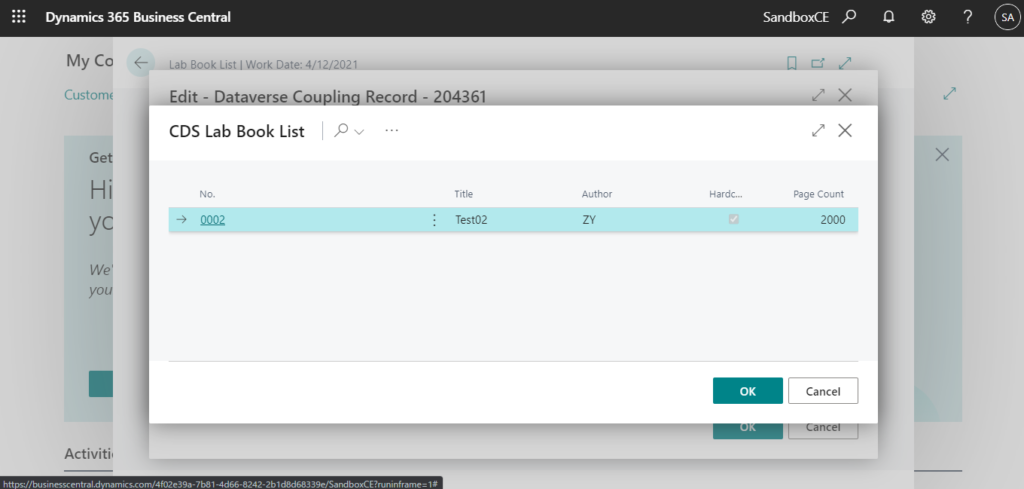
Now you can open the CDS Lab Book List page, and synchronize data without any error.
Test Video:
In conclusion, this walk through may seem very complicated, but in fact, as long as you understand it, it is not difficult. The following is a simple summary of the process, I hope it can help you.

The complete source code in Github: IntegrationWithDataverse.
For more details from Microsoft Documents:
Customizing an Integration with Microsoft Dataverse
Scheduling a Synchronization between Business Central and Dataverse
Update 2024.03.12: Business Central 2024 wave 1 (BC24): Add table and field mappings to existing integration tables (Dataverse)
END
Hope this will help.
Thanks for reading.
ZHU



コメント