
Hi, Readers.
In Business Central, sorting makes it easy for you to get a quick overview of your data. For example, if you have many customers, you could sort them by Customer No., Currency Code, or Country Region Code to get the overview you need.
So is it possible to change the default sort order?
In this post, I would like to talk about how to set and change the default sort order of a page in Business Central.
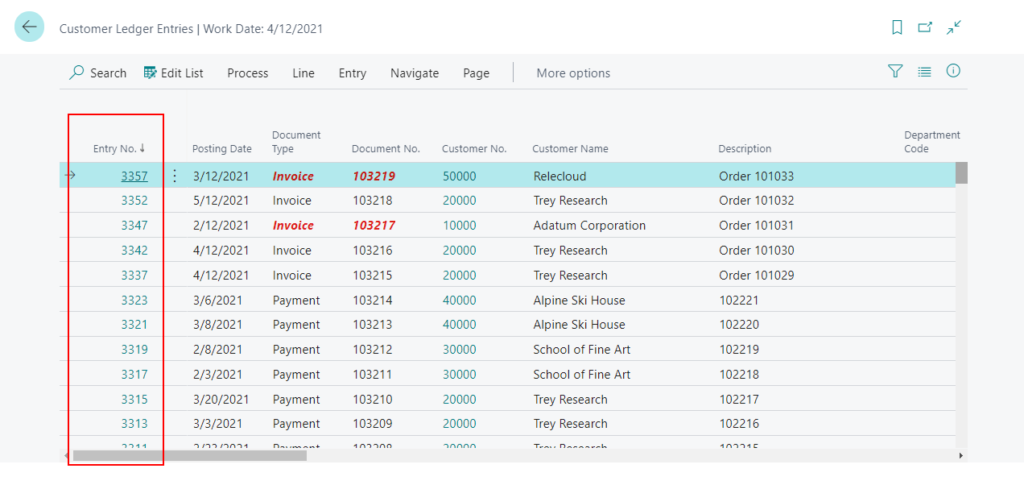
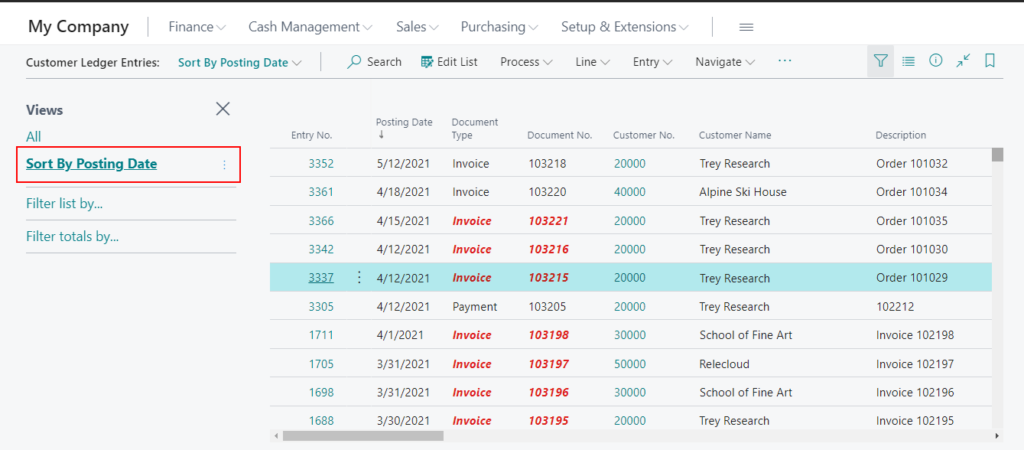
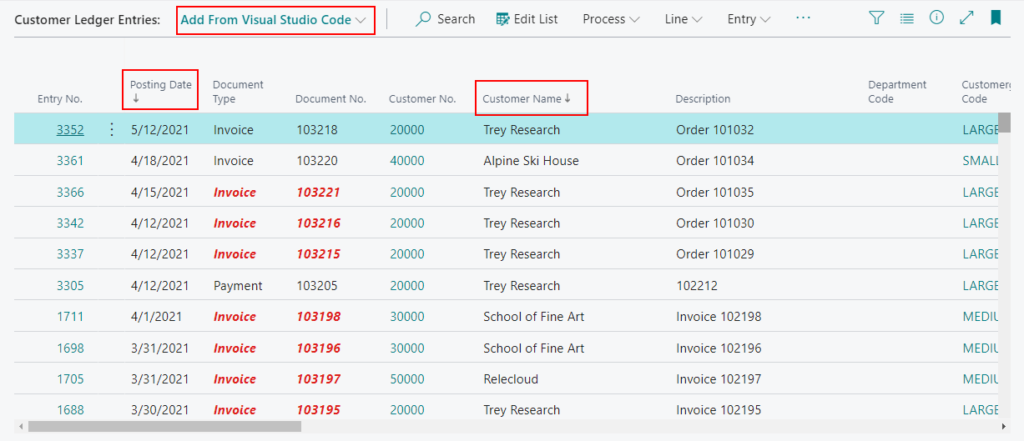
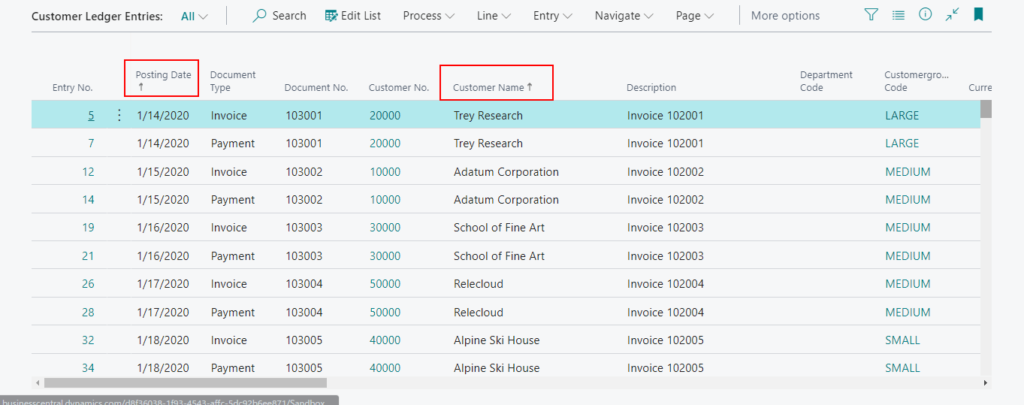
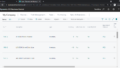
I would use the Customer Ledger Entries page as an example. As shown below, the Customer Ledger Entries page is sorted by “Entry No.” field by default.
If you look at the source code in Base Application, you will find that SourceTableView Property (Pages) is set in the Customer Ledger Entries page.
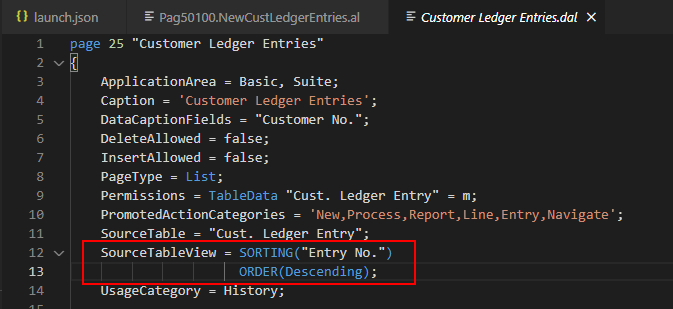
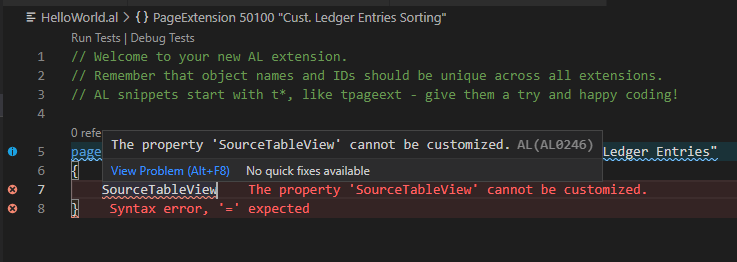
Please note that the SourceTableView Property (Pages) cannot be customized by page extension.
So if it’s a new page, you can set the default sort order in the same way. But what should we do for existing pages? Let’s see some simple methods next.
PS:
1. If the sorting key is not set in the page, table data will be displayed in the sort order defined by the primary key.
2. Sorting isn’t supported on images, BLOB fields, FlowFilters, and fields that do not belong to a table.
Save a list view (No Customization)
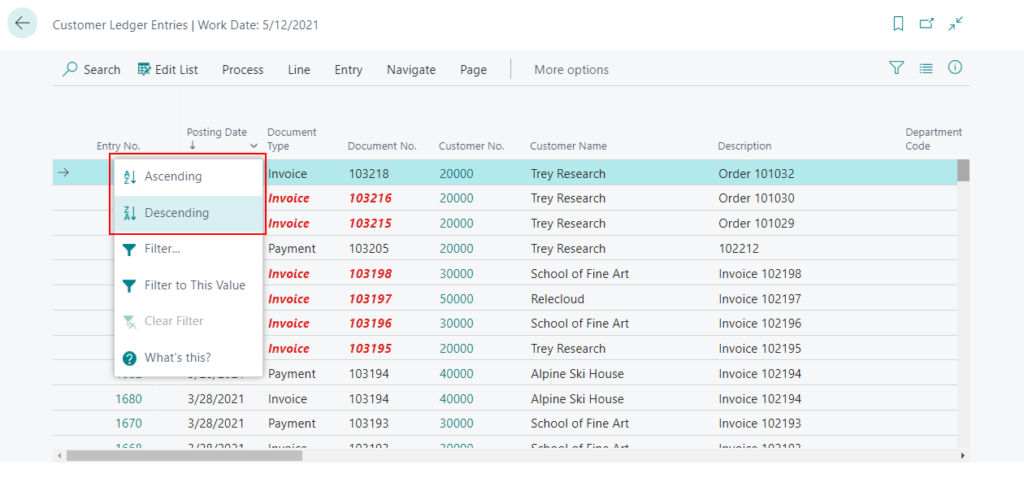
To sort a list in Business Central, you can either:
- Choose a column heading text to toggle between ascending and descending order
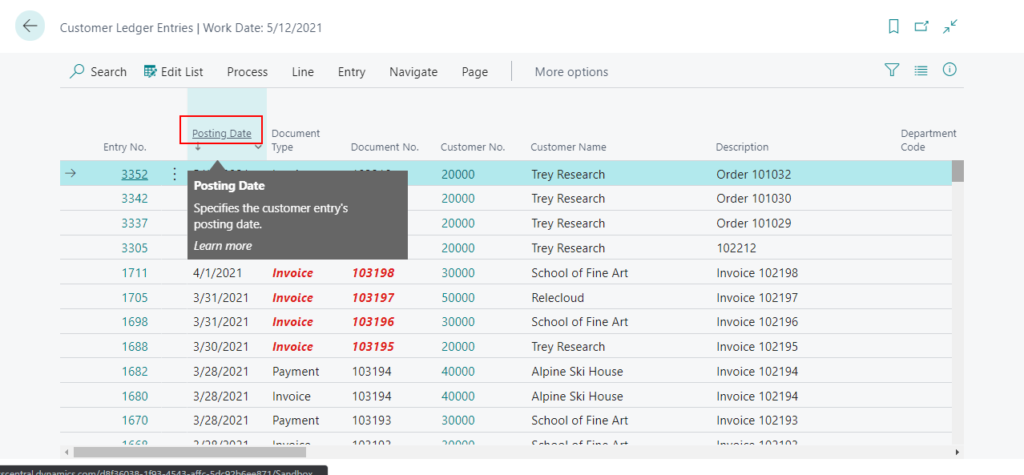
- Choose the drop-down arrow in the column heading or right-click the column, then choose the Ascending or Descending action.
Then select Show filter pane icon at the top of the list or press Shift+F3 to open the filter pane.
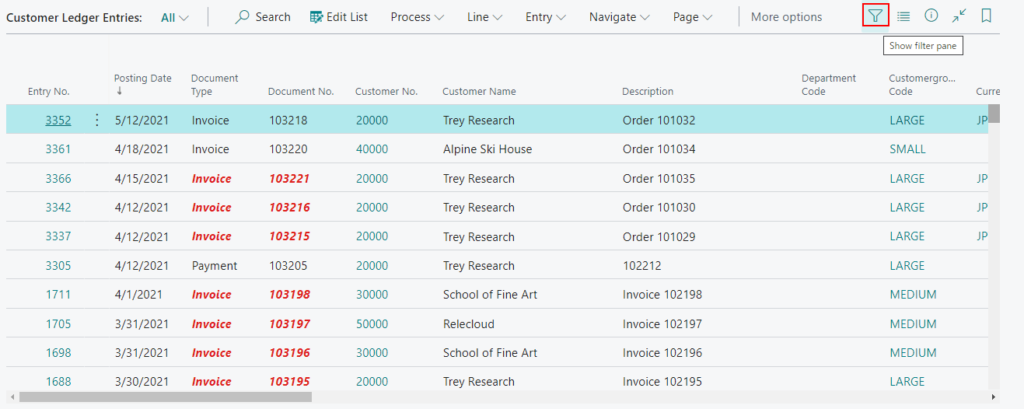
You can also set one or more new filters.
When you have set the sort and filters, choose Save as…
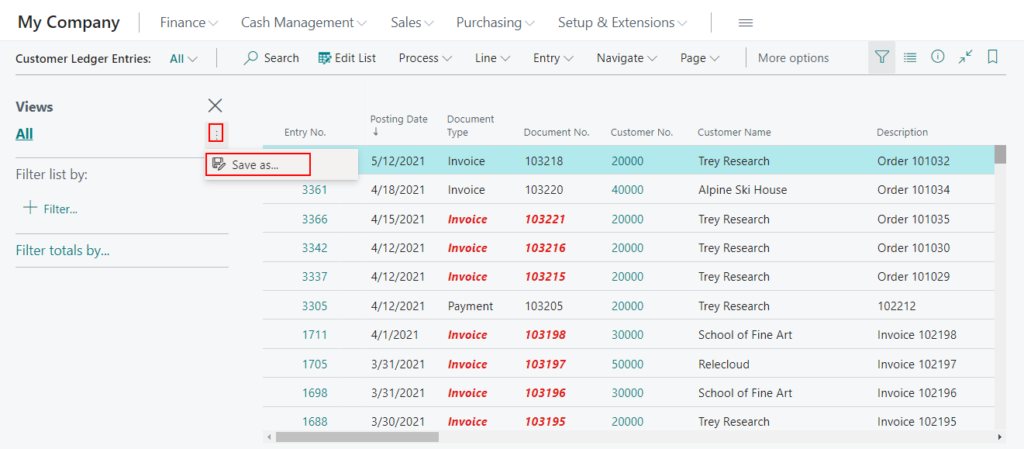
Enter a name for the view.
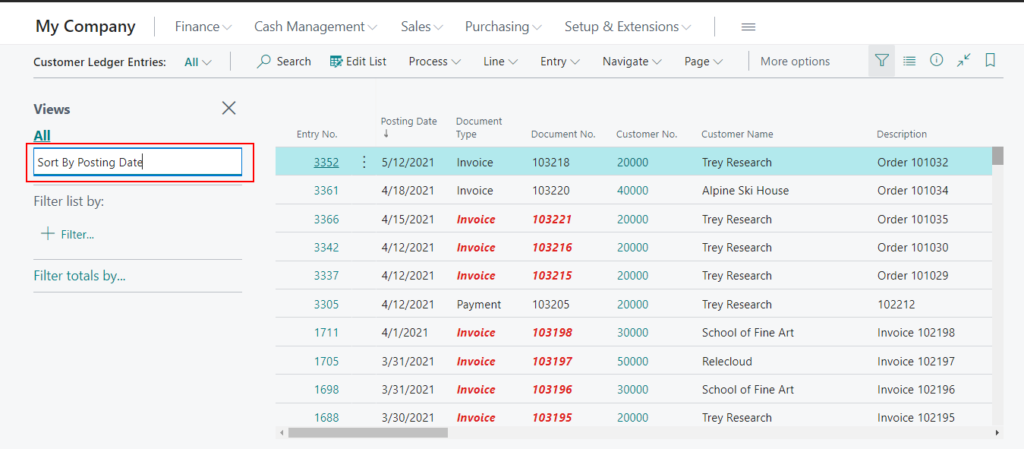
Then press the Enter key or move the cursor from the text box to accept the name.
Test video:
PS:
In NAV (Windows Client), you can hold down the shift key and choose the second column to sort on multiple columns.
For example:
Unfortunately, we cannot do this in the web client of Business Central. But don’t be discouraged, let’s look at the second method.
Use OrderBy Property (For new views)
In my previous blog, we have talked about how to create a new list view via VS Code.
For more details: How to create a new list view for all users
When you create a new list view in VS Code, you can add OrderBy Property.
OrderBy Property|Page View: Sorts table fields in the page view in ascending or descending order.
Note:
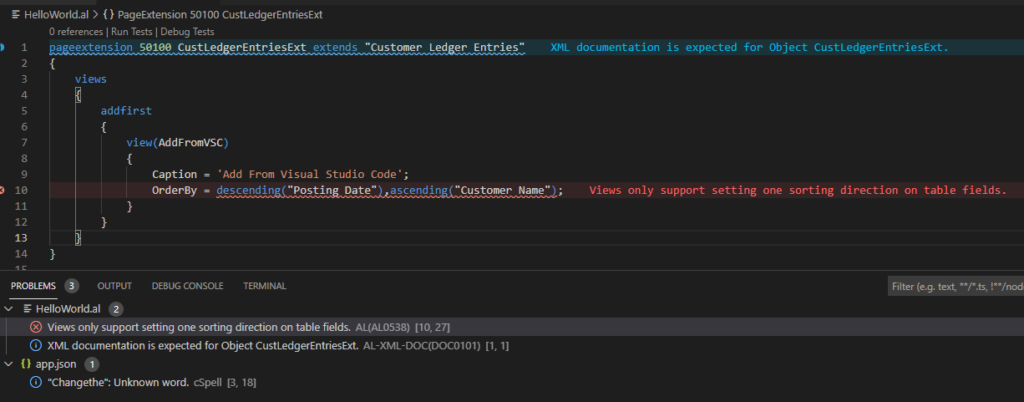
1. For page views you can only use one direction; either Ascending or Descending.
Views only support setting one sorting direction on table fields.
For Query you can sort on multiple columns, separate each column with a comma, like OrderBy = ascending (Name), descending (Quantity).
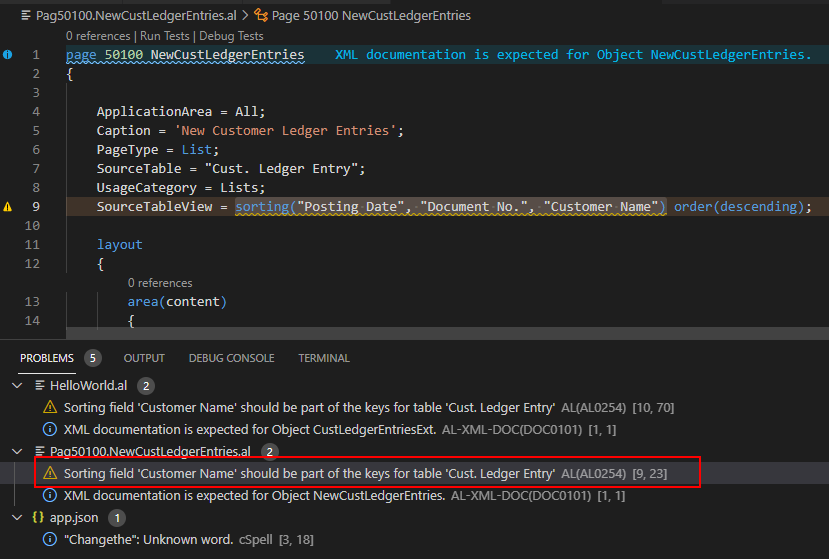
2. Warning: Sorting field should be part of the keys for the table. So it is recommended to create a new secondary key first.
Sorting field ‘Customer Name’ should be part of the keys for table ‘Cust. Ledger Entry’
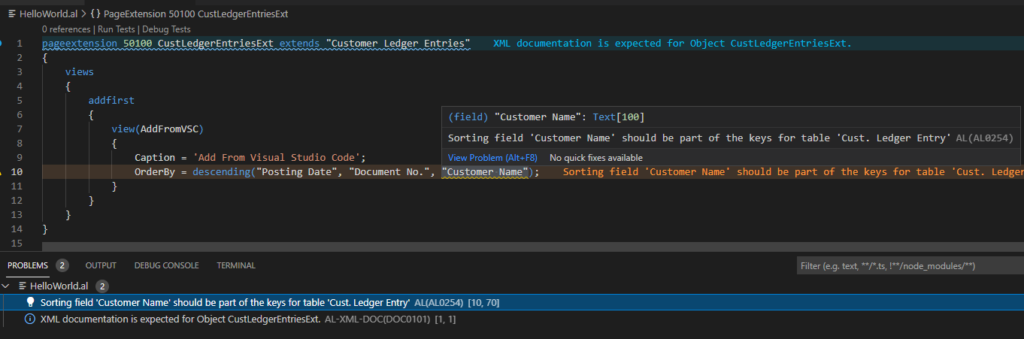
From BC18 onwards, you can add secondary key including the standard fields in a table extension.
For more details: Creating new keys in a tableextension with fields from the base table
Okay, let’s start.
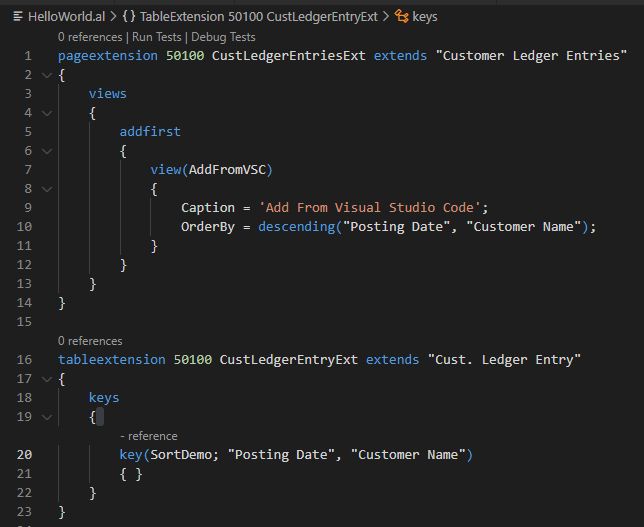
Source Code:
pageextension 50100 CustLedgerEntriesExt extends "Customer Ledger Entries"
{
    views
    {
        addfirst
        {
            view(AddFromVSC)
            {
                Caption = 'Add From Visual Studio Code';
                OrderBy = descending("Posting Date", "Customer Name");
            }
        }
    }
}

tableextension 50100 CustLedgerEntryExt extends "Cust. Ledger Entry"
{
    keys
    {
        key(SortDemo; "Posting Date", "Customer Name")
        { }
    }
}
Test:
Use SourceTableView Property (For new pages)
SourceTableView Property (Pages): Sets the key, sort order, and filter you want to use to determine the view of the source table presented to the user.
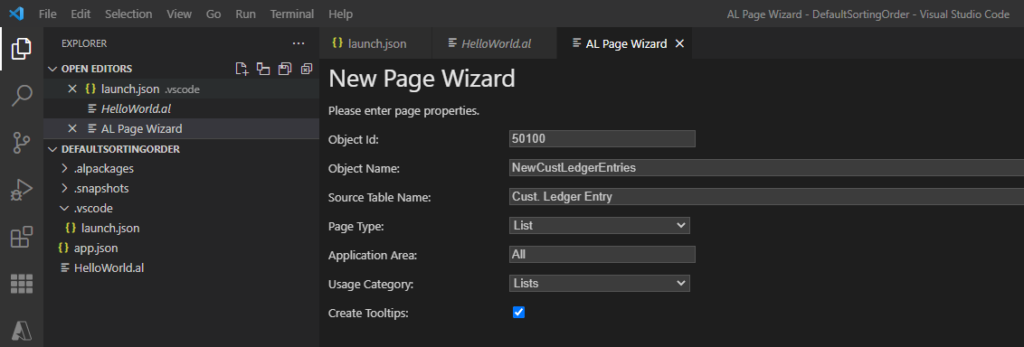
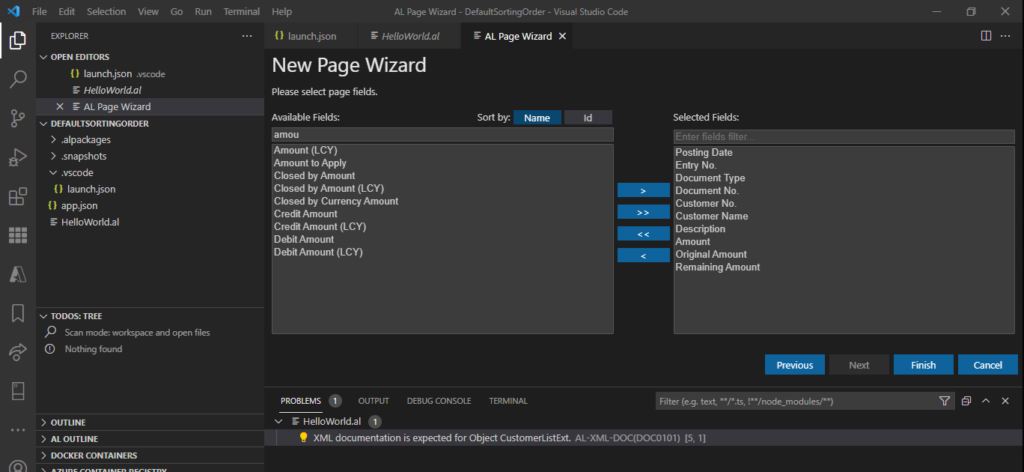
Create a new page.
Add SourceTableView Property to the page.
For example: SourceTableView = sorting(“Posting Date”, “Document No.”, “Customer Name”) order(descending);
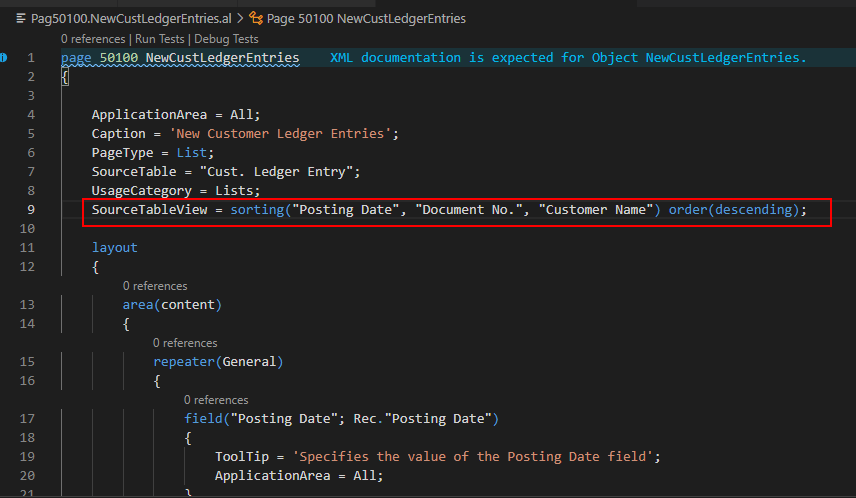
Note: Same as the above method
Warning: Sorting field should be part of the keys for the table. So it is recommended to create a new secondary key first.
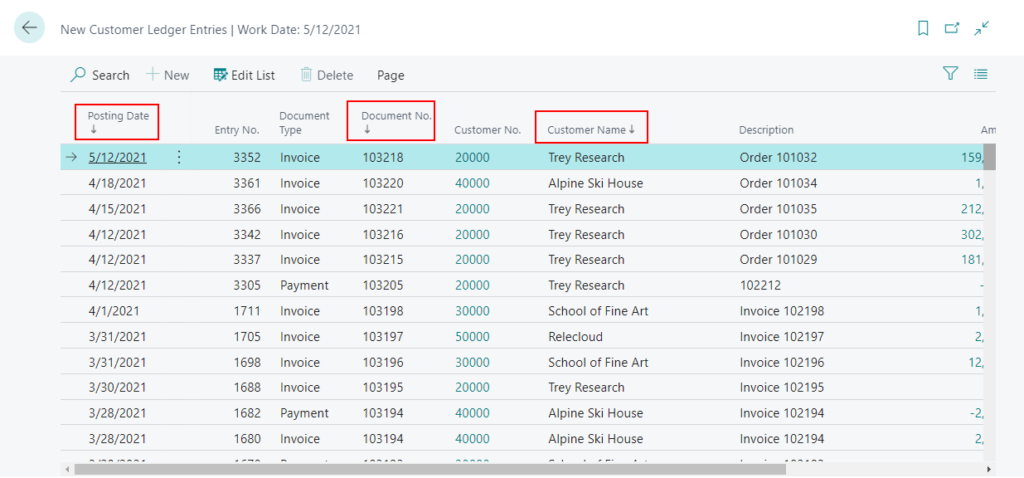
Source Code:
page 50100 NewCustLedgerEntries
{

    ApplicationArea = All;
    Caption = 'New Customer Ledger Entries';
    PageType = List;
    SourceTable = "Cust. Ledger Entry";
    UsageCategory = Lists;
    SourceTableView = sorting("Posting Date", "Document No.", "Customer Name") order(descending);

    layout
    {
        area(content)
        {
            repeater(General)
            {
                field("Posting Date"; Rec."Posting Date")
                {
                    ToolTip = 'Specifies the value of the Posting Date field';
                    ApplicationArea = All;
                }
                field("Entry No."; Rec."Entry No.")
                {
                    ToolTip = 'Specifies the value of the Entry No. field';
                    ApplicationArea = All;
                }
                field("Document Type"; Rec."Document Type")
                {
                    ToolTip = 'Specifies the value of the Document Type field';
                    ApplicationArea = All;
                }
                field("Document No."; Rec."Document No.")
                {
                    ToolTip = 'Specifies the value of the Document No. field';
                    ApplicationArea = All;
                }
                field("Customer No."; Rec."Customer No.")
                {
                    ToolTip = 'Specifies the value of the Customer No. field';
                    ApplicationArea = All;
                }
                field("Customer Name"; Rec."Customer Name")
                {
                    ToolTip = 'Specifies the value of the Customer Name field';
                    ApplicationArea = All;
                }
                field(Description; Rec.Description)
                {
                    ToolTip = 'Specifies the value of the Description field';
                    ApplicationArea = All;
                }
                field(Amount; Rec.Amount)
                {
                    ToolTip = 'Specifies the value of the Amount field';
                    ApplicationArea = All;
                }
                field("Original Amount"; Rec."Original Amount")
                {
                    ToolTip = 'Specifies the value of the Original Amount field';
                    ApplicationArea = All;
                }
                field("Remaining Amount"; Rec."Remaining Amount")
                {
                    ToolTip = 'Specifies the value of the Remaining Amount field';
                    ApplicationArea = All;
                }
            }
        }
    }

}


tableextension 50100 CustLedgerEntryExt extends "Cust. Ledger Entry"
{
    keys
    {
        key(SortDemo; "Posting Date", "Document No.", "Customer Name")
        { }
    }
}
Test video:
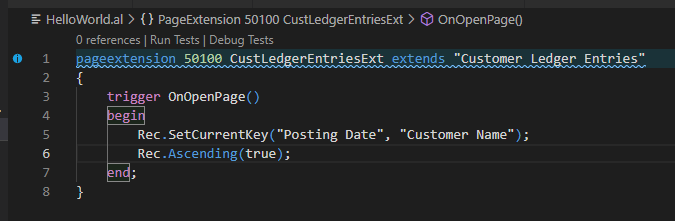
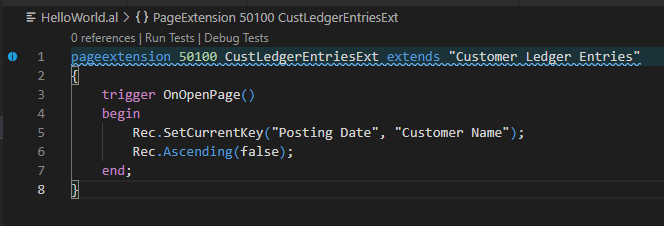
Use SetCurrentKey Method and Ascending Method
We can also use Record.SetCurrentKey Method and Record.Ascending Method in OnOpenPage (Page) Trigger.
Record.SetCurrentKey Method: Selects a key for a table.
Record.Ascending Method: Gets or sets the order in which the system searches through a table.
OnOpenPage (Page) Trigger: Runs after a page is initialized and run.
For example:
Record.Ascending(true)
pageextension 50100 CustLedgerEntriesExt extends "Customer Ledger Entries"
{
    trigger OnOpenPage()
    begin
        Rec.SetCurrentKey("Posting Date", "Customer Name");
        Rec.Ascending(true);
    end;
}
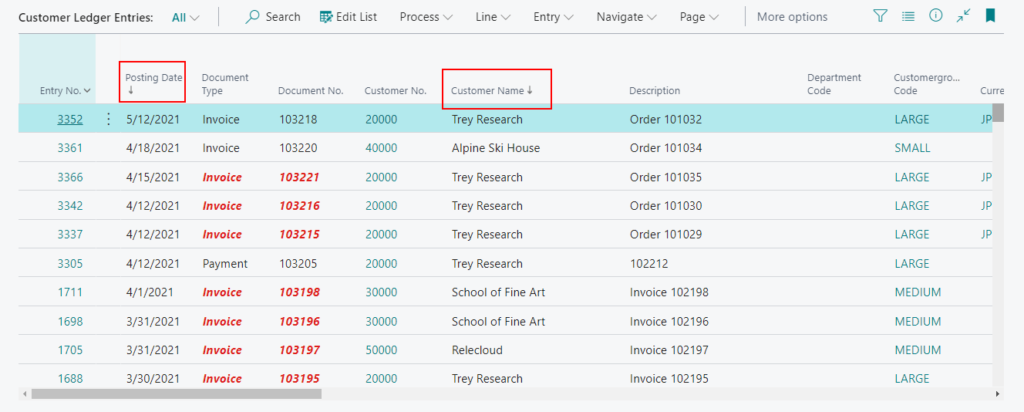
Record.Ascending(false)
pageextension 50100 CustLedgerEntriesExt extends "Customer Ledger Entries"
{
    trigger OnOpenPage()
    begin
        Rec.SetCurrentKey("Posting Date", "Customer Name");
        Rec.Ascending(false);
    end;
}
Other Tips
There are two other methods that can be used.
1. Record.SetAscending Method: Sets the sort order for the records returned. Use this method after you have set the keys to sort after, using SETCURRENTKEY. The default sort order is ascending. You can use SETASCENDING to change the sort order to descending for a specific field, while the other fields in the specified key are sorted in ascending order.
Remarks:
SetAscending is applicable to records that aren’t displayed in a page in the client. For example, you can read data from an ODATA web service where data is sorted in ascending order on one field and descending on another. When the records are shown in a page, the method has no effect.
For example:
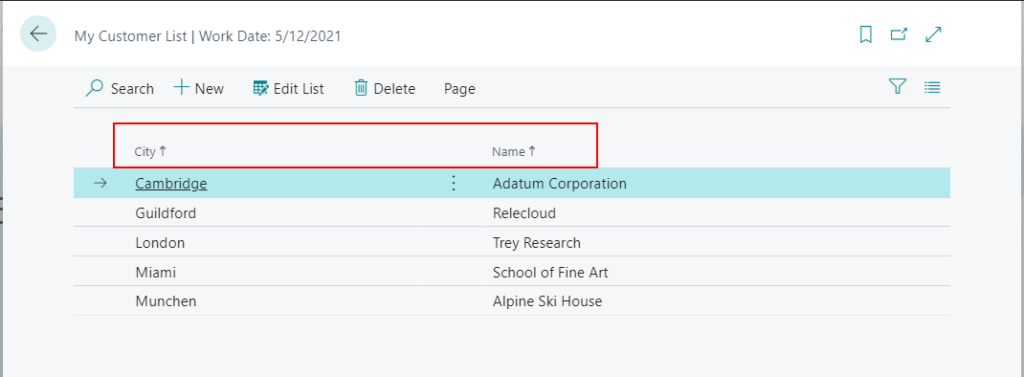
If you publish the page as a web service, and read the OData feed, you’ll see the records sorted in descending alphabetical order by city and ascending alphabetical order by name.

However, if you open the page in the client the city and name are both sorted in ascending order.
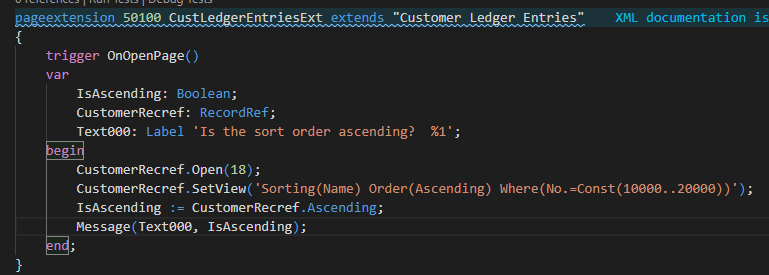
2. RecordRef.Ascending Method: Changes or checks the order in which a search through the table that is referred to by RecordRef will be performed.
For example:
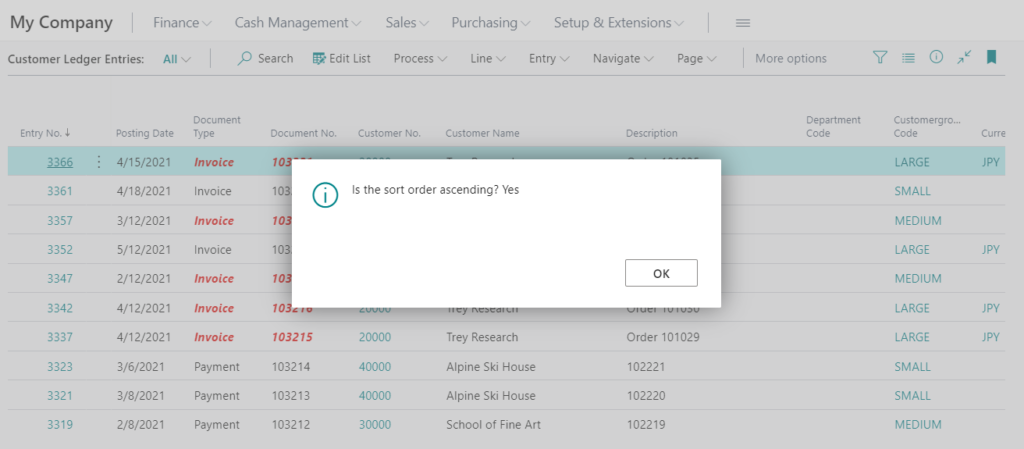
The following example opens table 18 (Customer) as a RecordRef variable that is named CustomerRecref. The SetView Method (RecordRef) sets a filter that includes sorting the data in ascending order. The Ascending method then checks whether the sort order is ascending, stores the return value in the IsAscending variable and displays True in a message box.
END
Hope this will help.
Thanks for reading.
ZHU
コメント