Hi, Readers.
Dynamics 365 Business Central 2022 wave 2 (BC21) is generally available. More details: Generally available: Dynamics 365 Business Central 2022 wave 2 (BC21)
I will continue to test and share some new features that I hope will be helpful.
Allow multiple Power BI charts to appear on Role Center:
Business value:
Having great visibility into your KPIs and data without leaving Business Central is essential for any organization. Enabling more complex visualizations using Power BI embedded in Business Central is bringing this capability closer to you.
https://learn.microsoft.com/en-us/dynamics365-release-plan/2022wave2/smb/dynamics365-business-central/allow-multiple-power-bi-charts-appear-role-center
In this version of Business Central, it’s possible to have multiple Power BI report parts embedded in a Role Center at the same time. All of these report parts can point to different Power BI reports, creating a comprehensive view of the customer’s business.
Note that although none of the built-in Role Centers takes advantage of this functionality as of today, you can easily create a new Role Center (or extend an existing one) to leverage it. We have a sample ready to install in your environment.
You find the sample in the BCTech area on GitHub at https://github.com/microsoft/BCTech/tree/master/samples/PowerBi/MultipleReportsOnRoleCenter.
The following information is extracted from MultipleReportsOnRoleCenter at master · microsoft/BCTech · GitHub.
Multiple Power BI reports on the Role Center
Since Microsoft Dynamics 365 Business Central version 2022 Wave 2 (21.0), it’s possible to have multiple Power BI reports embedded in a Role Center at the same time.
Even though none of the built-in Role Centers takes advantage of this functionality as of today, you can create a new Role Center (or extend an existing one) to leverage it.
f you worked with Power BI embedded into Business Central, you know reports have always been visualized inside a part (and will continue to be). This part can be hosted in a factbox (such as in page 31 "Item List"), in a Role Center part (such as in page 9022 "Business Manager Role Center"), or as part in a list or card page (such as in page 1156 "Company Detail").
These parts behave all in the same way: each part must be initialized with a context, which represents a keyword to identify the set of reports you want to visualize in that specific part. If no context is provided, the current user’s profile/role is used instead.
Until today, the way to specify a context for a Power BI part was to call some code from the main page (usually in the trigger OnOpenPage), for example:
page 50000 "Company Detail"
{
    layout
    {
        area(content)
        {
            group("Power BI")
            {
                part(PowerBIPartOne; "Power BI Embedded Report Part")
                {
                    ApplicationArea = All;
                }
            }
        }
    }

    trigger OnOpenPage()
    begin
        CurrPage.PowerBIPartOne.PAGE.SetPageContext('DetailedCompanyReports');
        // If you are using older versions, this might look like:
        // CurrPage.PowerBIPartOne.PAGE.SetContext('DetailedCompanyReports');
    end;
}
This has a few consequences:
- If you want to visualize the same set of reports in two different pages (for example, in both the List page and Card page for a certain record), you just need to use the same
contextfor the two pages, and the same reports will show up. - If you want to have two parts hosted in the same page, showing a different set of reports, you just need to use two different
context‘s for them. - Role Center pages have no triggers, which means no way to call the
SetPageContextfunction as in the snippet above. As a consequence, any Power BI part in the role center would have the samecontext: the current user’sprofile/role.
This is until Wave 2 2022 (21.0).
Since Wave 2 2022 (21.0), we added a small new feature that allows for different context‘s to be specified for different Role Center parts.
The way to achieve this is by using the SubPageView property. The following snippet is completely equivalent to the snippet above, and will show exactly the same reports (but, unlike the snippet above, this can be used in a Role Center as well).
page 50000 "Company Detail"
{
    layout
    {
        area(content)
        {
            group("Power BI")
            {
                part(PowerBIPartOne; "Power BI Embedded Report Part")
                {
                    ApplicationArea = All;
                    SubPageView = where(Context = const('DetailedCompanyReports'));
                }
            }
        }
    }
}
Notice, this is backwards compatible: if you selected some reports using the old way of specifying a context, you will see these same reports when specifying a context using the new way.
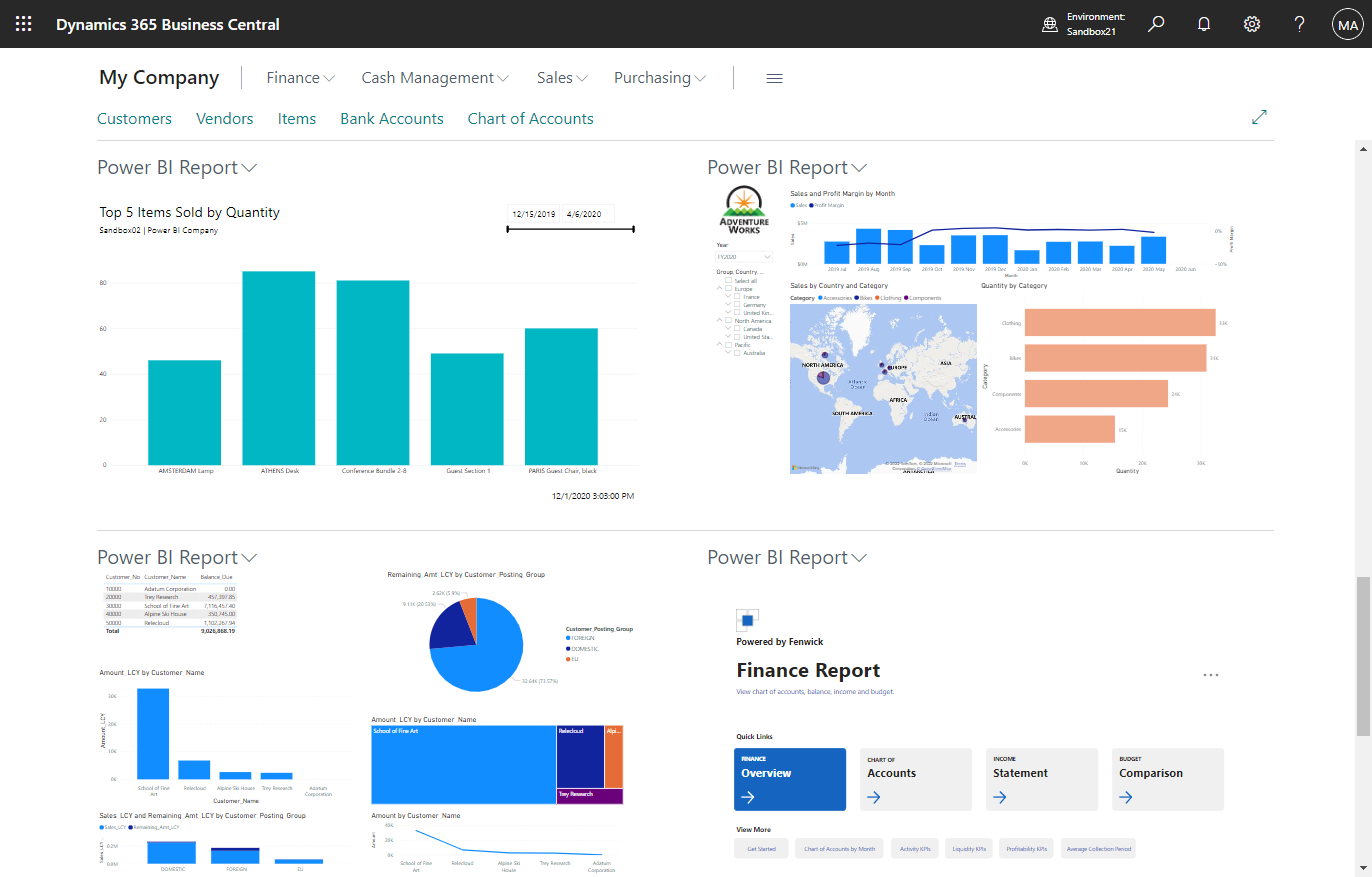
In this folder, you can find an example of the Business Manager Role Center adapted to host 4 different Power BI report parts (using different context‘s). More details: Link
There are currently some limitations on how the SubPageView property is handled.
- The
SubPageViewproperty for the Power BI parts only supports constant values, NOT filters. - If you use both ways of specifying a
contextat the same time, theSetPageContextvalue will overwrite the value specified in theSubPageViewproperty. - Dynamically changing the context (for example, by calling
SetPageContextin theOnAfterGetCurrRecord) is not fully supported and could lead to unexpected consequences.
END
In short, we can display multiple Power BI charts by adding the SubPageView property for “Power BI Embedded Report Part” since Wave 2 2022 (21.0).
Here are the key points:
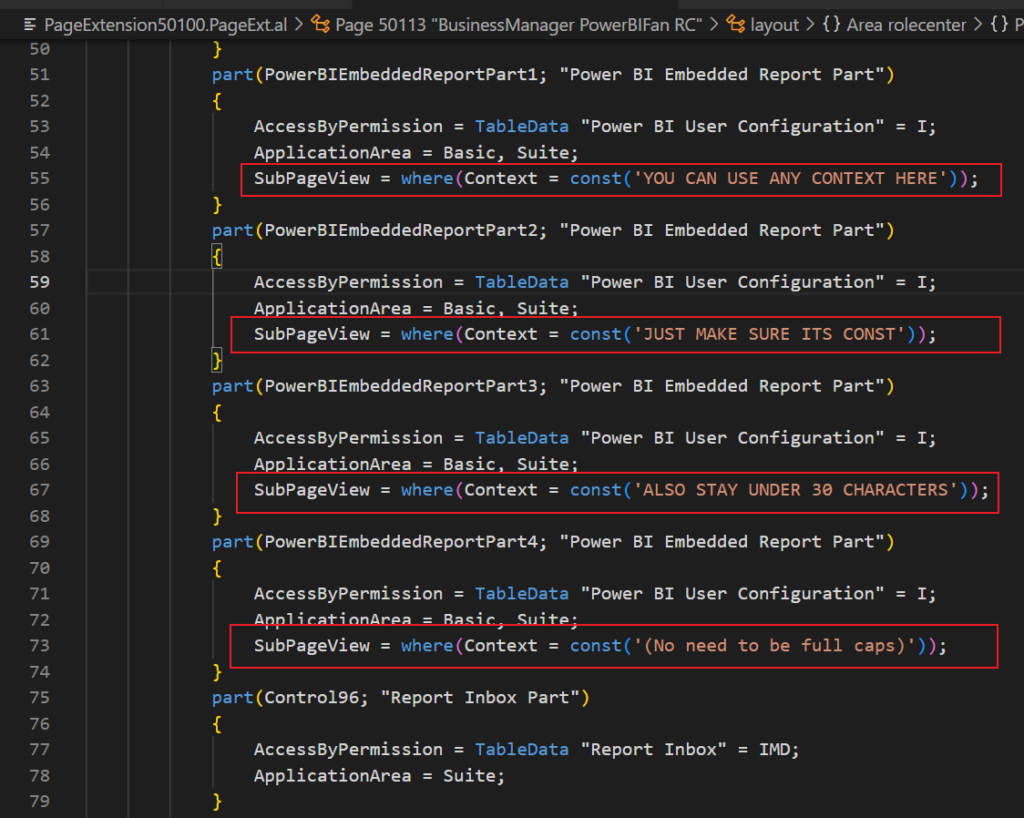
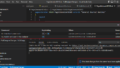
Code:
            part(PowerBIEmbeddedReportPart1; "Power BI Embedded Report Part")
            {
                AccessByPermission = TableData "Power BI User Configuration" = I;
                ApplicationArea = Basic, Suite;
                SubPageView = where(Context = const('YOU CAN USE ANY CONTEXT HERE'));
            }
            part(PowerBIEmbeddedReportPart2; "Power BI Embedded Report Part")
            {
                AccessByPermission = TableData "Power BI User Configuration" = I;
                ApplicationArea = Basic, Suite;
                SubPageView = where(Context = const('JUST MAKE SURE ITS CONST'));
            }
            part(PowerBIEmbeddedReportPart3; "Power BI Embedded Report Part")
            {
                AccessByPermission = TableData "Power BI User Configuration" = I;
                ApplicationArea = Basic, Suite;
                SubPageView = where(Context = const('ALSO STAY UNDER 30 CHARACTERS'));
            }
            part(PowerBIEmbeddedReportPart4; "Power BI Embedded Report Part")
            {
                AccessByPermission = TableData "Power BI User Configuration" = I;
                ApplicationArea = Basic, Suite;
                SubPageView = where(Context = const('(No need to be full caps)'));
            }
On the page:

You can try the following two examples. They all have the same result.
1. Built-in Role Center: Business Manager
Source Code:
pageextension 50111 MyExtension extends "Business Manager Role Center"
{
    layout
    {
        addafter(PowerBIEmbeddedReportPart)
        {
            part(PowerBIEmbeddedReportPart1; "Power BI Embedded Report Part")
            {
                AccessByPermission = TableData "Power BI User Configuration" = I;
                ApplicationArea = Basic, Suite;
                SubPageView = where(Context = const('YOU CAN USE ANY CONTEXT HERE'));
            }
            part(PowerBIEmbeddedReportPart2; "Power BI Embedded Report Part")
            {
                AccessByPermission = TableData "Power BI User Configuration" = I;
                ApplicationArea = Basic, Suite;
                SubPageView = where(Context = const('JUST MAKE SURE ITS CONST'));
            }
            part(PowerBIEmbeddedReportPart3; "Power BI Embedded Report Part")
            {
                AccessByPermission = TableData "Power BI User Configuration" = I;
                ApplicationArea = Basic, Suite;
                SubPageView = where(Context = const('ALSO STAY UNDER 30 CHARACTERS'));
            }
            part(PowerBIEmbeddedReportPart4; "Power BI Embedded Report Part")
            {
                AccessByPermission = TableData "Power BI User Configuration" = I;
                ApplicationArea = Basic, Suite;
                SubPageView = where(Context = const('(No need to be full caps)'));
            }
        }
    }
}
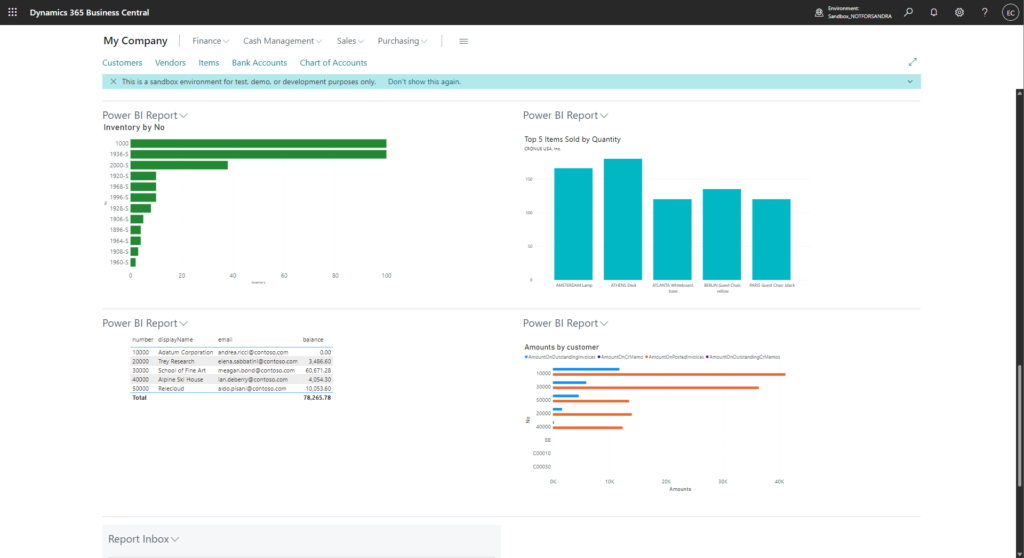
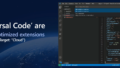
2. New Role Center: Provided by Microsoft.
Source Code:
profile ReportEnthusiast
{
Caption = 'Report Enthusiast';
RoleCenter = "BusinessManager PowerBIFan RC";
ProfileDescription = 'Report Enthusiast';
}
page 50113 "BusinessManager PowerBIFan RC"
{
Caption = 'Business Manager and Power BI Fan RoleCenter';
PageType = RoleCenter;
layout
{
area(rolecenter)
{
part(Control139; "Headline RC Business Manager")
{
ApplicationArea = Basic, Suite;
}
part(Control16; "O365 Activities")
{
AccessByPermission = TableData "Activities Cue" = I;
ApplicationArea = Basic, Suite;
}
part("User Tasks Activities"; "User Tasks Activities")
{
ApplicationArea = Suite;
}
part("Emails"; "Email Activities")
{
ApplicationArea = Basic, Suite;
}
part(ApprovalsActivities; "Approvals Activities")
{
ApplicationArea = Suite;
}
part(Control46; "Team Member Activities No Msgs")
{
ApplicationArea = Suite;
}
part("Favorite Accounts"; "My Accounts")
{
ApplicationArea = Basic, Suite;
Caption = 'Favorite Accounts';
}
part(Control9; "Trial Balance")
{
AccessByPermission = TableData "G/L Entry" = R;
ApplicationArea = Basic, Suite;
}
part(PowerBIEmbeddedReportPart1; "Power BI Embedded Report Part")
{
AccessByPermission = TableData "Power BI User Configuration" = I;
ApplicationArea = Basic, Suite;
SubPageView = where(Context = const('YOU CAN USE ANY CONTEXT HERE'));
}
part(PowerBIEmbeddedReportPart2; "Power BI Embedded Report Part")
{
AccessByPermission = TableData "Power BI User Configuration" = I;
ApplicationArea = Basic, Suite;
SubPageView = where(Context = const('JUST MAKE SURE ITS CONST'));
}
part(PowerBIEmbeddedReportPart3; "Power BI Embedded Report Part")
{
AccessByPermission = TableData "Power BI User Configuration" = I;
ApplicationArea = Basic, Suite;
SubPageView = where(Context = const('ALSO STAY UNDER 30 CHARACTERS'));
}
part(PowerBIEmbeddedReportPart4; "Power BI Embedded Report Part")
{
AccessByPermission = TableData "Power BI User Configuration" = I;
ApplicationArea = Basic, Suite;
SubPageView = where(Context = const('(No need to be full caps)'));
}
part(Control96; "Report Inbox Part")
{
AccessByPermission = TableData "Report Inbox" = IMD;
ApplicationArea = Suite;
}
systempart(MyNotes; MyNotes)
{
ApplicationArea = Basic, Suite;
}
}
}
actions
{
area(creation)
{
action("Sales Quote")
{
AccessByPermission = TableData "Sales Header" = IMD;
ApplicationArea = Basic, Suite;
Caption = 'Sales Quote';
Image = NewSalesQuote;
RunObject = Page "Sales Quote";
RunPageMode = Create;
ToolTip = 'Offer items or services to a customer.';
}
action("Sales Order")
{
AccessByPermission = TableData "Sales Header" = IMD;
ApplicationArea = Basic, Suite;
Caption = 'Sales Order';
Image = NewOrder;
RunObject = Page "Sales Order";
RunPageMode = Create;
ToolTip = 'Create a new sales order for items or services.';
}
action("Sales Invoice")
{
AccessByPermission = TableData "Sales Header" = IMD;
ApplicationArea = Basic, Suite;
Caption = 'Sales Invoice';
Image = NewSalesInvoice;
RunObject = Page "Sales Invoice";
RunPageMode = Create;
ToolTip = 'Create a new invoice for the sales of items or services. Invoice quantities cannot be posted partially.';
}
action("Purchase Quote")
{
AccessByPermission = TableData "Purchase Header" = IMD;
ApplicationArea = Suite;
Caption = 'Purchase Quote';
Image = NewSalesQuote;
RunObject = Page "Purchase Quote";
RunPageMode = Create;
ToolTip = 'Create a new purchase quote.';
}
action("<Page Purchase Order>")
{
AccessByPermission = TableData "Purchase Header" = IMD;
ApplicationArea = Suite;
Caption = 'Purchase Order';
Image = NewOrder;
RunObject = Page "Purchase Order";
RunPageMode = Create;
ToolTip = 'Create a new purchase order.';
}
action("Purchase Invoice")
{
AccessByPermission = TableData "Purchase Header" = IMD;
ApplicationArea = Basic, Suite;
Caption = 'Purchase Invoice';
Image = NewPurchaseInvoice;
RunObject = Page "Purchase Invoice";
RunPageMode = Create;
ToolTip = 'Create a purchase invoice to mirror a sales document sent by a vendor.';
}
}
area(processing)
{
action("Navigate")
{
ApplicationArea = Basic, Suite;
Caption = 'Find entries...';
Image = Navigate;
RunObject = Page Navigate;
ShortCutKey = 'Ctrl+Alt+Q';
ToolTip = 'Find entries and documents that exist for the document number and posting date on the selected document. (Formerly this action was named Navigate.)';
}
group(New)
{
Caption = 'New';
Image = New;
action(Customer)
{
AccessByPermission = TableData Customer = IMD;
ApplicationArea = Basic, Suite;
Caption = 'Customer';
Image = Customer;
RunObject = Page "Customer Card";
RunPageMode = Create;
ToolTip = 'Register a new customer.';
}
action(Vendor)
{
AccessByPermission = TableData Vendor = IMD;
ApplicationArea = Basic, Suite;
Caption = 'Vendor';
Image = Vendor;
RunObject = Page "Vendor Card";
RunPageMode = Create;
ToolTip = 'Register a new vendor.';
}
}
group(Payments)
{
Caption = 'Payments';
action("Payment Reconciliation Journals")
{
ApplicationArea = Basic, Suite;
Caption = 'Reconcile Imported Payments';
Image = ApplyEntries;
RunObject = Codeunit "Pmt. Rec. Journals Launcher";
ToolTip = 'Reconcile your bank account by importing transactions and applying them, automatically or manually, to open customer ledger entries, open vendor ledger entries, or open bank account ledger entries.';
}
action("Import Bank Transactions")
{
AccessByPermission = TableData "Bank Export/Import Setup" = IMD;
ApplicationArea = Basic, Suite;
Caption = 'Import Bank Transactions...';
Image = Import;
RunObject = Codeunit "Pmt. Rec. Jnl. Import Trans.";
ToolTip = 'To start the process of reconciling new payments, import a bank feed or electronic file containing the related bank transactions.';
}
action("Register Customer Payments")
{
AccessByPermission = TableData "Payment Registration Setup" = IMD;
ApplicationArea = Basic, Suite;
Caption = 'Register Customer Payments';
Image = Payment;
RunObject = Page "Payment Registration";
ToolTip = 'Process your customer payments by matching amounts received on your bank account with the related unpaid sales invoices, and then post the payments.';
}
action("Create Vendor Payments")
{
ApplicationArea = Basic, Suite;
Caption = 'Create Vendor Payments';
Image = SuggestVendorPayments;
RunObject = Page "Vendor Ledger Entries";
RunPageView = WHERE("Document Type" = FILTER(Invoice),
"Remaining Amount" = FILTER(< 0),
"Applies-to ID" = FILTER(''));
ToolTip = 'Opens vendor ledger entries for all vendors with invoices that have not been paid yet.';
}
}
group(Reports)
{
Caption = 'Reports';
group("Financial Statements")
{
Caption = 'Financial Statements';
Image = ReferenceData;
action("Balance Sheet")
{
ApplicationArea = Basic, Suite;
Caption = 'Balance Sheet';
Image = "Report";
RunObject = Report "Balance Sheet";
ToolTip = 'View your company''s assets, liabilities, and equity.';
}
action("Income Statement")
{
ApplicationArea = Basic, Suite;
Caption = 'Income Statement';
Image = "Report";
RunObject = Report "Income Statement";
ToolTip = 'View your company''s income and expenses.';
}
action("Statement of Cash Flows")
{
ApplicationArea = Basic, Suite;
Caption = 'Statement of Cash Flows';
Image = "Report";
RunObject = Report "Statement of Cashflows";
ToolTip = 'View a financial statement that shows how changes in balance sheet accounts and income affect the company''s cash holdings, displayed for operating, investing, and financing activities respectively.';
}
action("Statement of Retained Earnings")
{
ApplicationArea = Basic, Suite;
Caption = 'Statement of Retained Earnings';
Image = "Report";
RunObject = Report "Retained Earnings Statement";
ToolTip = 'View a report that shows your company''s changes in retained earnings for a specified period by reconciling the beginning and ending retained earnings for the period, using information such as net income from the other financial statements.';
}
action("Sales Taxes Collected")
{
ApplicationArea = SalesTax;
Caption = 'Sales Taxes Collected';
Image = "Report";
RunObject = Report "Sales Taxes Collected";
ToolTip = 'View a report that shows the sales taxes that have been collected on behalf of the authorities.';
}
}
}
}
area(reporting)
{
group("Excel Reports")
{
Caption = 'Excel Reports';
Image = Excel;
action(ExcelTemplatesBalanceSheet)
{
ApplicationArea = Basic, Suite;
Caption = 'Balance Sheet';
Image = "Report";
RunObject = Codeunit "Run Template Balance Sheet";
ToolTip = 'Open a spreadsheet that shows your company''s assets, liabilities, and equity.';
}
action(ExcelTemplateIncomeStmt)
{
ApplicationArea = Basic, Suite;
Caption = 'Income Statement';
Image = "Report";
RunObject = Codeunit "Run Template Income Stmt.";
ToolTip = 'Open a spreadsheet that shows your company''s income and expenses.';
}
action(ExcelTemplateCashFlowStmt)
{
ApplicationArea = Basic, Suite;
Caption = 'Cash Flow Statement';
Image = "Report";
RunObject = Codeunit "Run Template CashFlow Stmt.";
ToolTip = 'Open a spreadsheet that shows how changes in balance sheet accounts and income affect the company''s cash holdings.';
}
action(ExcelTemplateRetainedEarn)
{
ApplicationArea = Basic, Suite;
Caption = 'Retained Earnings Statement';
Image = "Report";
RunObject = Codeunit "Run Template Retained Earn.";
ToolTip = 'Open a spreadsheet that shows your company''s changes in retained earnings based on net income from the other financial statements.';
}
action(ExcelTemplateTrialBalance)
{
ApplicationArea = Basic, Suite;
Caption = 'Trial Balance';
Image = "Report";
RunObject = Codeunit "Run Template Trial Balance";
ToolTip = 'Open a spreadsheet that shows a summary trial balance by account.';
}
action(ExcelTemplateAgedAccPay)
{
ApplicationArea = Basic, Suite;
Caption = 'Aged Accounts Payable';
Image = "Report";
RunObject = Codeunit "Run Template Aged Acc. Pay.";
ToolTip = 'Open a spreadsheet that shows a list of aged remaining balances for each vendor by period.';
}
action(ExcelTemplateAgedAccRec)
{
ApplicationArea = Basic, Suite;
Caption = 'Aged Accounts Receivable';
Image = "Report";
RunObject = Codeunit "Run Template Aged Acc. Rec.";
ToolTip = 'Open a spreadsheet that shows when customer payments are due or overdue by period.';
}
}
}
area(embedding)
{
ToolTip = 'Manage your business. See KPIs, trial balance, and favorite customers.';
action(Customers)
{
ApplicationArea = Basic, Suite;
Caption = 'Customers';
RunObject = Page "Customer List";
ToolTip = 'View or edit detailed information for the customers that you trade with. From each customer card, you can open related information, such as sales statistics and ongoing orders, and you can define special prices and line discounts that you grant if certain conditions are met.';
}
action(Vendors)
{
ApplicationArea = Basic, Suite;
Caption = 'Vendors';
RunObject = Page "Vendor List";
ToolTip = 'View or edit detailed information for the vendors that you trade with. From each vendor card, you can open related information, such as purchase statistics and ongoing orders, and you can define special prices and line discounts that the vendor grants you if certain conditions are met.';
}
action(Items)
{
ApplicationArea = Basic, Suite;
Caption = 'Items';
RunObject = Page "Item List";
ToolTip = 'View or edit detailed information for the products that you trade in. The item card can be of type Inventory or Service to specify if the item is a physical unit or a labor time unit. Here you also define if items in inventory or on incoming orders are automatically reserved for outbound documents and whether order tracking links are created between demand and supply to reflect planning actions.';
}
action("Bank Accounts")
{
ApplicationArea = Basic, Suite;
Caption = 'Bank Accounts';
Image = BankAccount;
RunObject = Page "Bank Account List";
ToolTip = 'View or set up detailed information about your bank account, such as which currency to use, the format of bank files that you import and export as electronic payments, and the numbering of checks.';
}
action("Chart of Accounts")
{
ApplicationArea = Basic, Suite;
Caption = 'Chart of Accounts';
RunObject = Page "Chart of Accounts";
ToolTip = 'View or organize the general ledger accounts that store your financial data. All values from business transactions or internal adjustments end up in designated G/L accounts. Business Central includes a standard chart of accounts that is ready to support businesses in your country, but you can change the default accounts and add new ones.';
}
}
area(sections)
{
group(Action39)
{
Caption = 'Finance';
Image = Journals;
ToolTip = 'Post financial transactions, manage budgets, analyze G/L data, and prepare financial statements.';
action(GeneralJournals)
{
ApplicationArea = Basic, Suite;
Caption = 'General Journals';
Image = Journal;
RunObject = Page "General Journal Batches";
RunPageView = WHERE("Template Type" = CONST(General),
Recurring = CONST(false));
ToolTip = 'Post financial transactions directly to general ledger accounts and other accounts, such as bank, customer, vendor, and employee accounts. Posting with a general journal always creates entries on general ledger accounts. This is true even when, for example, you post a journal line to a customer account, because an entry is posted to a general ledger receivables account through a posting group.';
}
action(Action3)
{
ApplicationArea = Basic, Suite;
Caption = 'Chart of Accounts';
RunObject = Page "Chart of Accounts";
ToolTip = 'View or organize the general ledger accounts that store your financial data. All values from business transactions or internal adjustments end up in designated G/L accounts. Business Central includes a standard chart of accounts that is ready to support businesses in your country, but you can change the default accounts and add new ones.';
}
action("G/L Account Categories")
{
ApplicationArea = Basic, Suite;
Caption = 'G/L Account Categories';
RunObject = Page "G/L Account Categories";
ToolTip = 'Personalize the structure of your financial statements by mapping general ledger accounts to account categories. You can create category groups by indenting subcategories under them. Each grouping shows a total balance. When you choose the Generate Account Schedules action, the account schedules for the underlying financial reports are updated. The next time you run one of these reports, such as the balance statement, new totals and subentries are added, based on your changes.';
}
action("G/L Budgets")
{
ApplicationArea = Suite;
Caption = 'G/L Budgets';
RunObject = Page "G/L Budget Names";
ToolTip = 'View summary information about the amount budgeted for each general ledger account in different time periods.';
}
action(Action62)
{
ApplicationArea = FixedAssets;
Caption = 'Fixed Assets';
RunObject = Page "Fixed Asset List";
ToolTip = 'Manage periodic depreciation of your machinery or machines, keep track of your maintenance costs, manage insurance policies related to fixed assets, and monitor fixed asset statistics.';
}
action("Account Schedules")
{
ApplicationArea = Basic, Suite;
Caption = 'Financial Reporting';
RunObject = Page "Financial Reports";
ToolTip = 'Get insight into the financial data stored in your chart of accounts. Financial reports analyze figures in G/L accounts, and compare general ledger entries with general ledger budget entries. For example, you can view the general ledger entries as percentages of the budget entries. Financial reports provide the data for core financial statements and views, such as the Cash Flow chart.';
}
action("Intrastat Journals")
{
ApplicationArea = BasicEU;
Caption = 'Intrastat Journals';
RunObject = Page "Intrastat Jnl. Batches";
ToolTip = 'Summarize the value of your purchases and sales with business partners in the EU for statistical purposes and prepare to send it to the relevant authority.';
}
action("Sales Budgets")
{
ApplicationArea = SalesBudget;
Caption = 'Sales Budgets';
RunObject = Page "Budget Names Sales";
ToolTip = 'Enter item sales values of type amount, quantity, or cost for expected item sales in different time periods. You can create sales budgets by items, customers, customer groups, or other dimensions in your business. The resulting sales budgets can be reviewed here or they can be used in comparisons with actual sales data in sales analysis reports.';
}
action("Purchase Budgets")
{
ApplicationArea = PurchaseBudget;
Caption = 'Purchase Budgets';
RunObject = Page "Budget Names Purchase";
ToolTip = 'Enter item purchases values of type amount, quantity, or cost for expected item purchases in different time periods. You can create purchase budgets by items, vendors, vendor groups, or other dimensions in your business. The resulting purchase budgets can be reviewed here or they can be used in comparisons with actual purchases data in purchase analysis reports.';
}
action("Sales Analysis Reports")
{
ApplicationArea = SalesAnalysis;
Caption = 'Sales Analysis Reports';
RunObject = Page "Analysis Report Sale";
ToolTip = 'Analyze the dynamics of your sales according to key sales performance indicators that you select, for example, sales turnover in both amounts and quantities, contribution margin, or progress of actual sales against the budget. You can also use the report to analyze your average sales prices and evaluate the sales performance of your sales force.';
}
action("Purchase Analysis Reports")
{
ApplicationArea = PurchaseAnalysis;
Caption = 'Purchase Analysis Reports';
RunObject = Page "Analysis Report Purchase";
ToolTip = 'Analyze the dynamics of your purchase volumes. You can also use the report to analyze your vendors'' performance and purchase prices.';
}
action("Inventory Analysis Reports")
{
ApplicationArea = InventoryAnalysis;
Caption = 'Inventory Analysis Reports';
RunObject = Page "Analysis Report Inventory";
ToolTip = 'Analyze the dynamics of your inventory according to key performance indicators that you select, for example inventory turnover. You can also use the report to analyze your inventory costs, in terms of direct and indirect costs, as well as the value and quantities of your different types of inventory.';
}
action("VAT Returns")
{
ApplicationArea = VAT;
Caption = 'VAT Returns';
RunObject = Page "VAT Report List";
ToolTip = 'Prepare the VAT Return report so you can submit VAT amounts to a tax authority.';
}
action(Currencies)
{
ApplicationArea = Suite;
Caption = 'Currencies';
Image = Currency;
RunObject = Page Currencies;
ToolTip = 'View the different currencies that you trade in or update the exchange rates by getting the latest rates from an external service provider.';
}
action(Employees)
{
ApplicationArea = BasicHR;
Caption = 'Employees';
RunObject = Page "Employee List";
ToolTip = 'View or modify employees'' details and related information, such as qualifications and pictures, or register and analyze employee absence. Keeping up-to-date records about your employees simplifies personnel tasks. For example, if an employee''s address changes, you register this on the employee card.';
}
action("VAT Statements")
{
ApplicationArea = VAT;
Caption = 'VAT Statements';
RunObject = Page "VAT Statement Names";
ToolTip = 'View a statement of posted VAT amounts, calculate your VAT settlement amount for a certain period, such as a quarter, and prepare to send the settlement to the tax authorities.';
}
action(Dimensions)
{
ApplicationArea = Suite;
Caption = 'Dimensions';
RunObject = Page Dimensions;
ToolTip = 'View or edit dimensions, such as area, project, or department, that you can assign to sales and purchase documents to distribute costs and analyze transaction history.';
}
action(PostedGeneralJournals)
{
ApplicationArea = Basic, Suite;
Caption = 'Posted General Journals';
RunObject = Page "Posted General Journal";
ToolTip = 'Open the list of posted general journal lines.';
}
}
group("Cash Management")
{
Caption = 'Cash Management';
ToolTip = 'Process incoming and outgoing payments. Set up bank accounts and service connections for electronic banking.';
action("Cash Flow Forecasts")
{
ApplicationArea = Basic, Suite;
Caption = 'Cash Flow Forecasts';
RunObject = Page "Cash Flow Forecast List";
ToolTip = 'Combine various financial data sources to find out when a cash surplus or deficit might happen or whether you should pay down debt, or borrow to meet upcoming expenses.';
}
action("Chart of Cash Flow Accounts")
{
ApplicationArea = Basic, Suite;
Caption = 'Chart of Cash Flow Accounts';
RunObject = Page "Chart of Cash Flow Accounts";
ToolTip = 'View a chart contain a graphical representation of one or more cash flow accounts and one or more cash flow setups for the included general ledger, purchase, sales, services, or fixed assets accounts.';
}
action("Cash Flow Manual Revenues")
{
ApplicationArea = Basic, Suite;
Caption = 'Cash Flow Manual Revenues';
RunObject = Page "Cash Flow Manual Revenues";
ToolTip = 'Record manual revenues, such as rental income, interest from financial assets, or new private capital to be used in cash flow forecasting.';
}
action("Cash Flow Manual Expenses")
{
ApplicationArea = Basic, Suite;
Caption = 'Cash Flow Manual Expenses';
RunObject = Page "Cash Flow Manual Expenses";
ToolTip = 'Record manual expenses, such as salaries, interest on credit, or planned investments to be used in cash flow forecasting.';
}
action(CashReceiptJournals)
{
ApplicationArea = Basic, Suite;
Caption = 'Cash Receipt Journals';
Image = Journals;
RunObject = Page "General Journal Batches";
RunPageView = WHERE("Template Type" = CONST("Cash Receipts"),
Recurring = CONST(false));
ToolTip = 'Register received payments by manually applying them to the related customer, vendor, or bank ledger entries. Then, post the payments to G/L accounts and thereby close the related ledger entries.';
}
action(PaymentJournals)
{
ApplicationArea = Basic, Suite;
Caption = 'Payment Journals';
Image = Journals;
RunObject = Page "General Journal Batches";
RunPageView = WHERE("Template Type" = CONST(Payments),
Recurring = CONST(false));
ToolTip = 'Register payments to vendors. A payment journal is a type of general journal that is used to post outgoing payment transactions to G/L, bank, customer, vendor, employee, and fixed assets accounts. The Suggest Vendor Payments functions automatically fills the journal with payments that are due. When payments are posted, you can export the payments to a bank file for upload to your bank if your system is set up for electronic banking. You can also issue computer checks from the payment journal.';
}
action(Action23)
{
ApplicationArea = Basic, Suite;
Caption = 'Bank Accounts';
Image = BankAccount;
RunObject = Page "Bank Account List";
ToolTip = 'View or set up detailed information about your bank account, such as which currency to use, the format of bank files that you import and export as electronic payments, and the numbering of checks.';
}
action("Bank Acc. Statements")
{
ApplicationArea = Basic, Suite;
Caption = 'Bank Acc. Statements';
Image = BankAccountStatement;
RunObject = Page "Bank Account Statement List";
ToolTip = 'View statements for selected bank accounts. For each bank transaction, the report shows a description, an applied amount, a statement amount, and other information.';
}
action("Payment Recon. Journals")
{
ApplicationArea = Basic, Suite;
Caption = 'Payment Recon. Journals';
Image = ApplyEntries;
RunObject = Page "Pmt. Reconciliation Journals";
ToolTip = 'Reconcile unpaid documents automatically with their related bank transactions by importing a bank statement feed or file. In the payment reconciliation journal, incoming or outgoing payments on your bank are automatically, or semi-automatically, applied to their related open customer or vendor ledger entries. Any open bank account ledger entries related to the applied customer or vendor ledger entries will be closed when you choose the Post Payments and Reconcile Bank Account action. This means that the bank account is automatically reconciled for payments that you post with the journal.';
}
action("Direct Debit Collections")
{
ApplicationArea = Basic, Suite;
Caption = 'Direct Debit Collections';
RunObject = Page "Direct Debit Collections";
ToolTip = 'Instruct your bank to withdraw payment amounts from your customer''s bank account and transfer them to your company''s account. A direct debit collection holds information about the customer''s bank account, the affected sales invoices, and the customer''s agreement, the so-called direct-debit mandate. From the resulting direct-debit collection entry, you can then export an XML file that you send or upload to your bank for processing.';
}
action("Payment Terms")
{
ApplicationArea = Basic, Suite;
Caption = 'Payment Terms';
Image = Payment;
RunObject = Page "Payment Terms";
ToolTip = 'Set up the payment terms that you select from on customer cards to define when the customer must pay, such as within 14 days.';
}
action(Deposits)
{
ApplicationArea = Basic, Suite;
Caption = 'Bank Deposits';
RunObject = codeunit "Open Deposits Page";
ToolTip = 'Manage bank deposits to your bank accounts.';
}
action(BankAccountReconciliations)
{
ApplicationArea = Basic, Suite;
Caption = 'Bank Account Reconciliations';
Image = BankAccountRec;
RunObject = Page "Bank Acc. Reconciliation List";
ToolTip = 'Reconcile bank accounts in your system with bank statements received from your bank.';
}
}
group(Action40)
{
Caption = 'Sales';
Image = Sales;
ToolTip = 'Make quotes, orders, and credit memos to customers. Manage customers and view transaction history.';
action(Sales_CustomerList)
{
ApplicationArea = Basic, Suite;
Caption = 'Customers';
RunObject = Page "Customer List";
ToolTip = 'View or edit detailed information for the customers that you trade with. From each customer card, you can open related information, such as sales statistics and ongoing orders, and you can define special prices and line discounts that you grant if certain conditions are met.';
}
action(Action129)
{
ApplicationArea = Basic, Suite;
Caption = 'Items';
RunObject = Page "Item List";
ToolTip = 'View or edit detailed information for the products that you trade in. The item card can be of type Inventory or Service to specify if the item is a physical unit or a labor time unit.';
}
action("Item Charges")
{
ApplicationArea = Suite;
Caption = 'Item Charges';
RunObject = Page "Item Charges";
ToolTip = 'View or edit the codes for item charges that you can assign to purchase and sales transactions to include any added costs, such as freight, physical handling, and insurance that you incur when purchasing or selling items. This is important to ensure correct inventory valuation. For purchases, the landed cost of a purchased item consists of the vendor''s purchase price and all additional direct item charges that can be assigned to individual receipts or return shipments. For sales, knowing the cost of shipping sold items can be as vital to your company as knowing the landed cost of purchased items.';
}
action("Sales Quotes")
{
ApplicationArea = Basic, Suite;
Caption = 'Sales Quotes';
RunObject = Page "Sales Quotes";
ToolTip = 'Make offers to customers to sell certain products on certain delivery and payment terms. While you negotiate with a customer, you can change and resend the sales quote as much as needed. When the customer accepts the offer, you convert the sales quote to a sales invoice or a sales order in which you process the sale.';
}
action("Sales Orders")
{
ApplicationArea = Basic, Suite;
Caption = 'Sales Orders';
RunObject = Page "Sales Order List";
ToolTip = 'Record your agreements with customers to sell certain products on certain delivery and payment terms. Sales orders, unlike sales invoices, allow you to ship partially, deliver directly from your vendor to your customer, initiate warehouse handling, and print various customer-facing documents. Sales invoicing is integrated in the sales order process.';
}
action("Blanket Sales Orders")
{
ApplicationArea = Suite;
Caption = 'Blanket Sales Orders';
Image = Reminder;
RunObject = Page "Blanket Sales Orders";
ToolTip = 'Use blanket sales orders as a framework for a long-term agreement between you and your customers to sell large quantities that are to be delivered in several smaller shipments over a certain period of time. Blanket orders often cover only one item with predetermined delivery dates. The main reason for using a blanket order rather than a sales order is that quantities entered on a blanket order do not affect item availability and thus can be used as a worksheet for monitoring, forecasting, and planning purposes..';
}
action("Sales Invoices")
{
ApplicationArea = Basic, Suite;
Caption = 'Sales Invoices';
RunObject = Page "Sales Invoice List";
ToolTip = 'Register your sales to customers and invite them to pay according to the delivery and payment terms by sending them a sales invoice document. Posting a sales invoice registers shipment and records an open receivable entry on the customer''s account, which will be closed when payment is received. To manage the shipment process, use sales orders, in which sales invoicing is integrated.';
}
action("Sales Credit Memos")
{
ApplicationArea = Basic, Suite;
Caption = 'Sales Credit Memos';
RunObject = Page "Sales Credit Memos";
ToolTip = 'Revert the financial transactions involved when your customers want to cancel a purchase or return incorrect or damaged items that you sent to them and received payment for. To include the correct information, you can create the sales credit memo from the related posted sales invoice or you can create a new sales credit memo with copied invoice information. If you need more control of the sales return process, such as warehouse documents for the physical handling, use sales return orders, in which sales credit memos are integrated. Note: If an erroneous sale has not been paid yet, you can simply cancel the posted sales invoice to automatically revert the financial transaction.';
}
action("Sales Return Orders")
{
ApplicationArea = SalesReturnOrder;
Caption = 'Sales Return Orders';
RunObject = Page "Sales Return Order List";
ToolTip = 'Compensate your customers for incorrect or damaged items that you sent to them and received payment for. Sales return orders support warehouse documents for the item handling, the ability to return items from multiple sales documents with one return, and automatic creation of related sales credit memos or other return-related documents, such as a replacement sales order.';
}
action(Reminders)
{
ApplicationArea = Suite;
Caption = 'Reminders';
Image = Reminder;
RunObject = Page "Reminder List";
ToolTip = 'Remind customers about overdue amounts based on reminder terms and the related reminder levels. Each reminder level includes rules about when the reminder will be issued in relation to the invoice due date or the date of the previous reminder and whether interests are added. Reminders are integrated with finance charge memos, which are documents informing customers of interests or other money penalties for payment delays.';
}
action("Finance Charge Memos")
{
ApplicationArea = Suite;
Caption = 'Finance Charge Memos';
Image = FinChargeMemo;
RunObject = Page "Finance Charge Memo List";
ToolTip = 'Send finance charge memos to customers with delayed payments, typically following a reminder process. Finance charges are calculated automatically and added to the overdue amounts on the customer''s account according to the specified finance charge terms and penalty/interest amounts.';
}
action("Posted Sales Invoices")
{
ApplicationArea = Basic, Suite;
Caption = 'Posted Sales Invoices';
RunObject = Page "Posted Sales Invoices";
ToolTip = 'Open the list of posted sales invoices.';
}
action("Posted Sales Credit Memos")
{
ApplicationArea = Basic, Suite;
Caption = 'Posted Sales Credit Memos';
RunObject = Page "Posted Sales Credit Memos";
ToolTip = 'Open the list of posted sales credit memos.';
}
action("Posted Sales Return Receipts")
{
ApplicationArea = SalesReturnOrder;
Caption = 'Posted Sales Return Receipts';
RunObject = Page "Posted Return Receipts";
ToolTip = 'Open the list of posted sales return receipts.';
}
action("Issued Reminders")
{
ApplicationArea = Suite;
Caption = 'Issued Reminders';
Image = OrderReminder;
RunObject = Page "Issued Reminder List";
ToolTip = 'View the list of issued reminders.';
}
action("Issued Finance Charge Memos")
{
ApplicationArea = Suite;
Caption = 'Issued Finance Charge Memos';
Image = PostedMemo;
RunObject = Page "Issued Fin. Charge Memo List";
ToolTip = 'View the list of issued finance charge memos.';
}
}
group(Action41)
{
Caption = 'Purchasing';
Image = AdministrationSalesPurchases;
ToolTip = 'Manage purchase invoices and credit memos. Maintain vendors and their history.';
action(Purchase_VendorList)
{
ApplicationArea = Basic, Suite;
Caption = 'Vendors';
RunObject = Page "Vendor List";
ToolTip = 'View or edit detailed information for the vendors that you trade with. From each vendor card, you can open related information, such as purchase statistics and ongoing orders, and you can define special prices and line discounts that the vendor grants you if certain conditions are met.';
}
action("Incoming Documents")
{
ApplicationArea = Basic, Suite;
Caption = 'Incoming Documents';
Gesture = None;
RunObject = Page "Incoming Documents";
ToolTip = 'Handle incoming documents, such as vendor invoices in PDF or as image files, that you can manually or automatically convert to document records, such as purchase invoices. The external files that represent incoming documents can be attached at any process stage, including to posted documents and to the resulting vendor, customer, and general ledger entries.';
}
action(Action131)
{
ApplicationArea = Suite;
Caption = 'Item Charges';
RunObject = Page "Item Charges";
ToolTip = 'View or edit the codes for item charges that you can assign to purchase and sales transactions to include any added costs, such as freight, physical handling, and insurance that you incur when purchasing or selling items. This is important to ensure correct inventory valuation. For purchases, the landed cost of a purchased item consists of the vendor''s purchase price and all additional direct item charges that can be assigned to individual receipts or return shipments. For sales, knowing the cost of shipping sold items can be as vital to your company as knowing the landed cost of purchased items.';
}
action("Purchase Quotes")
{
ApplicationArea = Suite;
Caption = 'Purchase Quotes';
RunObject = Page "Purchase Quotes";
ToolTip = 'Create purchase quotes to represent your request for quotes from vendors. Quotes can be converted to purchase orders.';
}
action("<Page Purchase Orders>")
{
ApplicationArea = Suite;
Caption = 'Purchase Orders';
RunObject = Page "Purchase Order List";
ToolTip = 'Create purchase orders to mirror sales documents that vendors send to you. This enables you to record the cost of purchases and to track accounts payable. Posting purchase orders dynamically updates inventory levels so that you can minimize inventory costs and provide better customer service. Purchase orders allow partial receipts, unlike with purchase invoices, and enable drop shipment directly from your vendor to your customer. Purchase orders can be created automatically from PDF or image files from your vendors by using the Incoming Documents feature.';
}
action("Blanket Purchase Orders")
{
ApplicationArea = Suite;
Caption = 'Blanket Purchase Orders';
RunObject = Page "Blanket Purchase Orders";
ToolTip = 'Use blanket purchase orders as a framework for a long-term agreement between you and your vendors to buy large quantities that are to be delivered in several smaller shipments over a certain period of time. Blanket orders often cover only one item with predetermined delivery dates. The main reason for using a blanket order rather than a purchase order is that quantities entered on a blanket order do not affect item availability and thus can be used as a worksheet for monitoring, forecasting, and planning purposes.';
}
action("<Page Purchase Invoices>")
{
ApplicationArea = Basic, Suite;
Caption = 'Purchase Invoices';
RunObject = Page "Purchase Invoices";
ToolTip = 'Create purchase invoices to mirror sales documents that vendors send to you. This enables you to record the cost of purchases and to track accounts payable. Posting purchase invoices dynamically updates inventory levels so that you can minimize inventory costs and provide better customer service. Purchase invoices can be created automatically from PDF or image files from your vendors by using the Incoming Documents feature.';
}
action("<Page Purchase Credit Memos>")
{
ApplicationArea = Basic, Suite;
Caption = 'Purchase Credit Memos';
RunObject = Page "Purchase Credit Memos";
ToolTip = 'Create purchase credit memos to mirror sales credit memos that vendors send to you for incorrect or damaged items that you have paid for and then returned to the vendor. If you need more control of the purchase return process, such as warehouse documents for the physical handling, use purchase return orders, in which purchase credit memos are integrated. Purchase credit memos can be created automatically from PDF or image files from your vendors by using the Incoming Documents feature. Note: If you have not yet paid for an erroneous purchase, you can simply cancel the posted purchase invoice to automatically revert the financial transaction.';
}
action("Purchase Return Orders")
{
ApplicationArea = SalesReturnOrder;
Caption = 'Purchase Return Orders';
RunObject = Page "Purchase Return Order List";
ToolTip = 'Create purchase return orders to mirror sales return documents that vendors send to you for incorrect or damaged items that you have paid for and then returned to the vendor. Purchase return orders enable you to ship back items from multiple purchase documents with one purchase return and support warehouse documents for the item handling. Purchase return orders can be created automatically from PDF or image files from your vendors by using the Incoming Documents feature. Note: If you have not yet paid for an erroneous purchase, you can simply cancel the posted purchase invoice to automatically revert the financial transaction.';
}
action("<Page Posted Purchase Invoices>")
{
ApplicationArea = Basic, Suite;
Caption = 'Posted Purchase Invoices';
RunObject = Page "Posted Purchase Invoices";
ToolTip = 'Open the list of posted purchase invoices.';
}
action("<Page Posted Purchase Credit Memos>")
{
ApplicationArea = Basic, Suite;
Caption = 'Posted Purchase Credit Memos';
RunObject = Page "Posted Purchase Credit Memos";
ToolTip = 'Open the list of posted purchase credit memos.';
}
action("<Page Posted Purchase Receipts>")
{
ApplicationArea = Suite;
Caption = 'Posted Purchase Receipts';
RunObject = Page "Posted Purchase Receipts";
ToolTip = 'Open the list of posted purchase receipts.';
}
action("Posted Purchase Return Shipments")
{
ApplicationArea = SalesReturnOrder;
Caption = 'Posted Purchase Return Shipments';
RunObject = Page "Posted Return Shipments";
ToolTip = 'Open the list of posted purchase return shipments.';
}
}
}
}
}At the end, after my testing, it is possible to add multiple Power BI charts not only on the Role Center but also on other pages.
For example, Customer List (22, List)
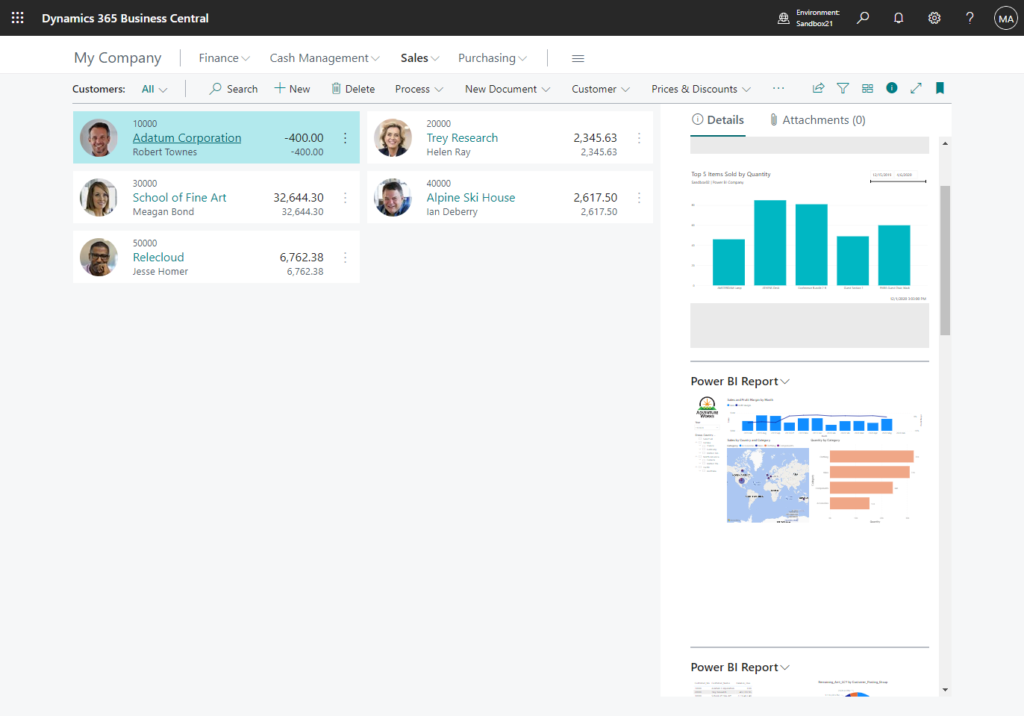
Source Code:
pageextension 50112 MyExtension3 extends "Customer List"
{
    layout
    {
        addafter(PowerBIEmbeddedReportPart)
        {
            part(PowerBIEmbeddedReportPart1; "Power BI Embedded Report Part")
            {
                AccessByPermission = TableData "Power BI User Configuration" = I;
                ApplicationArea = Basic, Suite;
                SubPageView = where(Context = const('YOU CAN USE ANY CONTEXT HERE'));
            }
            part(PowerBIEmbeddedReportPart2; "Power BI Embedded Report Part")
            {
                AccessByPermission = TableData "Power BI User Configuration" = I;
                ApplicationArea = Basic, Suite;
                SubPageView = where(Context = const('JUST MAKE SURE ITS CONST'));
            }
            part(PowerBIEmbeddedReportPart3; "Power BI Embedded Report Part")
            {
                AccessByPermission = TableData "Power BI User Configuration" = I;
                ApplicationArea = Basic, Suite;
                SubPageView = where(Context = const('ALSO STAY UNDER 30 CHARACTERS'));
            }
            part(PowerBIEmbeddedReportPart4; "Power BI Embedded Report Part")
            {
                AccessByPermission = TableData "Power BI User Configuration" = I;
                ApplicationArea = Basic, Suite;
                SubPageView = where(Context = const('(No need to be full caps)'));
            }
        }
    }
}
Give it a try!!!😁
END
Hope this will help.
Thanks for reading.
ZHU
コメント