Hello everyone.
As you know, dimensions are a very powerful feature in Business Central. To make it simpler to perform analysis on documents such as sales orders, you can use dimensions. Dimensions are attributes and values that categorize entries so you can track and analyze them. For example, dimensions can indicate the project or department an entry came from.
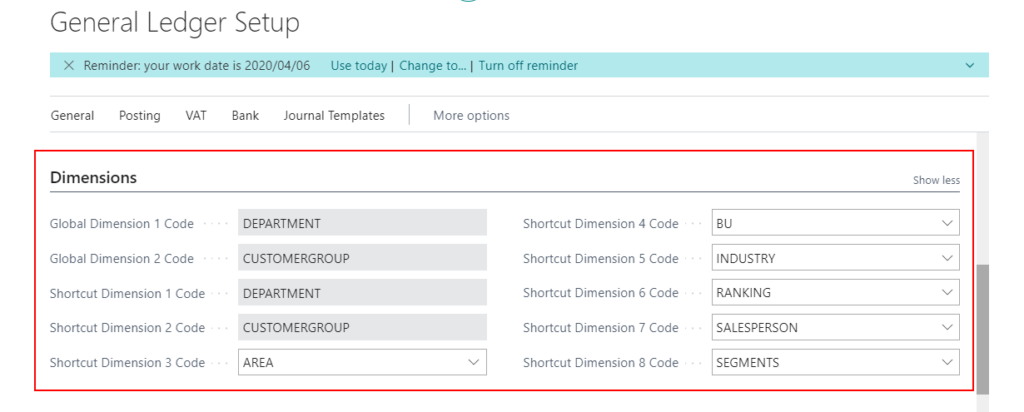
There is no limit to the number of dimensions, but there are 8 dimensions that are easy to analyze in the Business Central.
You can set them on “General Ledger Setup” page.
PS: Requied
Global Dimension 1 Code = Shortcut Dimension 1 Code
Global Dimension 2 Code = Shortcut Dimension 2 Code
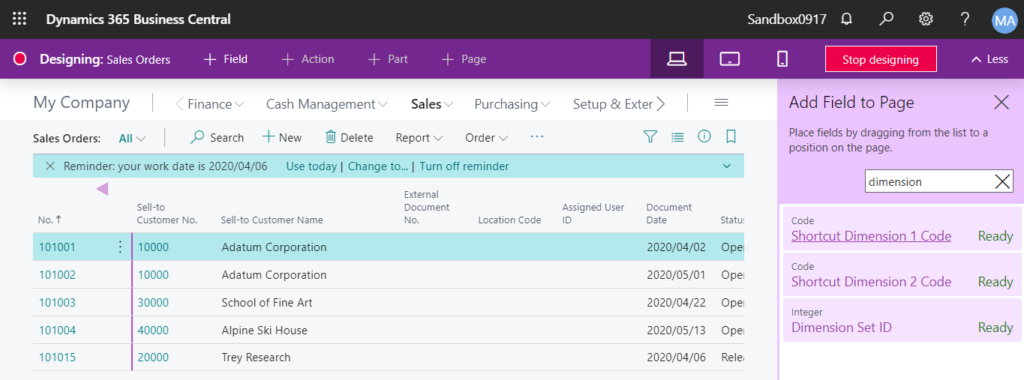
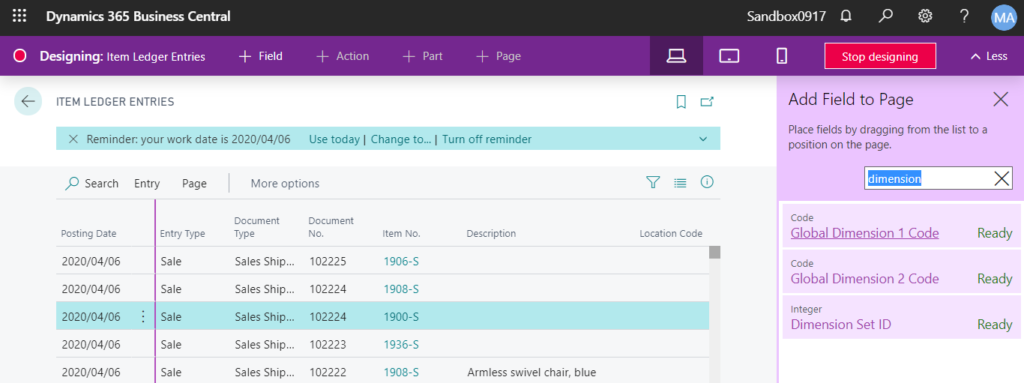
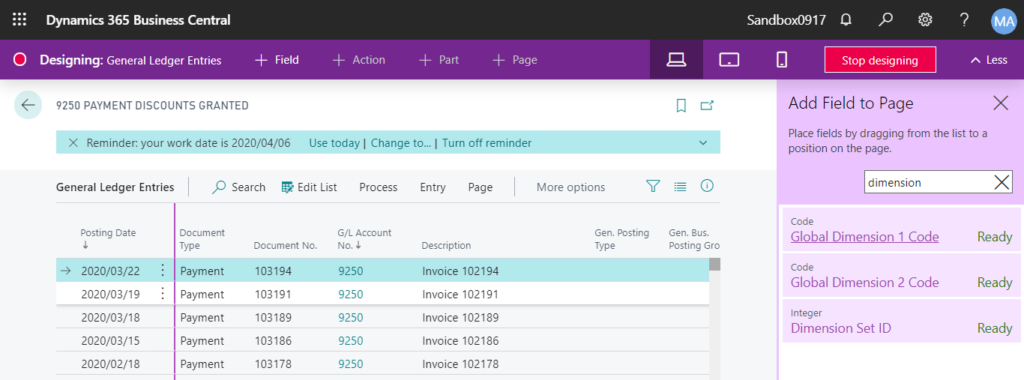
On almost all pages, you can simply use the “Design” feature to show them for Global Dimension 1 Code and Global Dimension 2 Code.
For Example:
Sales Orders:
Item Ledger Entries:
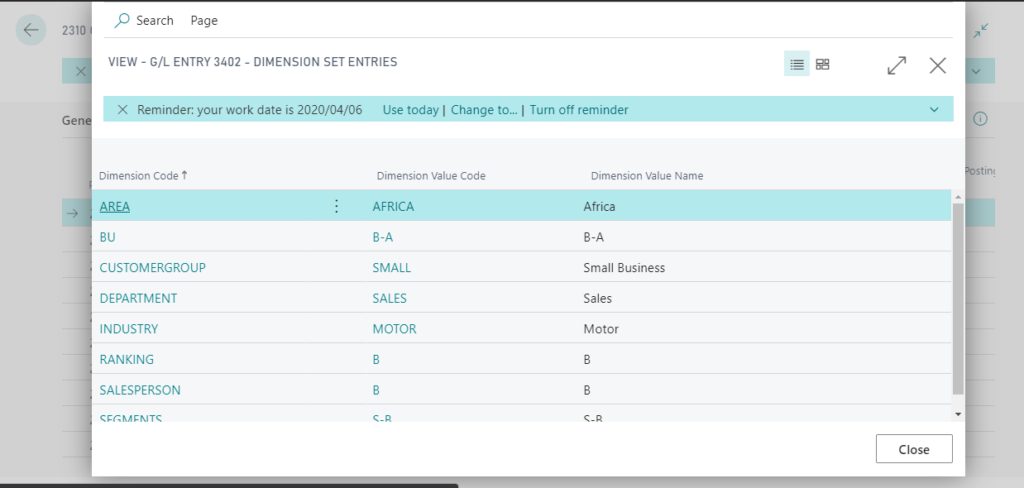
General Ledger Entries:
So if you need to expose all Dimensions on the page, how to do it?
I will share two methods here. One is to add real fields to the table, and the other is to just add variables on the page.
let’s start.
Method 1 (Add new fields)
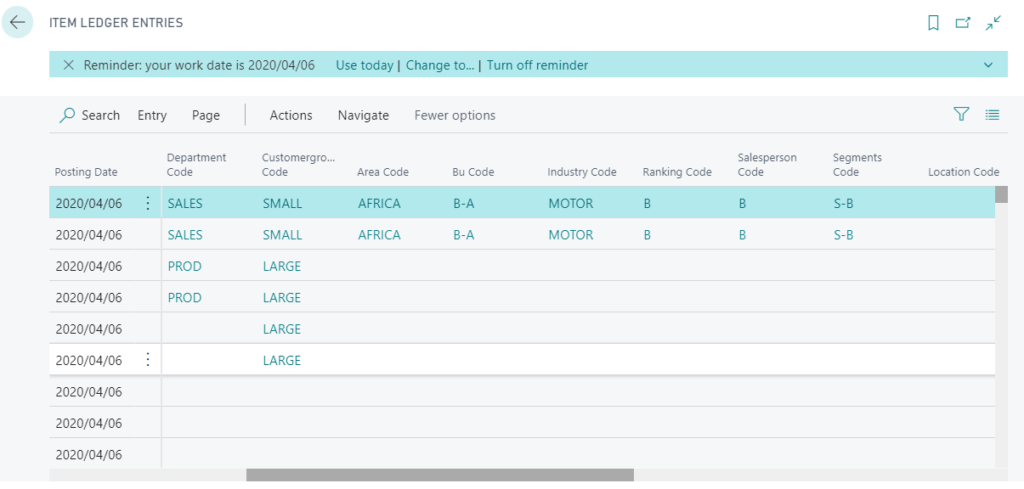
Add the 2 Global Dimensions & 6 Shortcut Dimensions to Item Ledger Entries.
First add new Shortcut Dimension fields to the “Item Ledger Entry” table.
Please pay attention to the properties of “CaptionClass” and “TableRelation”.
tableextension 50133 "ZY Item Ledger Entry Ext" extends "Item Ledger Entry"
{
    fields
    {
        field(50103; "ZY ShortcutDim3Code"; Code[20])
        {
            Caption = 'Shortcut Dimension 3 Code';
            CaptionClass = '1,2,3';
            TableRelation = "Dimension Value".Code where("Global Dimension No." = const(3));
            DataClassification = CustomerContent;
        }
        field(50104; "ZY ShortcutDim4Code"; Code[20])
        {
            Caption = 'Shortcut Dimension 4 Code';
            CaptionClass = '1,2,4';
            TableRelation = "Dimension Value".Code where("Global Dimension No." = const(4));
            DataClassification = CustomerContent;
        }
        field(50105; "ZY ShortcutDim5Code"; Code[20])
        {
            Caption = 'Shortcut Dimension 5 Code';
            CaptionClass = '1,2,5';
            TableRelation = "Dimension Value".Code where("Global Dimension No." = const(5));
            DataClassification = CustomerContent;
        }
        field(50106; "ZY ShortcutDim6Code"; Code[20])
        {
            Caption = 'Shortcut Dimension 6 Code';
            CaptionClass = '1,2,6';
            TableRelation = "Dimension Value".Code where("Global Dimension No." = const(6));
            DataClassification = CustomerContent;
        }
        field(50107; "ZY ShortcutDim7Code"; Code[20])
        {
            Caption = 'Shortcut Dimension 7 Code';
            CaptionClass = '1,2,7';
            TableRelation = "Dimension Value".Code where("Global Dimension No." = const(7));
            DataClassification = CustomerContent;
        }
        field(50108; "ZY ShortcutDim8Code"; Code[20])
        {
            Caption = 'Shortcut Dimension 8 Code';
            CaptionClass = '1,2,8';
            TableRelation = "Dimension Value".Code where("Global Dimension No." = const(8));
            DataClassification = CustomerContent;
        }
    }
}
Then show these fields on the “Item Ledger Entries” page.
pageextension 50100 "ZY Item Ledger Entries Ext" extends "Item Ledger Entries"
{
    layout
    {
        modify("Global Dimension 1 Code")
        {
            Visible = true;
        }
        modify("Global Dimension 2 Code")
        {
            Visible = true;
        }

        addafter("Global Dimension 2 Code")
        {
            field("ZY ShortcutDim3Code"; "ZY ShortcutDim3Code")
            {
                ApplicationArea = All;
            }
            field("ZY ShortcutDim4Code"; "ZY ShortcutDim4Code")
            {
                ApplicationArea = All;
            }
            field("ZY ShortcutDim5Code"; "ZY ShortcutDim5Code")
            {
                ApplicationArea = All;
            }
            field("ZY ShortcutDim6Code"; "ZY ShortcutDim6Code")
            {
                ApplicationArea = All;
            }
            field("ZY ShortcutDim7Code"; "ZY ShortcutDim7Code")
            {
                ApplicationArea = All;
            }
            field("ZY ShortcutDim8Code"; "ZY ShortcutDim8Code")
            {
                ApplicationArea = All;
            }
        }
    }
}
Finally, because they are all real fields, logic needs to be added when posting.
codeunit 50100 ShortcutDimensionMgt
{
    [EventSubscriber(ObjectType::Codeunit, Codeunit::"Item Jnl.-Post Line", 'OnBeforeInsertItemLedgEntry', '', false, false)]
    local procedure TransferDimValueToItemLedgEntry(var ItemLedgerEntry: Record "Item Ledger Entry"; ItemJournalLine: Record "Item Journal Line"; TransferItem: Boolean; OldItemLedgEntry: Record "Item Ledger Entry")
    var
        DimMgt: Codeunit DimensionManagement;
        ShortcutDimensionCode: array[8] of Code[20];
    begin
        DimMgt.GetShortcutDimensions(ItemLedgerEntry."Dimension Set ID", ShortcutDimensionCode);
        ItemLedgerEntry."ZY ShortcutDim3Code" := ShortcutDimensionCode[3];
        ItemLedgerEntry."ZY ShortcutDim4Code" := ShortcutDimensionCode[4];
        ItemLedgerEntry."ZY ShortcutDim5Code" := ShortcutDimensionCode[5];
        ItemLedgerEntry."ZY ShortcutDim6Code" := ShortcutDimensionCode[6];
        ItemLedgerEntry."ZY ShortcutDim7Code" := ShortcutDimensionCode[7];
        ItemLedgerEntry."ZY ShortcutDim8Code" := ShortcutDimensionCode[8];
    end;
Ok, let’s open the page to confirm.
Completed.
Method 2 (Only use variables)
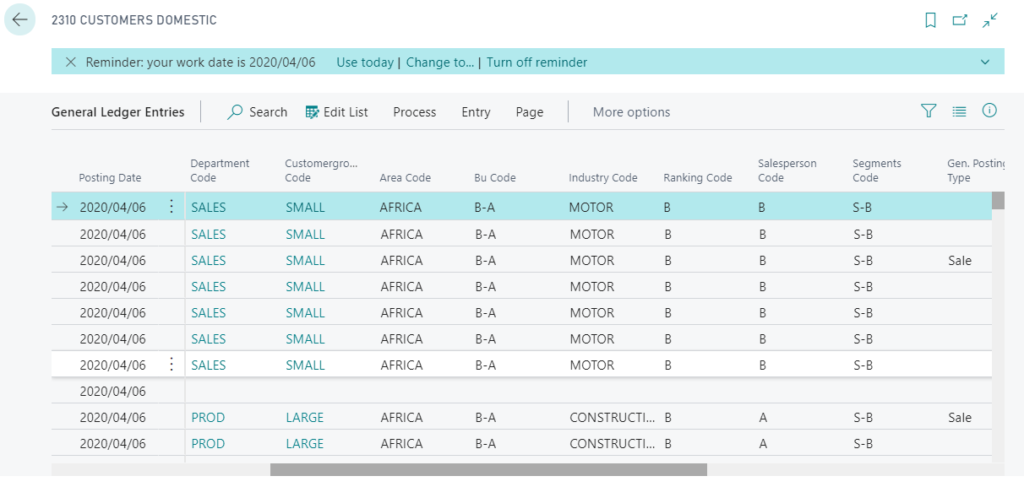
Add the 2 Global Dimensions & 6 Shortcut Dimensions to General Ledger Entries.
Just create an Page Extension to do it.
Flow: Add variables of Shortcut Dimensions -> Show fields on the page -> Add logic.
pageextension 50101 "ZY General Ledger Entries Ext" extends "General Ledger Entries"
{
    layout
    {
        modify("Global Dimension 1 Code")
        {
            Visible = true;
        }
        modify("Global Dimension 2 Code")
        {
            Visible = true;
        }
        addafter("Global Dimension 2 Code")
        {
            field(ShortcutDimension3; ShortcutDimension3)
            {
                Caption = 'Shortcut Dimension 3 Code';
                CaptionClass = '1,2,3';
                TableRelation = "Dimension Value".Code where("Global Dimension No." = const(3));
                ApplicationArea = All;
            }
            field(ShortcutDimension4; ShortcutDimension4)
            {
                Caption = 'Shortcut Dimension 4 Code';
                CaptionClass = '1,2,4';
                TableRelation = "Dimension Value".Code where("Global Dimension No." = const(4));
                ApplicationArea = All;
            }
            field(ShortcutDimension5; ShortcutDimension5)
            {
                Caption = 'Shortcut Dimension 5 Code';
                CaptionClass = '1,2,5';
                TableRelation = "Dimension Value".Code where("Global Dimension No." = const(5));
                ApplicationArea = All;
            }
            field(ShortcutDimension6; ShortcutDimension6)
            {
                Caption = 'Shortcut Dimension 6 Code';
                CaptionClass = '1,2,6';
                TableRelation = "Dimension Value".Code where("Global Dimension No." = const(6));
                ApplicationArea = All;
            }
            field(ShortcutDimension7; ShortcutDimension7)
            {
                Caption = 'Shortcut Dimension 7 Code';
                CaptionClass = '1,2,7';
                TableRelation = "Dimension Value".Code where("Global Dimension No." = const(7));
                ApplicationArea = All;
            }
            field(ShortcutDimension8; ShortcutDimension8)
            {
                Caption = 'Shortcut Dimension 8 Code';
                CaptionClass = '1,2,8';
                TableRelation = "Dimension Value".Code where("Global Dimension No." = const(8));
                ApplicationArea = All;
            }
        }
    }

    trigger OnAfterGetRecord()
    var
        DimMgt: Codeunit DimensionManagement;
        ShortcutDimensionCode: array[8] of Code[20];
    begin
        DimMgt.GetShortcutDimensions("Dimension Set ID", ShortcutDimensionCode);
        ShortcutDimension3 := ShortcutDimensionCode[3];
        ShortcutDimension4 := ShortcutDimensionCode[4];
        ShortcutDimension5 := ShortcutDimensionCode[5];
        ShortcutDimension6 := ShortcutDimensionCode[6];
        ShortcutDimension7 := ShortcutDimensionCode[7];
        ShortcutDimension8 := ShortcutDimensionCode[8];
    end;

    var
        ShortcutDimension3: Code[20];
        ShortcutDimension4: Code[20];
        ShortcutDimension5: Code[20];
        ShortcutDimension6: Code[20];
        ShortcutDimension7: Code[20];
        ShortcutDimension8: Code[20];
}
Publish and confirm.
Completed.
Personally, I prefer the first method. If the fields exist in the real table, they can be used for reports, query, etc. Of course, if you only need to display it, the second method is also possible.
You can refer to this blog to show dimensions on other pages.
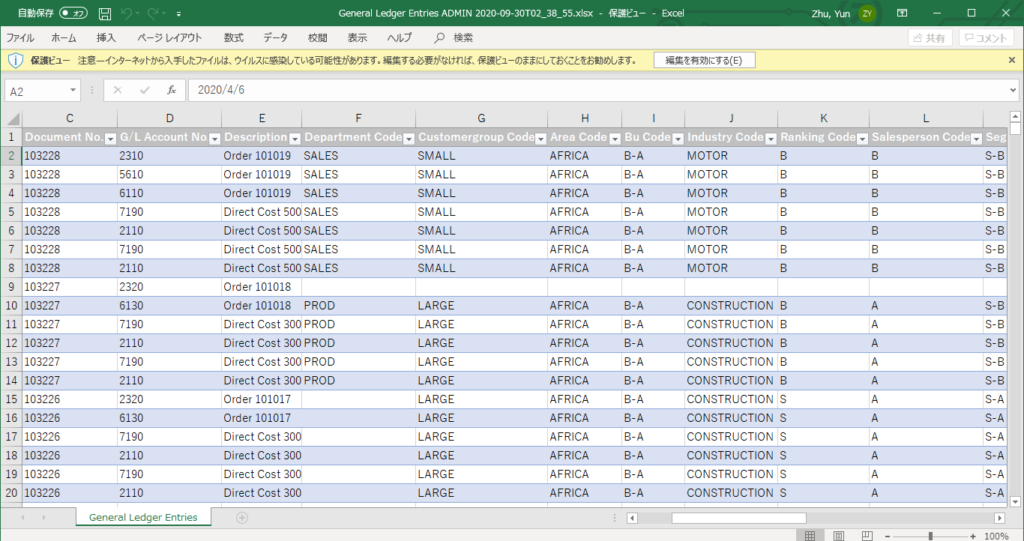
PS: Both methods support viewing in Excel.
Update: From BC17.3
Use shortcut dimensions in G/L entries for financial reporting
END.
Hope this will help.
Thanks.


コメント