Hi, Readers.
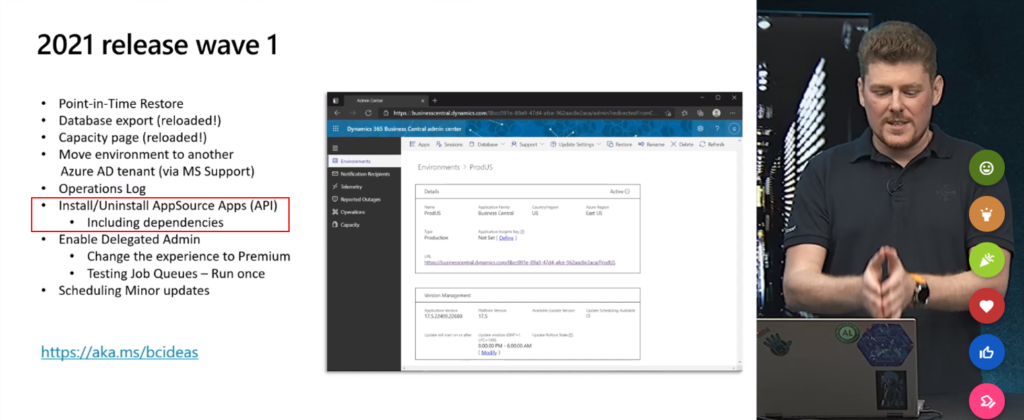
In the Dynamics 365 Business Central Launch Event 2021 release wave 1 this week, Microsoft shared a new way to install/Uninstall AppSource Apps for Business Central. Using Admin Center API.
I have successfully tested it today and in this post, I would like to discuss how to do it. Hope this will help.
Traditional installation method: How to install AppSource Extension in Dynamics 365 Business Central SaaS
My test results video: Test AppSource app is Jet Reports (Including dependencies).
The tools needed for this test:
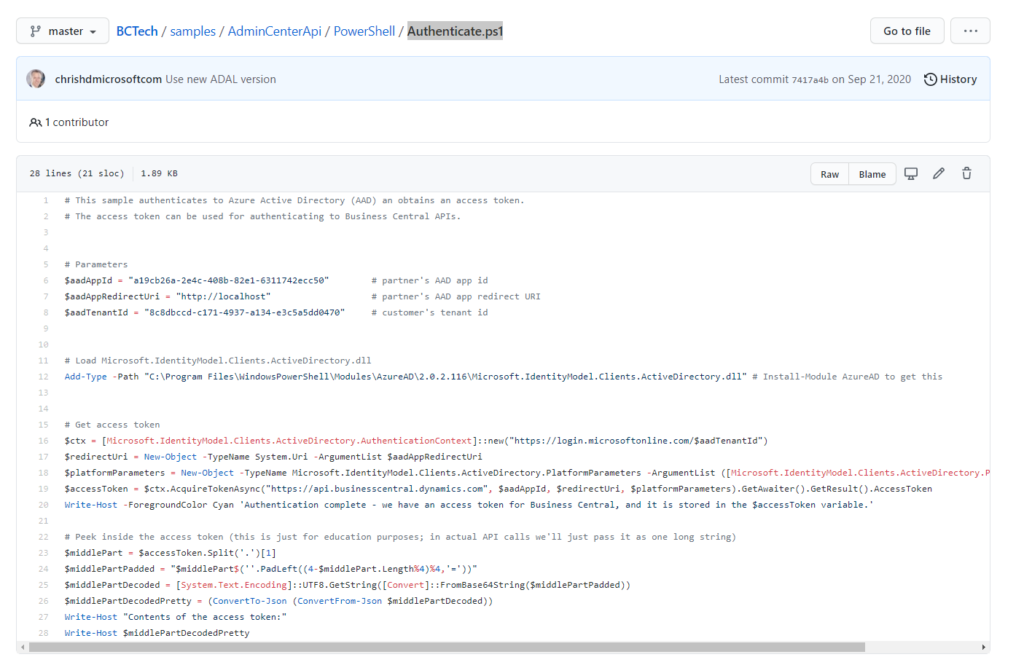
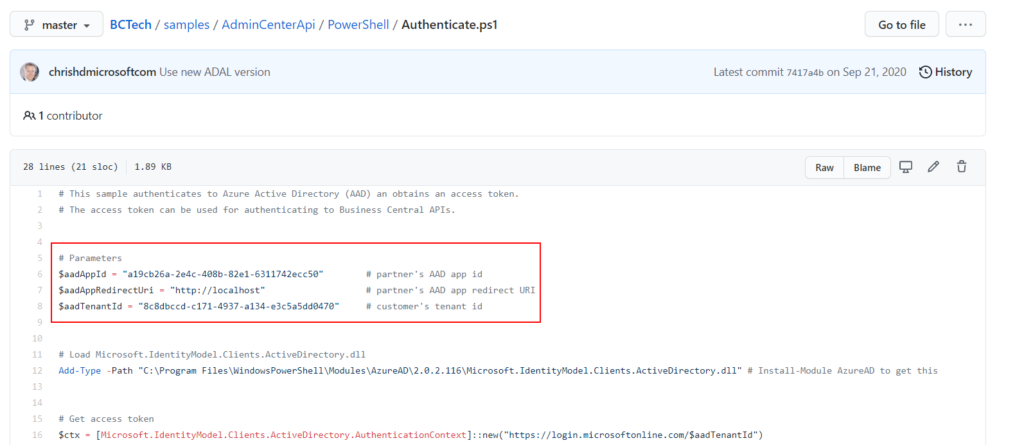
Authenticate.ps1: This sample authenticates to Azure Active Directory (AAD) an obtains an access token.
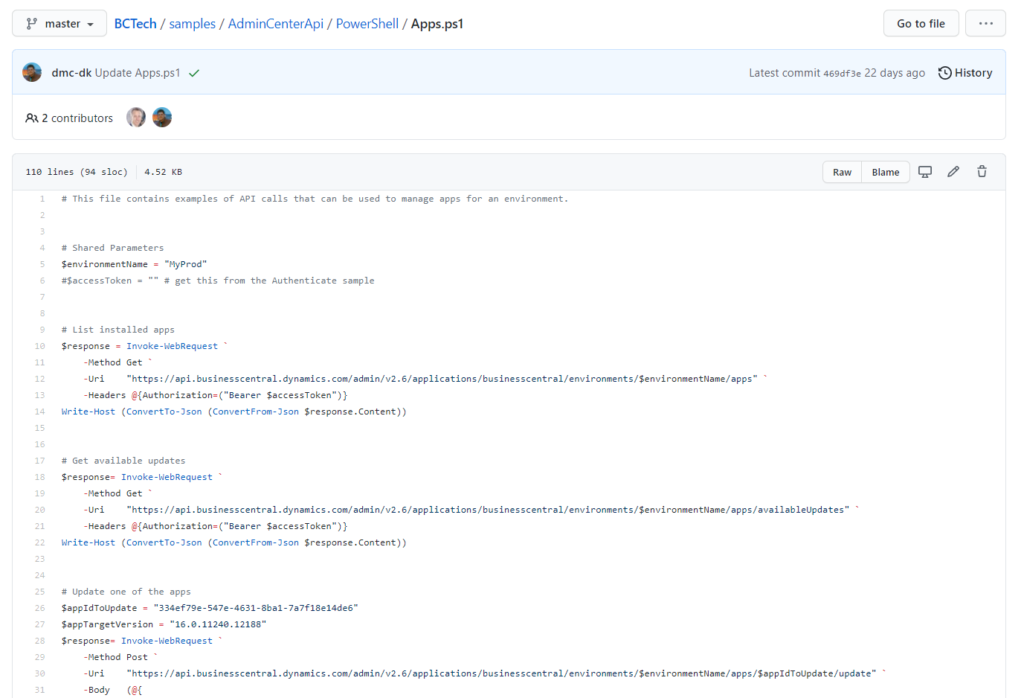
Apps.ps1: This file contains examples of API calls that can be used to manage apps for an environment.
In short, there are only two steps needed to do this. The first is Authentication and the second is Installation.
Authentication
Pre-requisites:
・Microsoft Azure App Registrations (If you don’t already have one, get a subscription to Microsoft Azure)
1. Sign into Azure Portal.
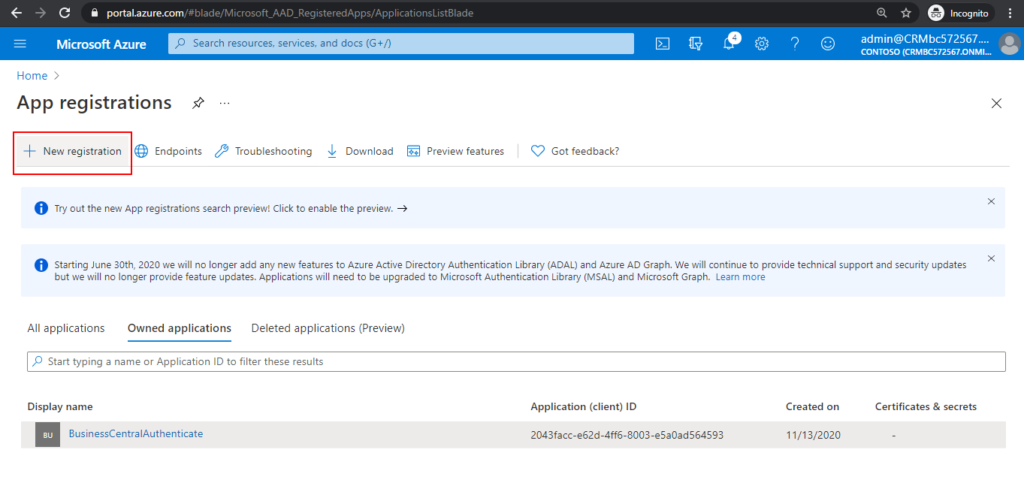
2. Enter App registrations in search, and then choose the related link.

3. Choose New registration.
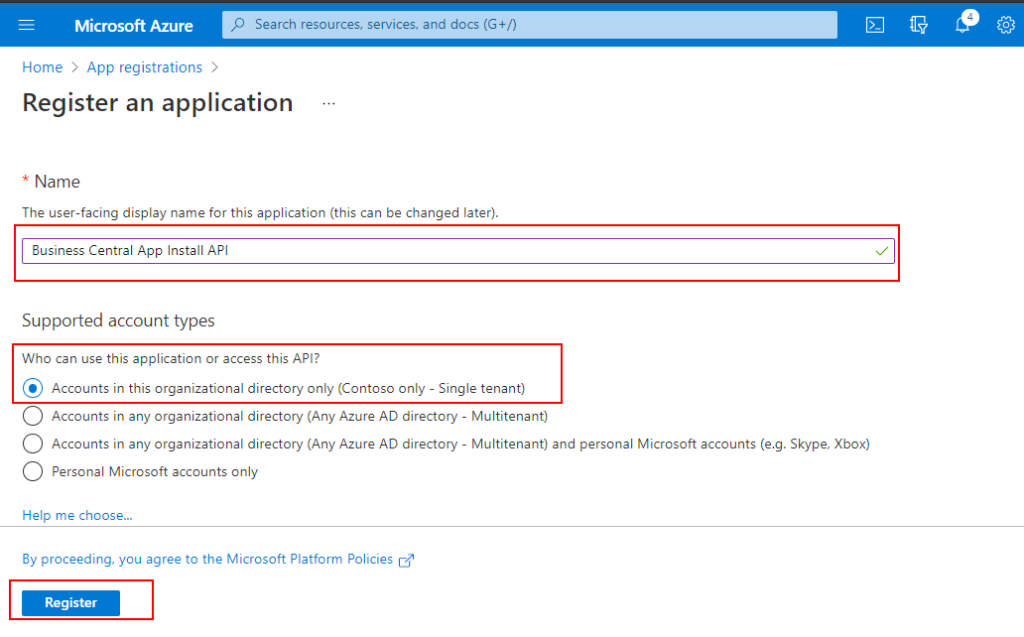
4. Enter Name and select who can use this application or access this API, then choose Register.
For Example:
Name: Business Central App Install API
Who can use this application or access this API: Accounts in this organizational directory only.
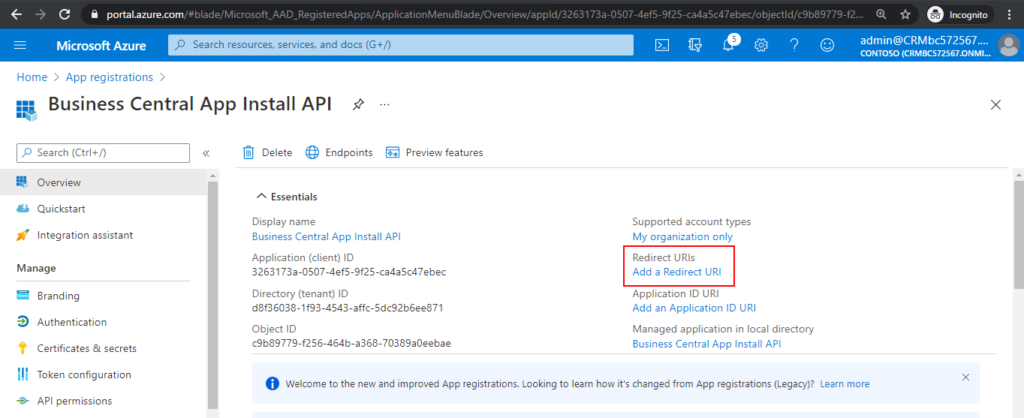
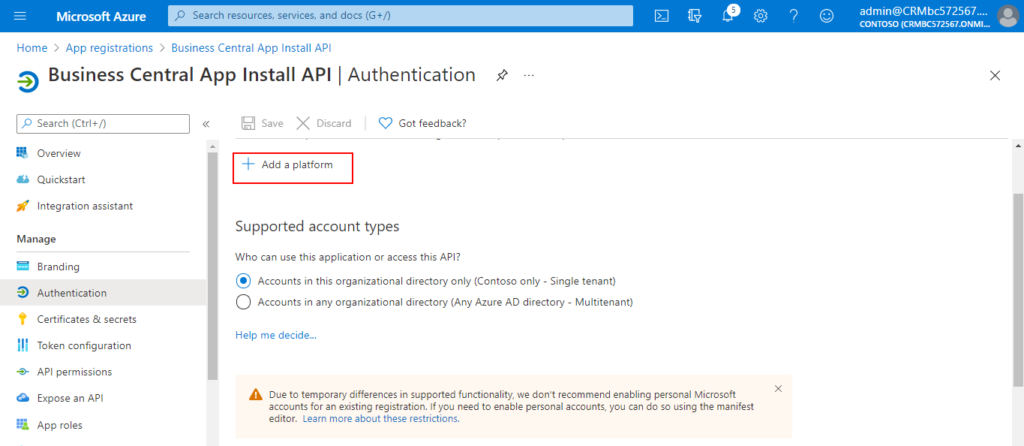
5. Choose a Add a Redirect URI in the Overview page.
6. Choose Add a platform.
7. Choose Mobile and desktop applications.
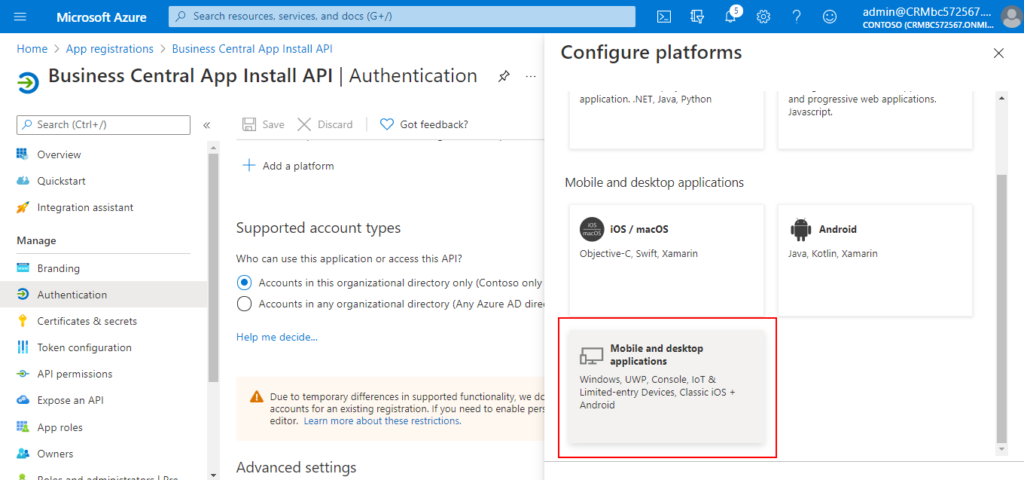
8. Add http://localhost in Custom redirect URIs, then choose Configure.

Successfully updated

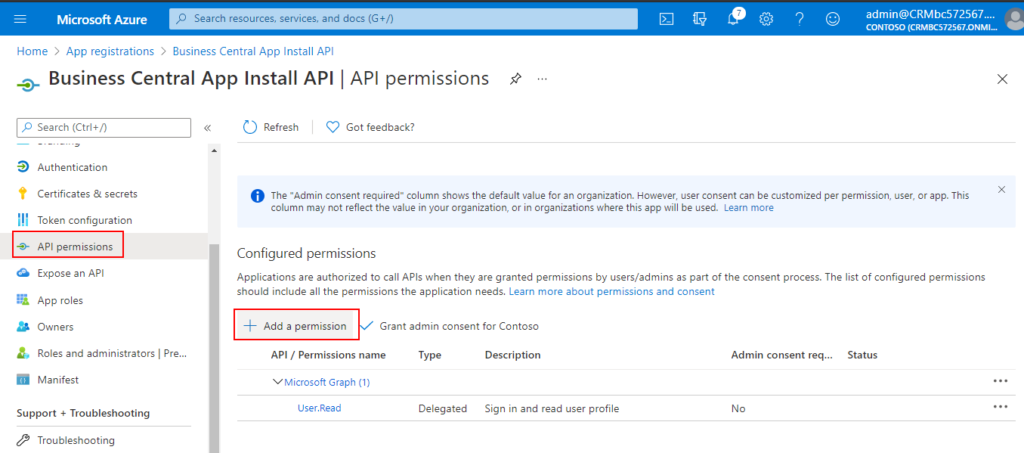
9. Choose API permissions, then choose Add a permission.
10. Choose Dynamics 365 Business Central.
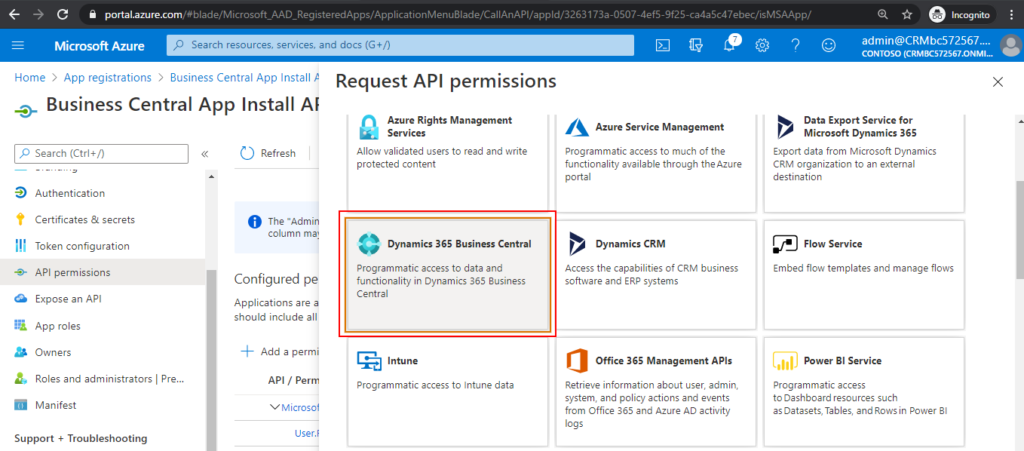
11. Choose Delegated permissions.
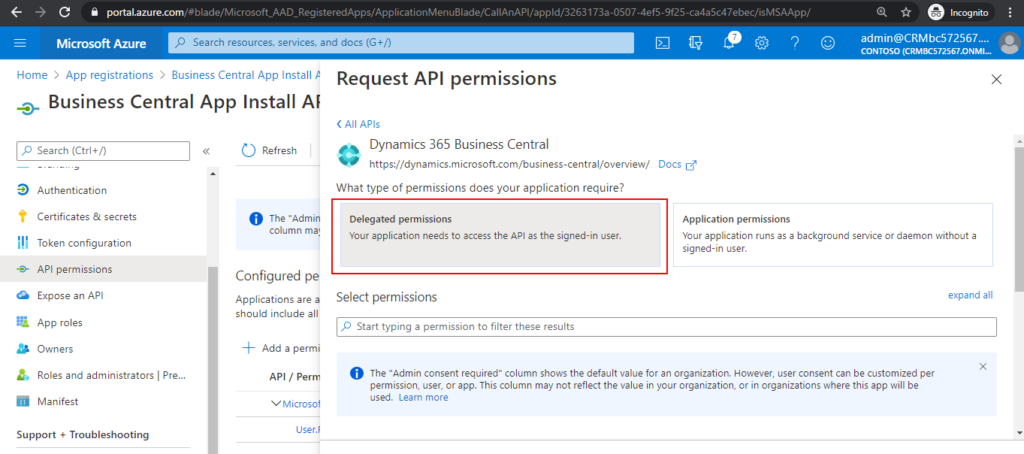
12. Select all permissions, then choose Add permissions.

13. Choose Manifest, set “allowPublicClient”: true, then choose Save.

14. Back to the overview
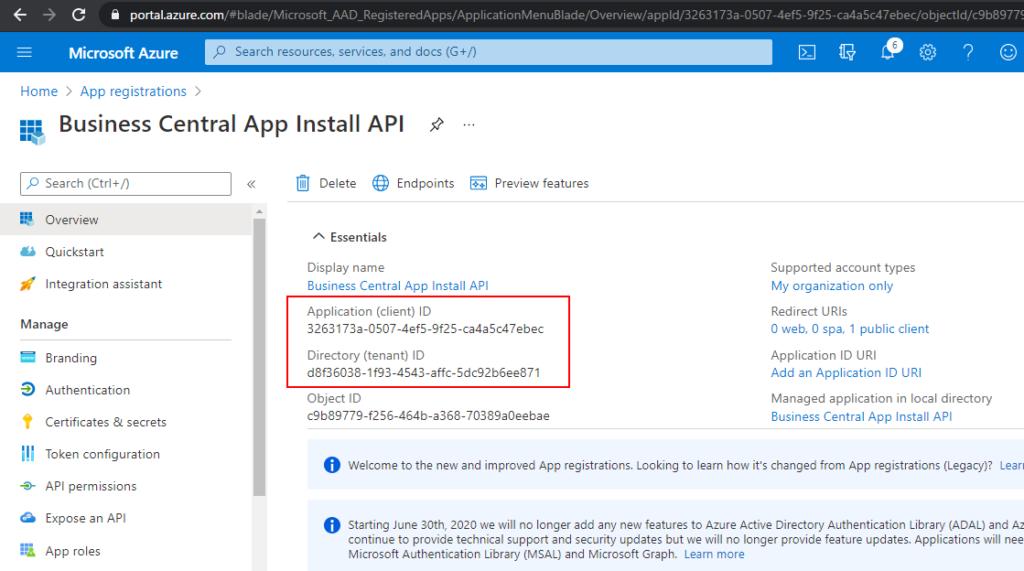
Now you can update Parameters in Authenticate.ps1.
For example:
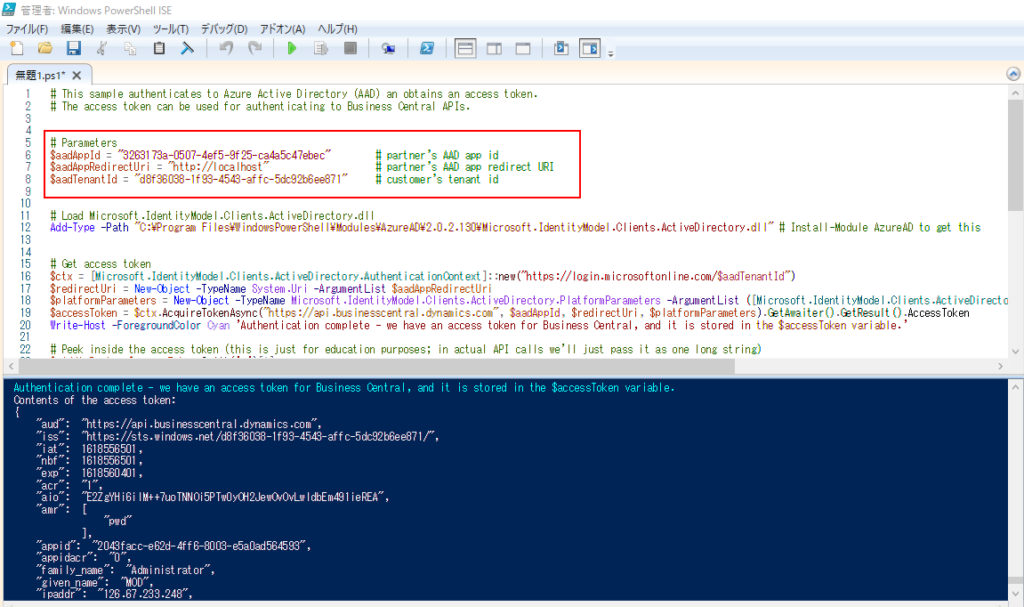
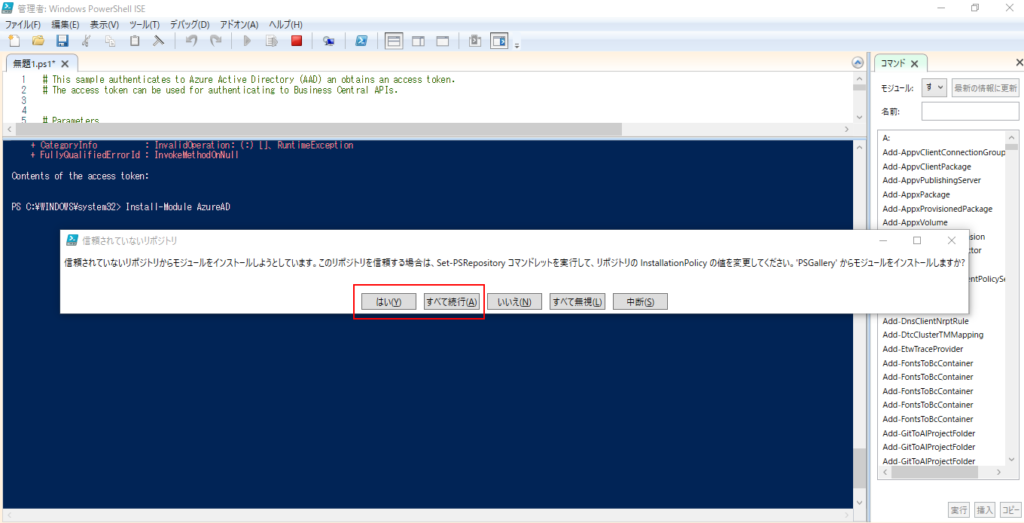
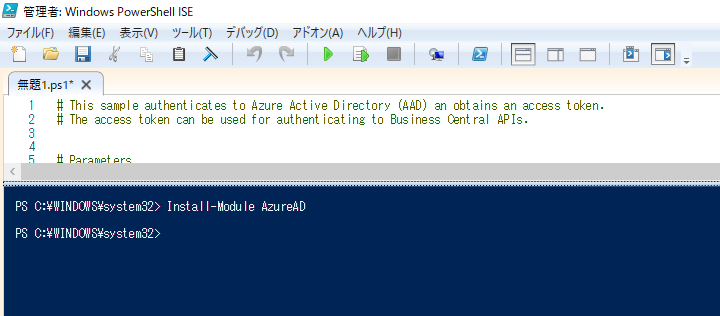
15. Run Windows PowerShell ISE by the administrator, then run Install-Module AzureAD command.
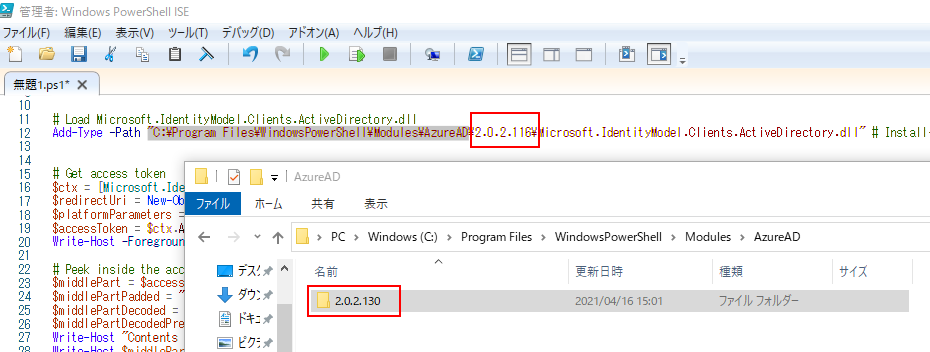
Add-Type -Path “C:\Program Files\WindowsPowerShell\Modules\AzureAD\2.0.2.130\Microsoft.IdentityModel.Clients.ActiveDirectory.dll” # Install-Module AzureAD to get this

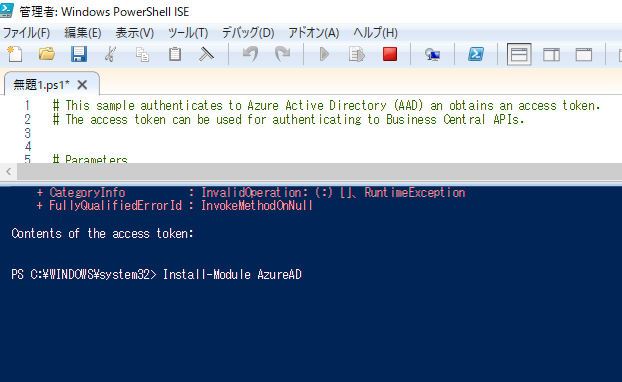
Choose Yes.
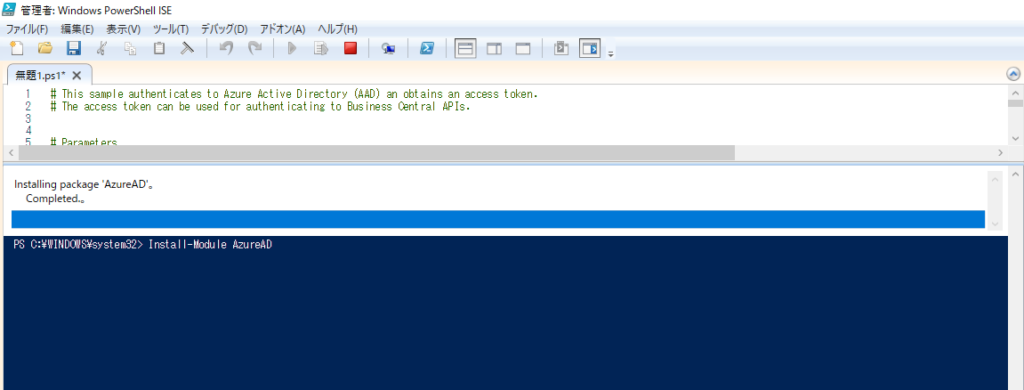
Completed.
Note: After the download is complete, you need to update the path to the folder. Otherwise, it will report an error.
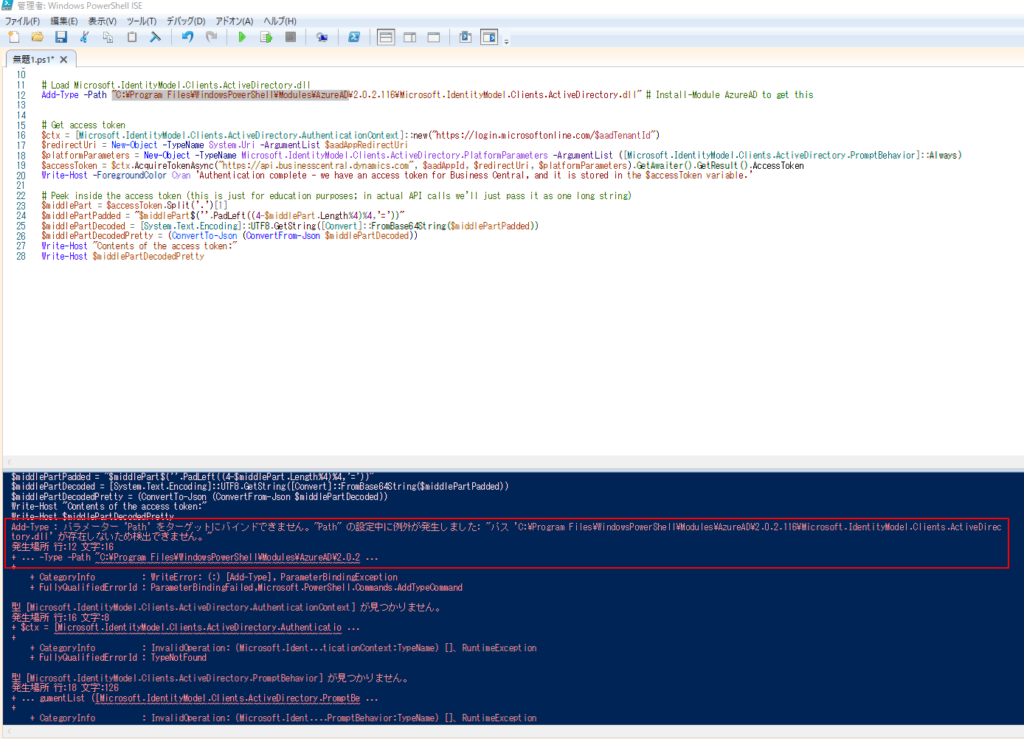
New version is 2.0.2.130.(2021/04/16)
The required settings are all complete.
For example:
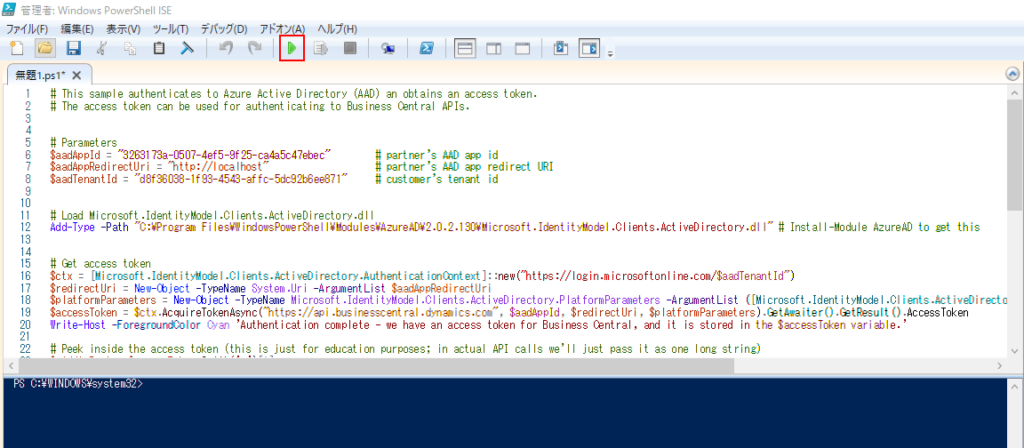
# This sample authenticates to Azure Active Directory (AAD) an obtains an access token.
# The access token can be used for authenticating to Business Central APIs.
# Parameters
$aadAppId = "3263173a-0507-4ef5-9f25-ca4a5c47ebec" # partner's AAD app id
$aadAppRedirectUri = "http://localhost" # partner's AAD app redirect URI
$aadTenantId = "d8f36038-1f93-4543-affc-5dc92b6ee871" # customer's tenant id
# Load Microsoft.IdentityModel.Clients.ActiveDirectory.dll
Add-Type -Path "C:\Program Files\WindowsPowerShell\Modules\AzureAD\2.0.2.130\Microsoft.IdentityModel.Clients.ActiveDirectory.dll" # Install-Module AzureAD to get this
# Get access token
$ctx = [Microsoft.IdentityModel.Clients.ActiveDirectory.AuthenticationContext]::new("https://login.microsoftonline.com/$aadTenantId")
$redirectUri = New-Object -TypeName System.Uri -ArgumentList $aadAppRedirectUri
$platformParameters = New-Object -TypeName Microsoft.IdentityModel.Clients.ActiveDirectory.PlatformParameters -ArgumentList ([Microsoft.IdentityModel.Clients.ActiveDirectory.PromptBehavior]::Always)
$accessToken = $ctx.AcquireTokenAsync("https://api.businesscentral.dynamics.com", $aadAppId, $redirectUri, $platformParameters).GetAwaiter().GetResult().AccessToken
Write-Host -ForegroundColor Cyan 'Authentication complete - we have an access token for Business Central, and it is stored in the $accessToken variable.'
# Peek inside the access token (this is just for education purposes; in actual API calls we'll just pass it as one long string)
$middlePart = $accessToken.Split('.')[1]
$middlePartPadded = "$middlePart$(''.PadLeft((4-$middlePart.Length%4)%4,'='))"
$middlePartDecoded = [System.Text.Encoding]::UTF8.GetString([Convert]::FromBase64String($middlePartPadded))
$middlePartDecodedPretty = (ConvertTo-Json (ConvertFrom-Json $middlePartDecoded))
Write-Host "Contents of the access token:"
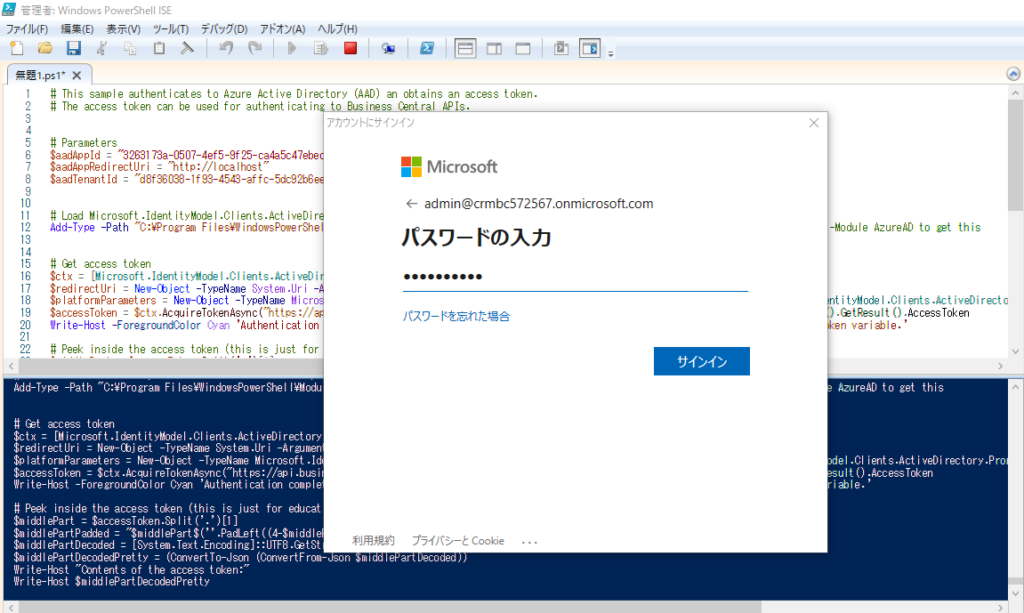
Write-Host $middlePartDecodedPretty16. Run all commands in Windows PowerShell ISE.
Enter the sign in information.
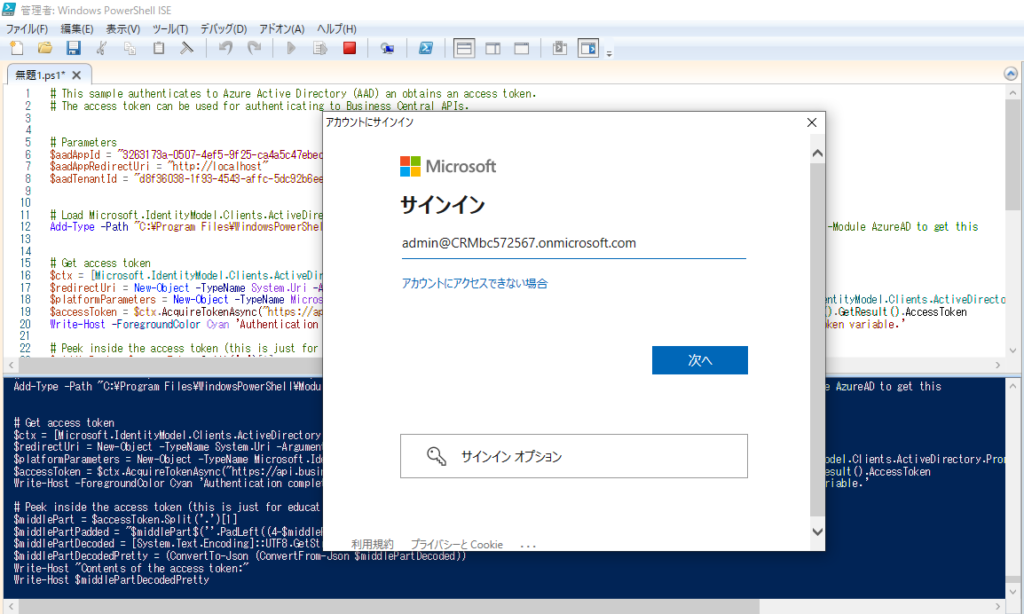
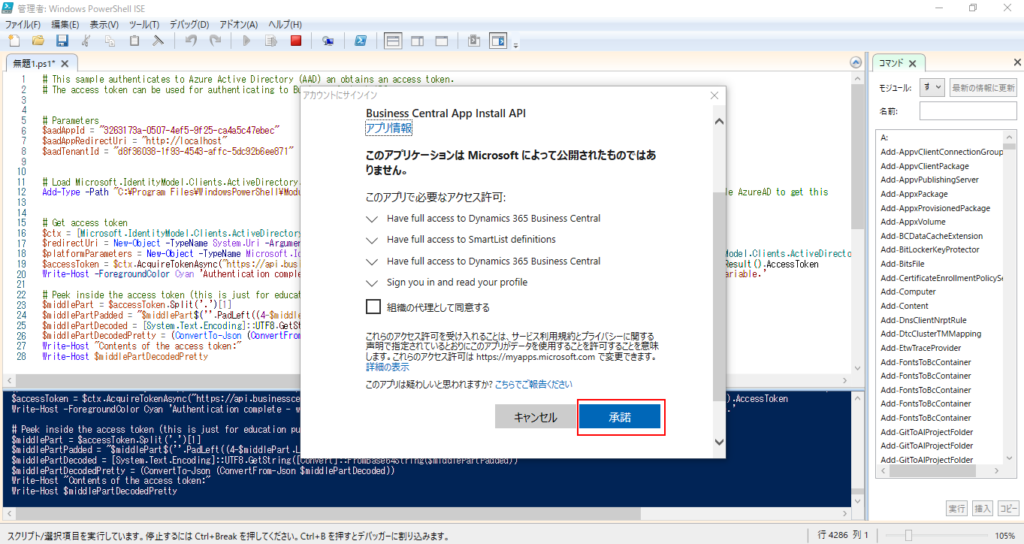
Choose Accept (承諾).
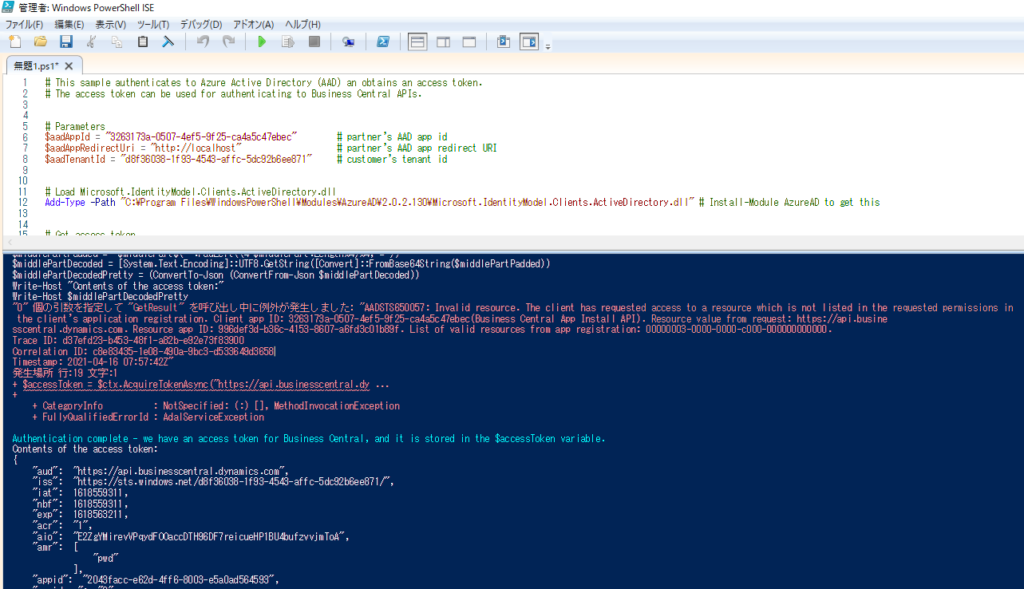
If you see the message “Authentication complete – we have an access token for Business Central, and it is stored in the $accessToken variable.” and there are no errors, it means the Authentication is successful.

Note: If the App registrations is not set sufficiently, the following permission error may occur.
“0” 個の引数を指定して “GetResult” を呼び出し中に例外が発生しました: “AADSTS650057: Invalid resource. The client has requested access to a resource which is not listed in the requested permissions in the client’s application registration. Client app ID: 3263173a-0507-4ef5-9f25-ca4a5c47ebec(Business Central App Install API). Resource value from request https://api.businesscentral.dynamics.com. Resource app ID: 996def3d-b36c-4153-8607-a6fd3c01b89f. List of valid resources from app registration: 00000003-0000-0000-c000-000000000000.
Installation
Once the Authentication is complete, the rest is relatively simple.
You can refer to the commands in Apps.ps1 to view and install/uninstall the AppSource Apps.
For example:
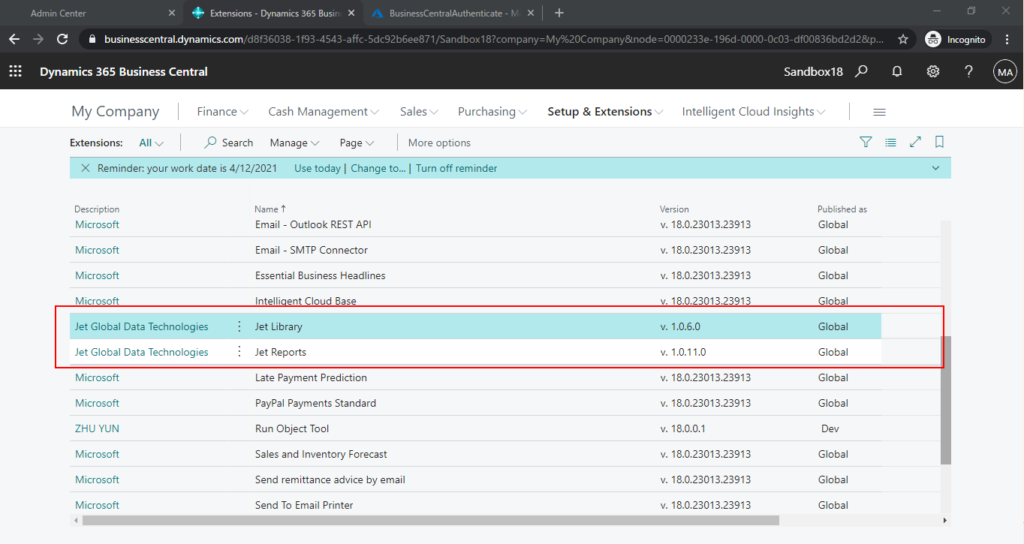
View the list of extensions in the Sandbox18 environment
# Shared Parameters
$environmentName = "Sandbox18"
#$accessToken = "" # get this from the Authenticate sample


# List installed apps
$response = Invoke-WebRequest `
    -Method Get `
    -Uri    "https://api.businesscentral.dynamics.com/admin/v2.6/applications/businesscentral/environments/$environmentName/apps" `
    -Headers @{Authorization=("Bearer $accessToken")}
Write-Host (ConvertTo-Json (ConvertFrom-Json $response.Content))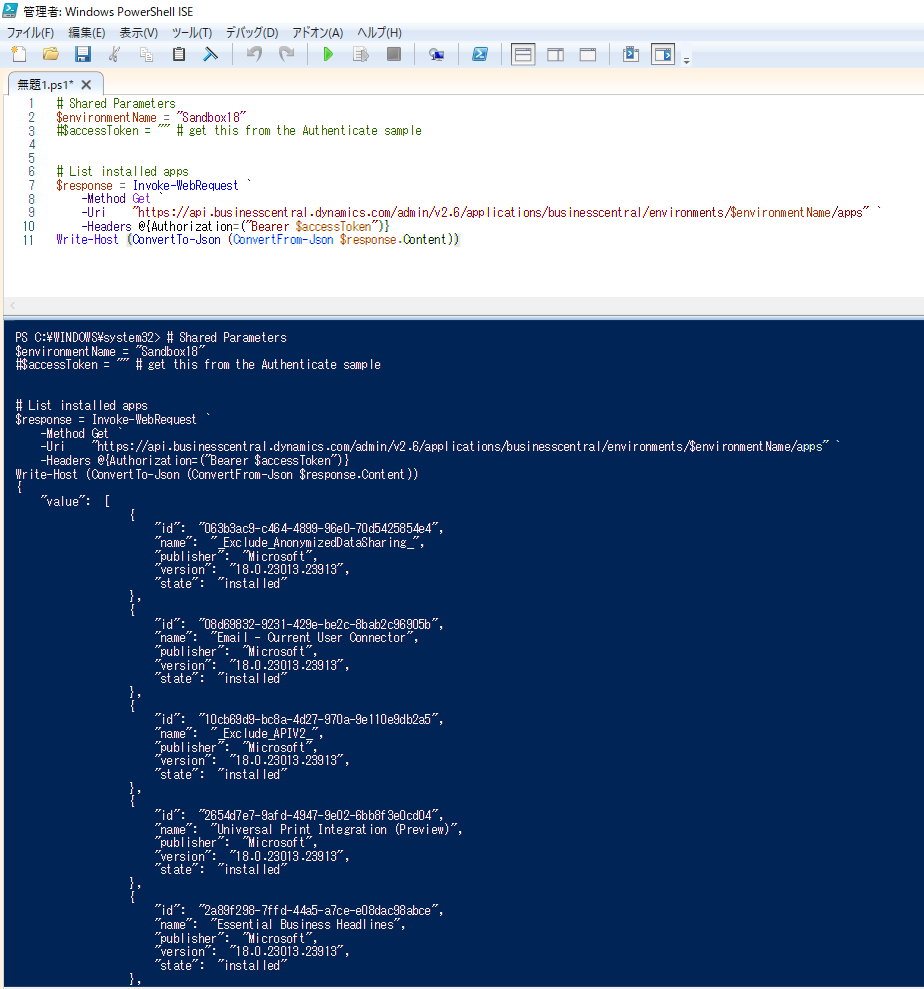
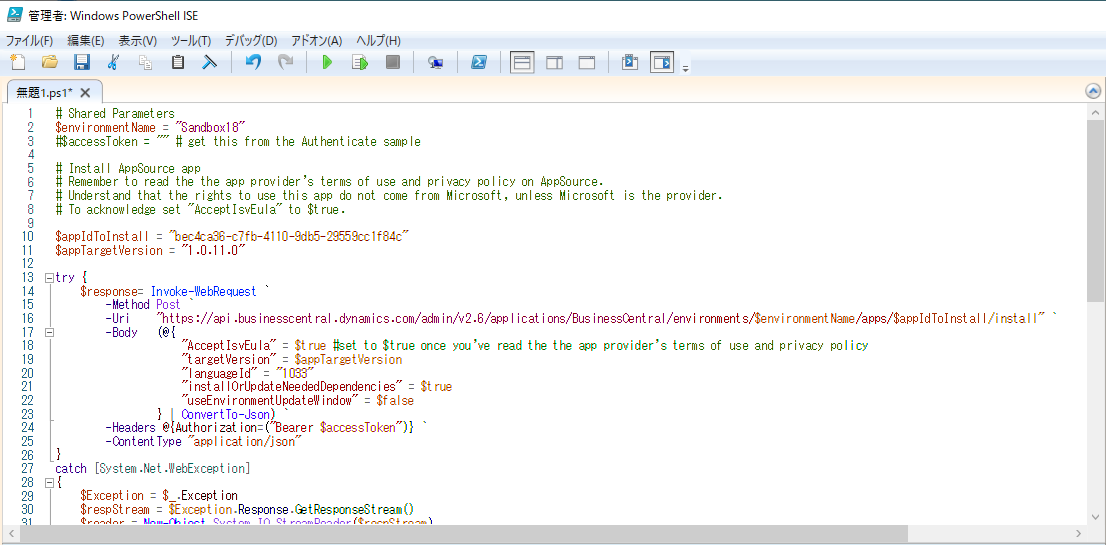
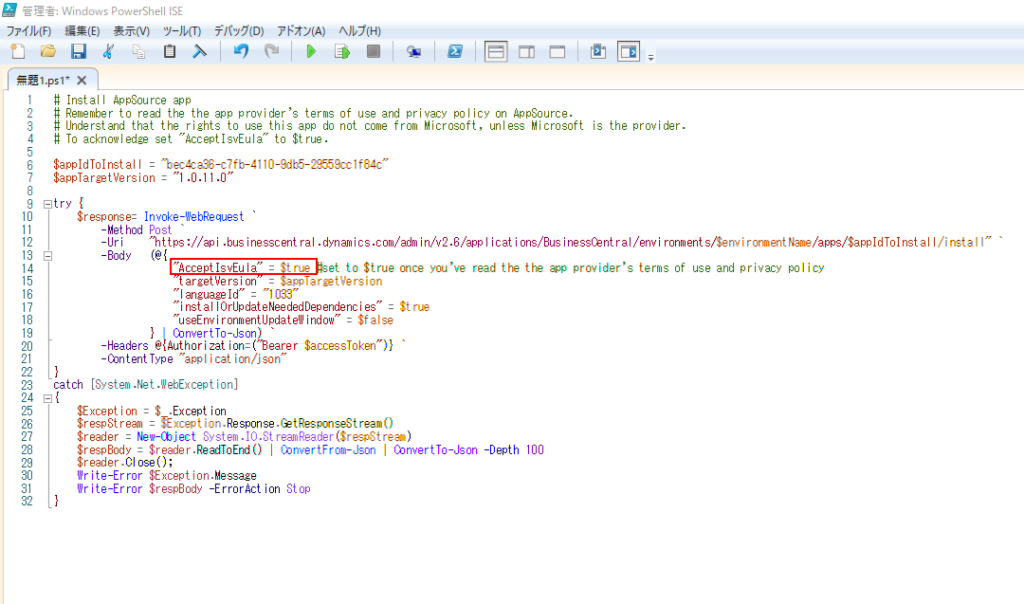
Install Jet Report app. (You can change appID and appTargetVersion to install other AppSource apps)
# Shared Parameters
$environmentName = "Sandbox18"
#$accessToken = "" # get this from the Authenticate sample
# Install AppSource app
# Remember to read the the app provider's terms of use and privacy policy on AppSource.
# Understand that the rights to use this app do not come from Microsoft, unless Microsoft is the provider.
# To acknowledge set "AcceptIsvEula" to $true.
$appIdToInstall = "bec4ca36-c7fb-4110-9db5-29559cc1f84c"
$appTargetVersion = "1.0.11.0"
try {
$response= Invoke-WebRequest `
-Method Post `
-Uri "https://api.businesscentral.dynamics.com/admin/v2.6/applications/BusinessCentral/environments/$environmentName/apps/$appIdToInstall/install" `
-Body (@{
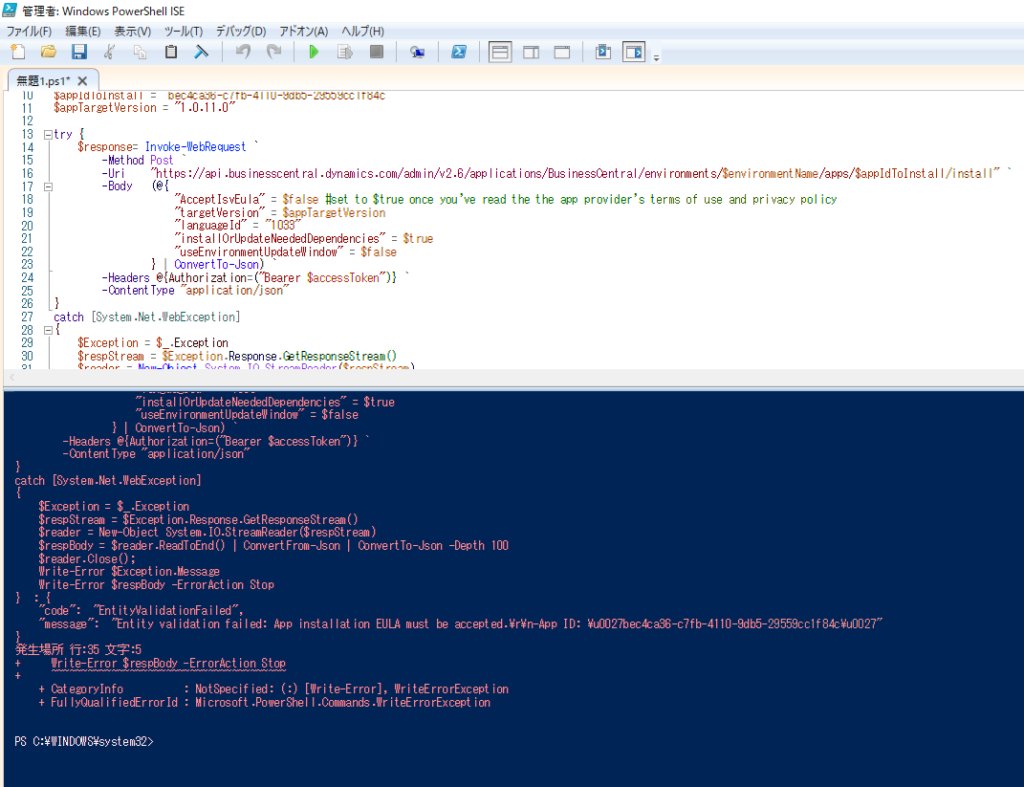
"AcceptIsvEula" = $true #set to $true once you've read the the app provider's terms of use and privacy policy
"targetVersion" = $appTargetVersion
"languageId" = "1033"
"installOrUpdateNeededDependencies" = $true
"useEnvironmentUpdateWindow" = $false
} | ConvertTo-Json) `
-Headers @{Authorization=("Bearer $accessToken")} `
-ContentType "application/json"
}
catch [System.Net.WebException]
{
$Exception = $_.Exception
$respStream = $Exception.Response.GetResponseStream()
$reader = New-Object System.IO.StreamReader($respStream)
$respBody = $reader.ReadToEnd() | ConvertFrom-Json | ConvertTo-Json -Depth 100
$reader.Close();
Write-Error $Exception.Message
Write-Error $respBody -ErrorAction Stop
}Check install status.
# Shared Parameters
$environmentName = "Sandbox18"
#$accessToken = "" # get this from the Authenticate sample

# Check install status
$response= Invoke-WebRequest `
    -Method Get `
    -Uri    "https://api.businesscentral.dynamics.com/admin/v2.6/applications/BusinessCentral/environments/$environmentName/apps/$appIdToInstall/operations" `
    -Headers @{Authorization=("Bearer $accessToken")}
Write-Host (ConvertTo-Json (ConvertFrom-Json $response.Content))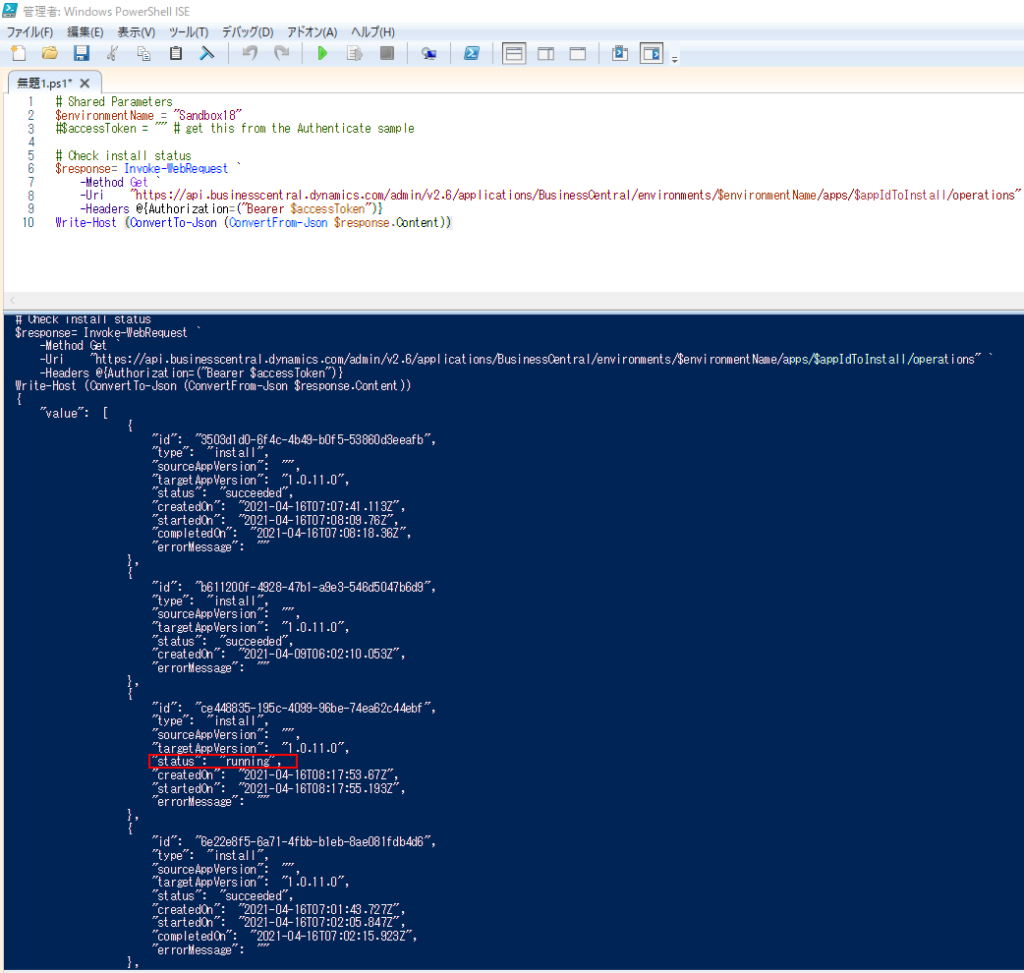
Install succeeded.
Note:
1. “AcceptIsvEula” must be set to $true once you’ve read the app provider’s terms of use and privacy policy.
Otherwise, an error will be reported when the command is executed.
“code”: “EntityValidationFailed”,
“message”: “Entity validation failed: App installation EULA must be accepted.\r\n-App ID: \u0027bec4ca36-c7fb-4110-9db5-29559cc1f84c\u0027”
2. If the AppSource app to be installed or updated as dependencies “installOrUpdateNeededDependencies” must be set to $true.
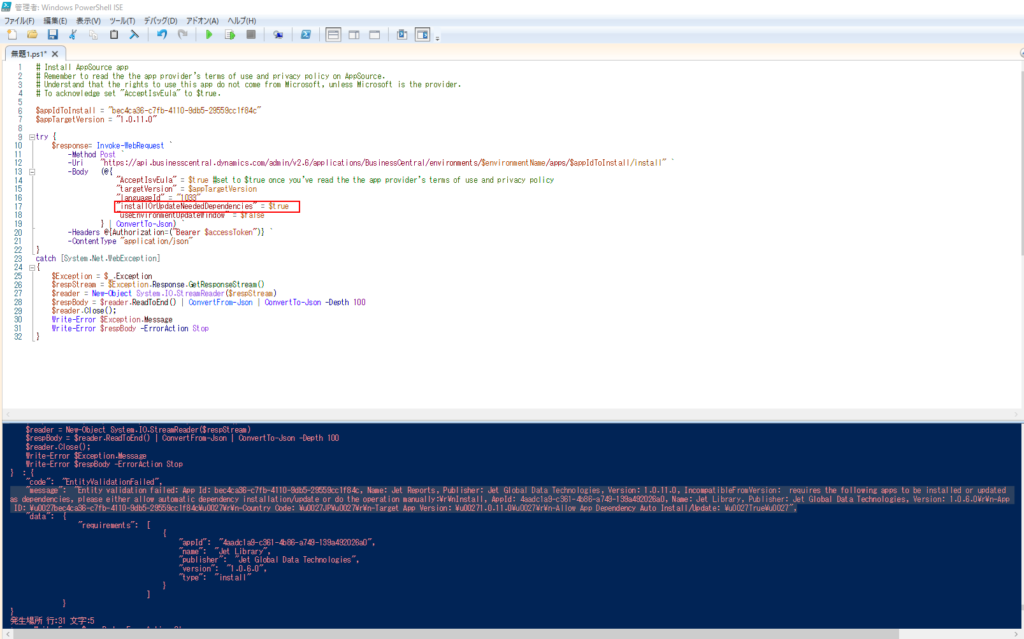
“message”: “Entity validation failed: App Id: bec4ca36-c7fb-4110-9db5-29559cc1f84c, Name: Jet Reports, Publisher: Jet Global Data Technologies, Version: 1.0.11.0, IncompatibleFromVersion: requires the following apps to be installed or updated as dependencies, please either allow automatic dependency installation/update or do the operation manually:\r\nInstall, AppId: 4aadc1a9-c361-4b86-a749-139a492026a0, Name: Jet Library, Publisher: Jet Global Data Technologies, Version: 1.0.6.0\r\n-App
ID: \u0027bec4ca36-c7fb-4110-9db5-29559cc1f84c\u0027\r\n-Country Code: \u0027JP\u0027\r\n-Target App Version: \u00271.0.11.0\u0027\r\n-Allow App Dependency Auto Install/Update: \u0027True\u0027″,
Update: How to install AppSource extension/app via AL
END
Hope this will help.
Thanks for reading.
ZHU
コメント