
Hi, Readers.
Today I would like to discuss a topic I was recently asked by a client, about the size of the value displayed on the card/document page (textbox too small to read?)
In Business Central, Card pages and Document pages are very commonly used pages.
You design card pages when you want to enable users to view, create, and modify records (master and reference data) in a table, such as a customer, vendor, or item.
For example, Customer Card (21, Card):

Design document pages when you want to represent a transaction or other important event in the domain of business. Document pages are the computerized counterpart to paper-based documents, such as quotes, invoices, orders, and so on. As such, document pages often have associated workflow or audit trail requirements.
For example, Sales Order (42, Document):

Some standard fields, such as Customer Name, have a length of 100, but when you actually enter 100, it can’t be displayed well on the web client because it is too long……


PS: Generally, a table field can display up to 2048 characters. If you want to display more than 2048 characters, use the Blob data type.
The maximum length for a field of type ‘Text’ is 2048 AL AL0154

So some customers who care about this may ask questions about how to display these contents well. In this post, I will briefly introduce several solutions and hope to give you some tips.
Using MultiLine Property
MultiLine Property: Sets the value that indicates whether a field can display multiple lines of text.
This can refer to the Work Description field on the Sales Order.


In short, to use this method to maximize the display area of the value, you can first create a group, then set the same caption as the field, and then set the MultiLine Property to true and the ShowCaption Property to false.

Great. The Blob data type is processed in the same way. Please refer to the standard Work Description field.

Test code:
pageextension 50119 CustomerCardExt extends "Customer Card"
{
    layout
    {
        addafter("No.")
        {
            group(ZYNameGroup)
            {
                Caption = 'Name';
                field(ZYName; Rec.Name)
                {
                    ApplicationArea = All;
                    Caption = 'Name';
                    MultiLine = true;
                    ShowCaption = false;
                    ToolTip = 'Specifies the name of the customer.';
                }
            }
        }
    }
}
PS:
The property ‘MultiLine’ cannot be customized. AL AL0246

Using Rich Text feature
The Rich Text feature in Business Central is designed to handle multimedia content, such as social media posts, email bodies, quick annotations, file contents, or any field that requires a mix of text, tables, links, and images. It’s best suited for cases where the user needs to author, view, or modify unstructured information and requires a moderate amount of space to work comfortably. More details: Business Central 2023 wave 2 (BC23): Use the built-in rich text editor to enter data
This is generally used to display large amounts of text.

Test code:
tableextension 50112 CustomerExt extends Customer
{
    fields
    {
        field(50100; RichText; Blob)
        {
            Caption = 'Rich Text';
            DataClassification = CustomerContent;
        }
    }
}
pageextension 50101 CustomerCardExt extends "Customer Card"
{
    layout
    {
        addafter(General)
        {
            group(RichTextGroup)
            {
                Caption = 'Rich Text Group';
                field(RichText; RichTextVar)
                {
                    Caption = 'Rich Text';
                    MultiLine = true;
                    ExtendedDatatype = RichContent;
                    ApplicationArea = All;
                    ShowCaption = false;
                    trigger OnValidate()
                    begin
                        SetRichText();
                    end;
                }
            }
        }
    }
    var
        RichTextVar: Text;

    trigger OnAfterGetRecord()
    begin
        GetRichText();
    end;

    local procedure GetRichText()
    var
        RichTextInS: InStream;
    begin
        Rec.CalcFields(RichText);
        Rec.RichText.CreateInStream(RichTextInS, TextEncoding::UTF8);
        RichTextInS.Read(RichTextVar);
    end;

    local procedure SetRichText()
    var
        RichTextOutS: OutStream;
    begin
        Rec.RichText.CreateOutStream(RichTextOutS, TextEncoding::UTF8);
        RichTextOutS.Write(RichTextVar);
        Rec.Modify(true);
    end;
}
PS: How to bulk import big/large text (length exceeds 250 and 2048) from external files via AL
Using FactBox
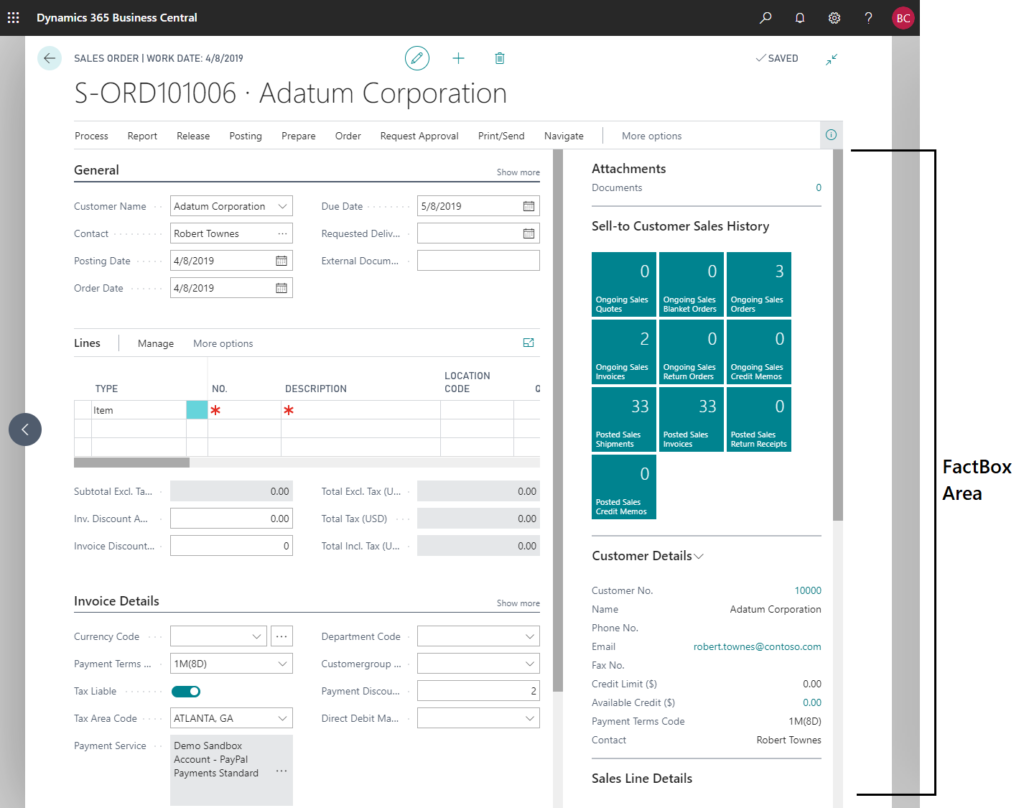
A FactBox is the area that is located on the right-most side of a page and it is divided into one or more parts that are arranged vertically. This area is used to display content including other pages, charts, and system parts such as Notes, and Links. Typically, you can use a FactBox to display information that is related to an item on the main content page. For example, on a page that shows a sales order list, you can use a FactBox to show sell-to customer sales history for a selected sales order in the list as shown below. More details: Adding a FactBox to a Page
PS: You can refer to standard Notes Factbox, but in the Notes FactBox, a link containing partial text will be displayed, which cannot display all the content. Users must click it to display all the content.


Let’s take the Work Description on Sales Order as an example.

Test code:
pageextension 50122 SalesOrderListExt extends "Sales Order"
{
    layout
    {
        addbefore(Control1902018507)
        {
            part(salesOrderWorkDescription; "Sales Order Work Description")
            {
                ApplicationArea = All;
                SubPageLink = "No." = field("No."),
                              "Document Type" = field("Document Type");
            }
        }
    }
}
page 50122 "Sales Order Work Description"
{
    Caption = 'Work Description';
    DeleteAllowed = false;
    InsertAllowed = false;
    LinksAllowed = false;
    PageType = CardPart;
    SourceTable = "Sales Header";
    layout
    {
        area(content)
        {
            field(WorkDescription; WorkDescription)
            {
                ApplicationArea = All;
                Importance = Additional;
                MultiLine = true;
                ShowCaption = false;
            }
        }
    }
    var
        WorkDescription: Text;

    trigger OnAfterGetRecord()
    begin
        WorkDescription := '';
        if Rec."Work Description".HasValue then
            WorkDescription := Rec.GetWorkDescription();
    end;
}
PS: FactBox can also be added to list pages. More details: Displaying Work Description in a FactBox (FactBox Area)

Show all content with one action
Finally, I would like to share a solution, which is not to display all content directly on the page, but to display all content when the user performs an action or triggers.
For example,


Test code:
pageextension 50112 MyExtension extends "Sales Order"
{
    layout
    {
        modify(WorkDescription)
        {
            trigger OnAssistEdit()
            begin
                Message(Rec.GetWorkDescription());
            end;
        }
    }
}
Great, give it a try!!!😁
END
Hope this will help.
Thanks for reading.
ZHU


コメント